Pentaho/Contact Zone:Tutorial
← Data Quality Components for Pentaho
| Pentaho/Contact Zone Basics Navigation | |||||||||||
|---|---|---|---|---|---|---|---|---|---|---|---|
| Overview | |||||||||||
| Tutorial | |||||||||||
| |||||||||||
| Custom Output Filter |
The following steps will guide you in the basic usage of Pentaho/Contact Zone.
Although simple, this tutorial will introduce you to some of the fundamentals of Pentaho/Contact Zone:
- Working with Pentaho/Contact Zone
- Transformations
- Steps and Hops
- Predefined variables
- Previewing and Executing from Pentaho/Contact Zone
Overview
We will use a SampleData.txt file containing a list of people and their contact information, use Melissa Data's Contact Verify Component, and create a .txt file containing their cleansed and verified data.
This is the first six lines of our SampleData.txt file:
Address,City,State,Zip,Name,Email,Phone
533 E Cold Spring Ln,Baltimore,MD,21212, Sarah Minnigan ,magelet@go.com,6148902413
22001 Bruce Ave,Euclid,OH,44123, john ,magelia12@lamrc.com,6148421304
1275 Risden Pl,Eugene,OR,97404, michelle knudson ,magelicuky@yahoo.com,6148421304
1332 W Turner St Apt 2,Allentown,PA,18102, spencer ballmer ,magelinchaad@yahoo.com,4194853151
44 Edgewater Dr,Poland,OH,44514, john ,magermanm@bigfoot.com,4194853151
Our goal .txt file will contain cleansed and parsed data. So now we need to Transform the SampleData.txt file through Steps and Hops.
A Transformation is made of Steps linked by Hops. These Steps and Hops form paths through which data flows. That is why it is said that a Transformation is data-flow oriented.

A Step is linked by a Hop.
![]()
They form a path through which data flows.

Therefore, a Transformation is data-flow oriented.
Preparing the Environment
Before starting a Transformation, take note that there is a samples folder in the Pentaho/Contact Zone folder. This is where we will save all the files we will create. Note that we will be using the SampleData.txt file in the samples/Contact Verify folder. There is also a Contact Verify.ktr file in this folder for an example transformation that is already set up.
Workspace
We must also familiarize ourselves with the workspace. Pentaho/Contact Zone is intuitively laid-out, with four notable areas in our workspace:
- Menu Bar
- This bar is along the top of the workspace.
- Shortcut Bar
- This bar is below the Menu Bar with simple icons.
- View/Design Pane
- This pane is on the left of the workspace with a View tab and Design tab.
- Transformation Pane
- This pane is to the right of the workspace. This is where we will set up our Transformations.

Transformation Walkthrough
Our task will be accomplished within three subtasks:
- Creating the Transformation
- Constructing the skeleton of the Transformation through Steps and Hops
- Configuring the Steps in order to specify their behavior
Creating the Transformation
1. We have three different ways to create a new transformation, choose one method:
- Click the New Icon, then select Transformation from the drop-down menu
- Go to the File Menu, select New, then Transformation
- Press Ctrl-N
2. Now we will name our transformation. We must first open the transformation settings. There are three ways:
- In the View tab on the left pane, right-click Transformation 1, then click Settings... (Or double click Transformation 1)
- Go to the Edit Menu, select Settings... in the drop down menu.
- Press Ctrl-T
3. A window will appear after we select Settings.... Here is where we specify the properties of our transformation. For now, we will just give our transformation a name and description. Fill in the two fields, marked Transformation name : and Description :, respectively. Click OK.
4. Now we will save our transformation. In order to save we:
- Click the Save Icon in the Shortcut Bar.
- Go to the File Menu and select Save
- Press Ctrl-S
5. In the save dialogue box enter a name for our transformation and click Save.
6. Save the Transformation in the default samples/Contact Verify folder. This will create a file with the .ktr extension.
Constructing the data flow of the Transformation using Steps and Hops
A Step is the minimal unit inside a Transformation. There are many different steps available, grouped into categories such as Input, Output, Transform, etc. Each Step has a specific function, such as parsing or cleansing data. An example of a Step is Melissa Data's Contact Verify Component, which cleanses and normalizes contact data.
A Hop is a graphical representation of data flowing between two Steps, with an origin and a destination. The data that flows through that Hop is the Output Data of the origin Step, and the Input Data of the destination Step. A Hop has only one origin and one destination, but more than one Hop could leave a Step. When that happens, the Output Data can be copied or distributed to every destination. Likewise, more than one Hop can reach a Step. In those instances, the Step has to have the ability to merge the Input from the different Steps in order to create the Output.
Our Transformation needs to:
- Read our CSV file (Input Data)
- Cleanse and normalize the contact data (Contact Verify)
- Save the cleansed data in a new file (Output Data)
Thus we need three Steps: One for our Input Data, one for Contact Verify, and one for our Output Data.
In this example, the Hops to our Steps are one-to-one because it is a very simple Transformation. However, this is not always the case.
Now we will prepare this Transformation by adding all the Steps we will need:
- In the View/Design Pane, select the Design Tab, then select the Input folder.
- Find the CSV file input Step, then left-click drag and drop it into the Transformation Pane.
- Select the Melissa Data folder.
- Find the MD Contact Verify Step, then left-click drag and drop it into the Transformation Pane.
- Select the Output folder.
- Find the Text file output Step, then left-click drag and drop it into the Transformation Pane.
Now we will connect the Steps to each other by creating Hops:
- There are three different ways to make a Hop: Shift-Left-Click and Drag, Middle Mouse Button Click and Drag, or using the Quick-Links Menu. Feel free to use whichever is easiest.
1. Shift-Left-Click and Drag:
- Holding the Shift key, left-click and drag the cursor from the CSV file input Step to the MD Contact Verify Step.
- When you release the Shift key and left mouse button, a menu will pop up. Select Main output of step.
- Hold the Shift key, left-click and drag the cursor from the MD Contact Verify Step to the Text file output Step.
- When the menu pops up, select Create a new target filter for this step.
2. Middle Mouse Button Click and Drag:
- Middle mouse button-click and drag the cursor from the CSV file input Step to the MD Contact Verify Step.
- When you release the middle mouse button, a menu will pop up. Select Main output of step.
- Middle mouse button-click and drag the cursor from the MD Contact Verify Step to the Text file output Step.
- When the menu pops up, select Create a new target filter for this step.

Quick-Links Menu Icons
3. Quick-Links Menu:
- Hover the cursor over the CSV file input Step.
- When the Quick-Links Menu pops up, Click the Output Hop icon.
- With the Hop attached to your cursor, Left-click the MD Contact Verify Step.
- When you release the left mouse button, a menu will pop up. Select Main output of step.
- Hover the cursor over the MD Contact Verify Step.
- When the Quick-Links Menu pops up, Click the Output Hop icon.
- With the Hop attached to your cursor, Left-click the Text file output Step.
- When the menu pops up, select Create a new target filter for this step.
We now have our Steps connected with Hops in order to create a data-flow.
Step Behavior Setup
Every step has a configuration window. These windows differ, depending on the type of Step. Step name always represents the name of the Step inside the Transformation. Step description helps us clarify the purpose of a Step.
Configuring the CSV file input Step
1. Double-click the CSV file input Step. (Or right-click the Step and select Edit step.)
2. Here the configuration window that belongs to this type of Step will appear. In this case, the CSV Input window. Here we need to setup:
- Step name - If needed, we can change this name to be more descriptive.
- Filename - Here we link this Step with our input data file.
- Click the Browse... button and navigate to the sampleData file in the default samples/Contact Verify folder.
- Delimiter - Specify what type of delimiter the file uses. In this case a [,] (comma.)
- Enclosure - Specify what type of enclosure the file uses. In this case a ["](parenthesis.)
3. Now we need to click Get Fields to populate what fields our CSV file has.
4. A pop-up will open. The default amount of 100 sample lines is fine. Click OK.
5. After this we get the Scan results. Take note that we have a warning about the Address field. Upon closer inspection, notice that Field type has been assigned as Number. Of course we know that our addresses will contain more than numbers. Also note the Estimated length of our addresses, 15. We have some modifications to make. Click Close.

6. We need to modify both the Type and Length of our Address and Zip fields.
- Change the Type from Number to String. Click on the cell under Type that we want to change, click the small down arrow to the right of the cell, and choose the desired type from the drop-down menu.
- Change the Length from 15 to something larger, for example, 50. Click on the cell under Length that we want to change, then enter the desired length in the cell.
- These modifications will prevent errors in our output and give us better results.
- Note - If you encounter errors or the output data seems incomplete, it may well be due to incorrect settings on our input file fields. So it is recommended to check this step if any errors occur.
7. Click OK to finish defining the CSV Input Step.

Configuring the MD Contact Verify Step
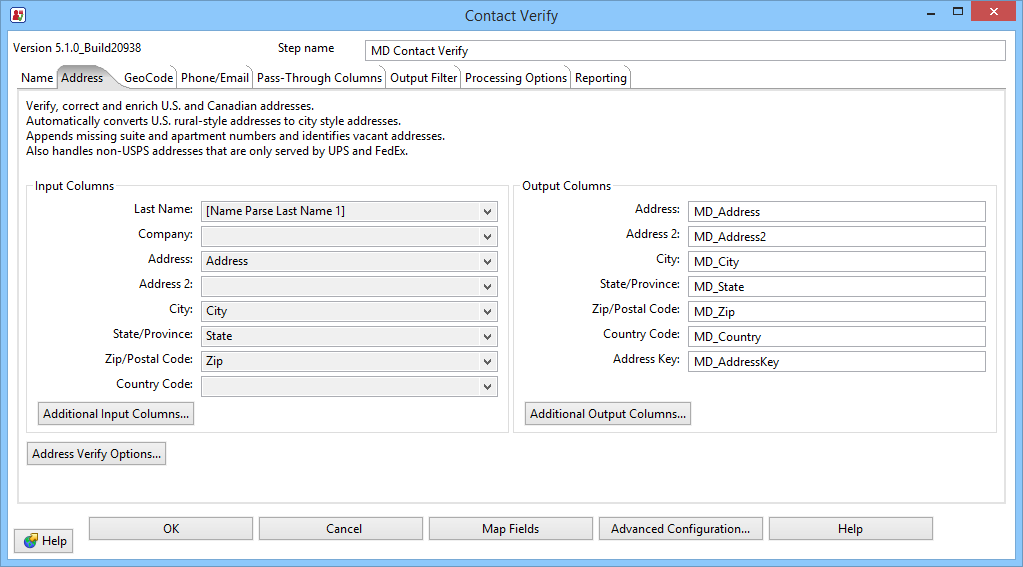
1. Double-click the MD Contact Verify Step. (Or right-click the Step and select Edit step.)
2. The Contact Verify configuration window will appear. Here we need to setup:
- Name tab
- Full Name In the drop down menu, select the Name field that was imported from our CSV file.
- Address tab
- Last Name: - Select [Name Parse Last Name 1] to select the last name as parsed by Contact Verify.
- Address: - Select Address.
- City: - Select City.
- State/Province: - Select State.
- Zip/Postal Code: - Select Zip.
- GeoCode tab
- Input Address - Select the Use Results of Address Process radio button.
- Phone/Email tab
- Phone Number: - Select Phone.
- Email Address: - Select Email.
- Pass-Through Columns tab
- Click the Get Fields button to populate the Pass Through column.
- Output Filter tab
- No changes are needed here, just note this is where the effects of our Hop connecting MD Contact Verify and the Text file output are shown. (And as a result can be modified.)
- Reporting tab
- Check Generate Report
- Job Name - Here we can enter a name for the job, if so desired.
- Location to save file(s) - We can set a location to save our files here.
3. Click OK to finish defining the MD Contact Verify Step.
Configuring the Text file output Step
1. Double-click the Text file output Step. (Or right-click the Step and select Edit step.)
2. The Text file output configuration window will appear. Here we need to setup:
- File
- Filename - Click Browse... and specify a location for our ResultsSampleData.txt file.
- Make sure Add filenames to result is checked.
- Content
- Separator - Enter a [,] (comma) to specify a comma separator.
- Fields
- Click the Get Fields button to populate the columns.
3. Click OK to finish defining the Text file output Step.

Run the Transformation
What is happening?
When you execute a Transformation, almost all Steps are executed simultaneously. The Transformation executes asynchronously; the rows of data flow through the Steps at their own pace. Each processed row flows to the next Step without waiting for the others. In real-world Transformations, forgetting this characteristic can be a significant source of unexpected results.
At this point, our tutorial Transformation is almost completely configured. Contact Verify (a Transformation) reads the CSV input file, cleanses and formats the data, and then sends the data to the output file. This example uses 1,000 entries, so it can be difficult to notice the asynchronous execution in action. Keep in mind, however, that it's possible that at the same time a name is being written in the output file, another is leaving the first Step of the Transformation.
Execute
1. Click the Run button to execute the transformation. (A green play icon that is positioned along the top of the Transformation Pane.)
![]()
Pentaho/Contact Zone will show a window where we can set, among other information, the parameters for the execution and the logging level.
2. Click Launch. Eventually a new window will appear below the Transformation Pane.
The Execution Results window contains useful tabs with logging, metrics, performance information, and more.

Once the job is done, feel free to open the newly generated ResultsSampleData.txt file and check its content.