This wiki is no longer being updated as of December 10, 2025.
|
Legacy:Dynamics:Express Entry:Custom Mapping: Difference between revisions
Created page with "{{LegacyDynamicsExpressEntryNav}} {{CustomTOC}} ==Custom Mapping Express Entry== 1. Navigate to the configuration screen. If you need more details on locating the configura..." |
No edit summary |
||
| (One intermediate revision by the same user not shown) | |||
| Line 5: | Line 5: | ||
==Custom Mapping Express Entry== | ==Custom Mapping Express Entry== | ||
1. Navigate to the configuration screen. If you need more details on locating the configuration screen, see the [[Dynamics:Express Entry:Configuration|Configuration tutorial]]. | 1. Navigate to the configuration screen. If you need more details on locating the configuration screen, see the [[Legacy:Dynamics:Express Entry:Configuration|Configuration tutorial]]. | ||
[[File:Dynamics_ExpressEntry_CustomMapping_01_Configuration.png|frame|none|Navigate to Configuration]] | [[File:Dynamics_ExpressEntry_CustomMapping_01_Configuration.png|frame|none|alt=Dynamics ExpressEntry CustomMapping 01 - Configuration - Melissa Wiki|Navigate to Configuration]] | ||
2. Click the '''Advanced Mapping''' tab. | 2. Click the '''Advanced Mapping''' tab. | ||
[[File:Dynamics_ExpressEntry_CustomMapping_02_AdvancedMapping.png|frame|none|Click '''Advanced Mapping''']] | [[File:Dynamics_ExpressEntry_CustomMapping_02_AdvancedMapping.png|frame|none|alt=Dynamics ExpressEntry CustomMapping 02 - Advanced Mapping - Melissa Wiki|Click '''Advanced Mapping''']] | ||
3. Click the '''Load Entities''' button. This queries the Dynamics organization for a full list of the entities that exist within your system and populates the list of attributes that are associated with the entity. | 3. Click the '''Load Entities''' button. This queries the Dynamics organization for a full list of the entities that exist within your system and populates the list of attributes that are associated with the entity. | ||
[[File:Dynamics_ExpressEntry_CustomMapping_03_LoadEntities.png|frame|none|Click '''Load Entities''']] | [[File:Dynamics_ExpressEntry_CustomMapping_03_LoadEntities.png|frame|none|alt=Dynamics ExpressEntry CustomMapping 03 - Load Entities - Melissa Wiki|Click '''Load Entities''']] | ||
4. Select an entity from the dropdown list. If a mapping has already been established for a particular entity, the fields should automatically be populated. | 4. Select an entity from the dropdown list. If a mapping has already been established for a particular entity, the fields should automatically be populated. | ||
[[File:Dynamics_ExpressEntry_CustomMapping_04_SelectEntity.png|frame|none|Select Entity]] | [[File:Dynamics_ExpressEntry_CustomMapping_04_SelectEntity.png|frame|none|alt=Dynamics ExpressEntry CustomMapping 04 - Select Entity - Melissa Wiki|Select Entity]] | ||
5. Type the name of the desired custom or out of box field. In order to assist the field entry process, the field names should be auto-completed with only the correct field names for that entity. The names should be the exact names that are assigned in Dynamics. These names can be viewed in the '''Fields''' section for that particular entity. | 5. Type the name of the desired custom or out of box field. In order to assist the field entry process, the field names should be auto-completed with only the correct field names for that entity. The names should be the exact names that are assigned in Dynamics. These names can be viewed in the '''Fields''' section for that particular entity. | ||
[[File:Dynamics_ExpressEntry_CustomMapping_05_FieldName.png|frame|none|Type Field Name]] | [[File:Dynamics_ExpressEntry_CustomMapping_05_FieldName.png|frame|none|alt=Dynamics ExpressEntry CustomMapping 05 - Field Name - Melissa Wiki|Type Field Name]] | ||
6. After the field names have been filled in, click the '''Save Mapping''' button to save your settings. | 6. After the field names have been filled in, click the '''Save Mapping''' button to save your settings. | ||
[[File:Dynamics_ExpressEntry_CustomMapping_05b_SaveMapping.png|frame|none|Click '''Save Mapping''']] | [[File:Dynamics_ExpressEntry_CustomMapping_05b_SaveMapping.png|frame|none|alt=Dynamics ExpressEntry CustomMapping 05b - Save Mapping - Melissa Wiki|Click '''Save Mapping''']] | ||
| Line 38: | Line 38: | ||
7. Navigate to the '''Forms''' option for the entity you want to add '''Express Entry''' to. | 7. Navigate to the '''Forms''' option for the entity you want to add '''Express Entry''' to. | ||
[[File:Dynamics_ExpressEntry_CustomMapping_06_CustomEntity.png|frame|none|Navigate to entity's '''Form''']] | [[File:Dynamics_ExpressEntry_CustomMapping_06_CustomEntity.png|frame|none|alt=Dynamics ExpressEntry CustomMapping 06 - Custom Entity - Melissa Wiki|Navigate to entity's '''Form''']] | ||
8. Select the form with the '''Main''' form type. | 8. Select the form with the '''Main''' form type. | ||
[[File:Dynamics_ExpressEntry_CustomMapping_07_MainForm.png|frame|none|Select '''Main''' form]] | [[File:Dynamics_ExpressEntry_CustomMapping_07_MainForm.png|frame|none|alt=Dynamics ExpressEntry CustomMapping 07 - Main Form - Melissa Wiki|Select '''Main''' form]] | ||
| Line 51: | Line 51: | ||
10. Click the '''Add''' button under '''Form Libraries'''. | 10. Click the '''Add''' button under '''Form Libraries'''. | ||
[[File:Dynamics_ExpressEntry_CustomMapping_08_AddLibraries.png|frame|none|Click '''Add''']] | [[File:Dynamics_ExpressEntry_CustomMapping_08_AddLibraries.png|frame|none|alt=Dynamics ExpressEntry CustomMapping 08 - Add Libraries - Melissa Wiki|Click '''Add''']] | ||
11. Search for '''<code>md_ee_autocomplete</code>'''. There should be two options available: <code>md_ee_autocomplete1</code> and <code>md_ee_autocomplete2</code>. Add both of these resources to the form properties. Dynamics requires these resources to be added one at a time. | 11. Search for '''<code>md_ee_autocomplete</code>'''. There should be two options available: <code>md_ee_autocomplete1</code> and <code>md_ee_autocomplete2</code>. Add both of these resources to the form properties. Dynamics requires these resources to be added one at a time. | ||
[[File:Dynamics_ExpressEntry_CustomMapping_09_SearchAutocomplete.png|frame|none|Search for '''md_ee_autocomplete''']] | [[File:Dynamics_ExpressEntry_CustomMapping_09_SearchAutocomplete.png|frame|none|alt=Dynamics ExpressEntry CustomMapping 01 - Configuration - Melissa Wiki|Search for '''md_ee_autocomplete''']] | ||
12. Once the libraries are added, click the '''Add''' button under the '''Event Handlers''' section of '''Form Properties'''. | 12. Once the libraries are added, click the '''Add''' button under the '''Event Handlers''' section of '''Form Properties'''. | ||
[[File:Dynamics_ExpressEntry_CustomMapping_010_AddEventHandlers.png|frame|none|Click '''Add''']] | [[File:Dynamics_ExpressEntry_CustomMapping_010_AddEventHandlers.png|frame|none|alt=Dynamics ExpressEntry CustomMapping 10 - Add Event Handlers - Melissa Wiki|Click '''Add''']] | ||
| Line 83: | Line 83: | ||
</ol> | </ol> | ||
[[File:Dynamics_ExpressEntry_CustomMapping_011_EventHandlerList.png|frame|none|Event Handler List]] | [[File:Dynamics_ExpressEntry_CustomMapping_011_EventHandlerList.png|frame|none|alt=Dynamics ExpressEntry CustomMapping 11 - Event Handler List - Melissa Wiki|Event Handler List]] | ||
14. '''Save''' then '''Publish''' these customizations. | 14. '''Save''' then '''Publish''' these customizations. | ||
[[File:Dynamics_ExpressEntry_CustomMapping_012_Autocomplete.png|frame|none|Auto-complete]] | [[File:Dynamics_ExpressEntry_CustomMapping_012_Autocomplete.png|frame|none|alt=Dynamics ExpressEntry CustomMapping 12 - Auto-complete - Melissa Wiki|Auto-complete]] | ||
Latest revision as of 21:22, 12 March 2021
← Legacy Clean Suite for CRM:Dynamics
| Express Entry Navigation |
|---|
| Overview |
| Installation |
| Configuration |
| Custom Mapping |
| Tutorial |
Custom Mapping Express Entry
1. Navigate to the configuration screen. If you need more details on locating the configuration screen, see the Configuration tutorial.

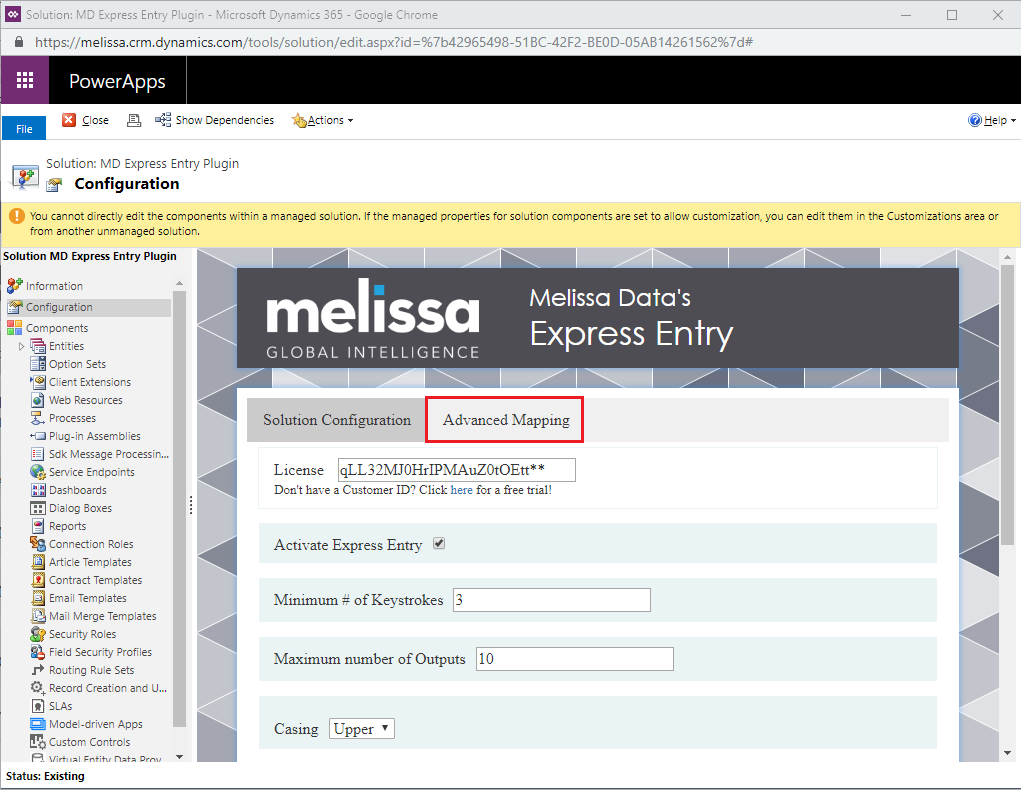
2. Click the Advanced Mapping tab.
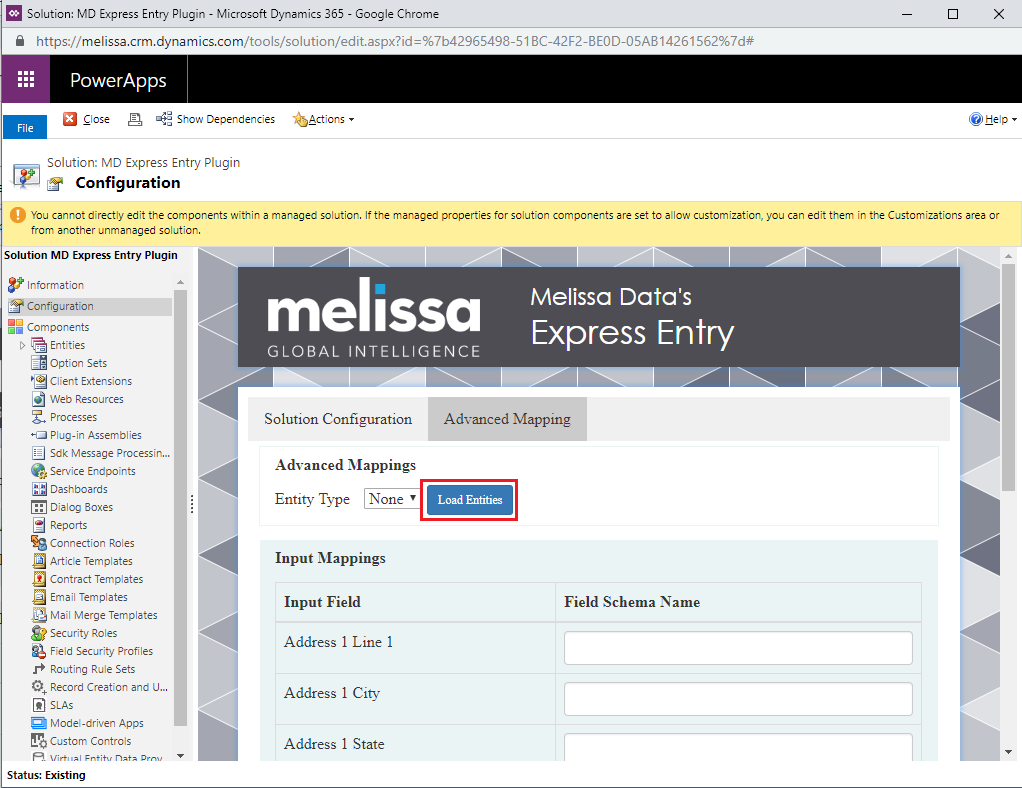
3. Click the Load Entities button. This queries the Dynamics organization for a full list of the entities that exist within your system and populates the list of attributes that are associated with the entity.
4. Select an entity from the dropdown list. If a mapping has already been established for a particular entity, the fields should automatically be populated.

5. Type the name of the desired custom or out of box field. In order to assist the field entry process, the field names should be auto-completed with only the correct field names for that entity. The names should be the exact names that are assigned in Dynamics. These names can be viewed in the Fields section for that particular entity.

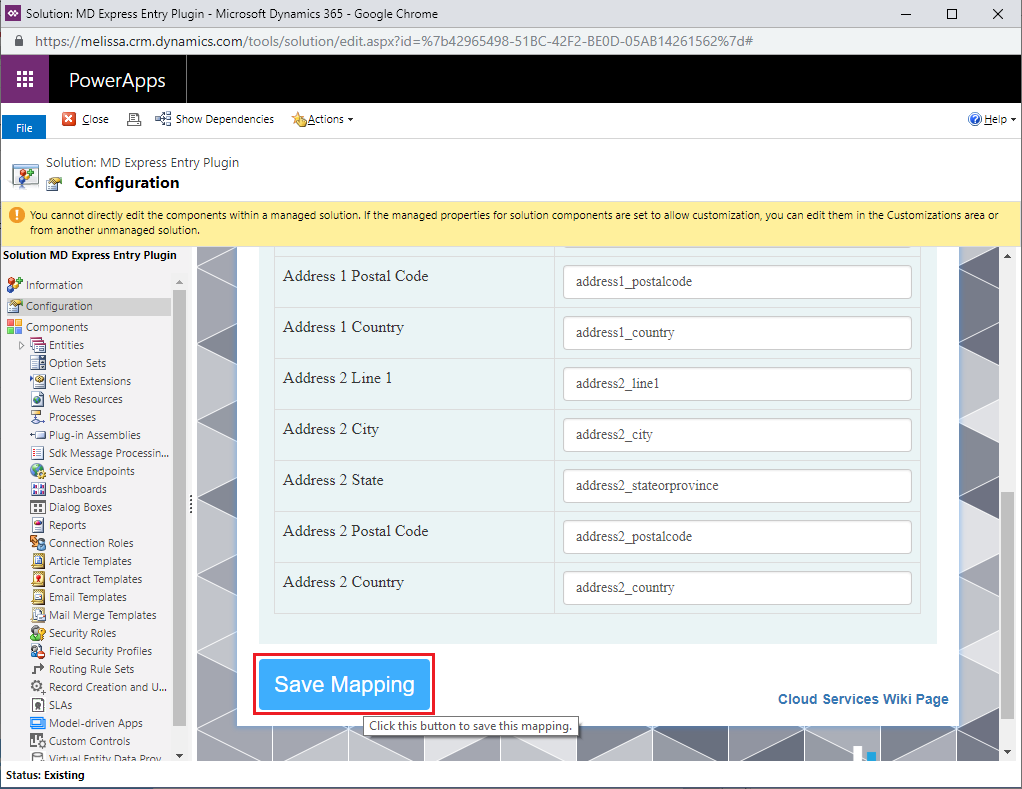
6. After the field names have been filled in, click the Save Mapping button to save your settings.
Adding Express Entry to a Custom Entity
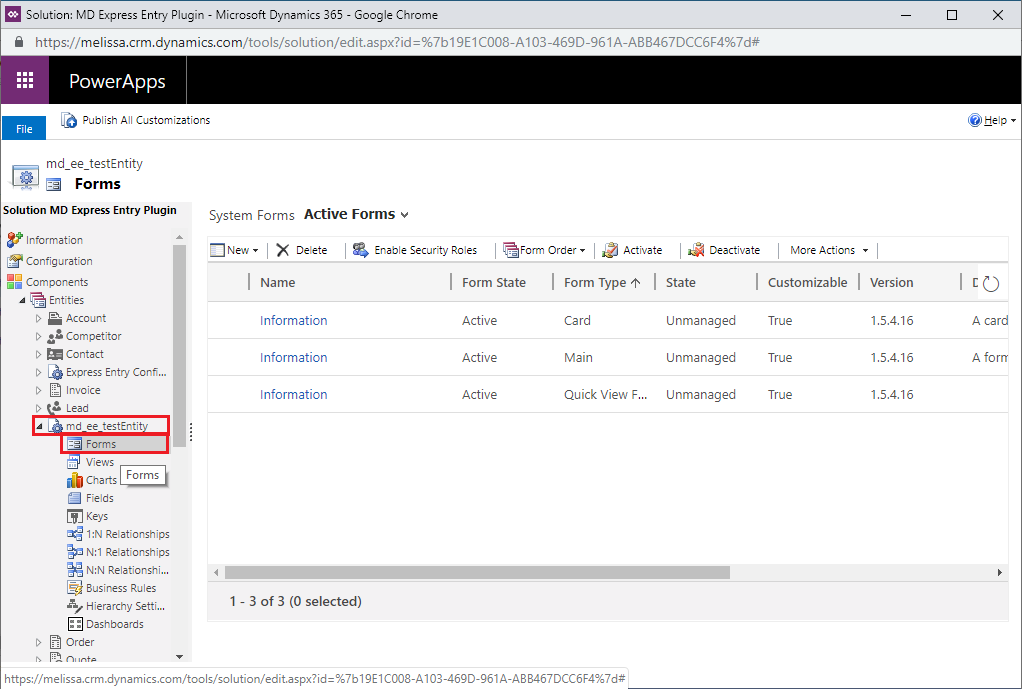
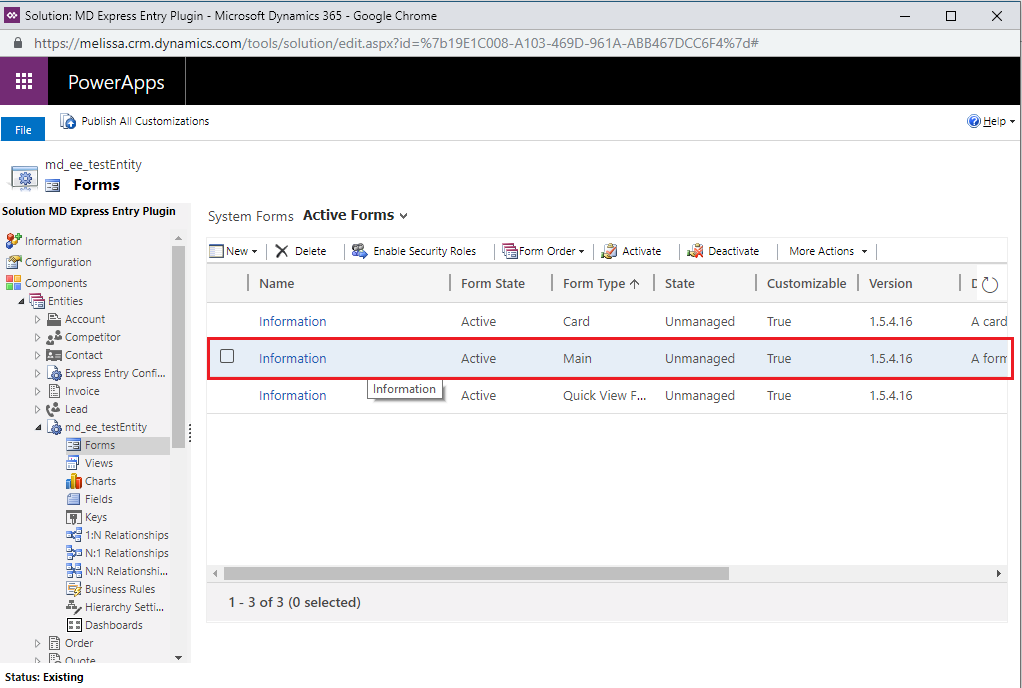
7. Navigate to the Forms option for the entity you want to add Express Entry to.
8. Select the form with the Main form type.
9. Click the Form Properties button at the top of the new pop-up.
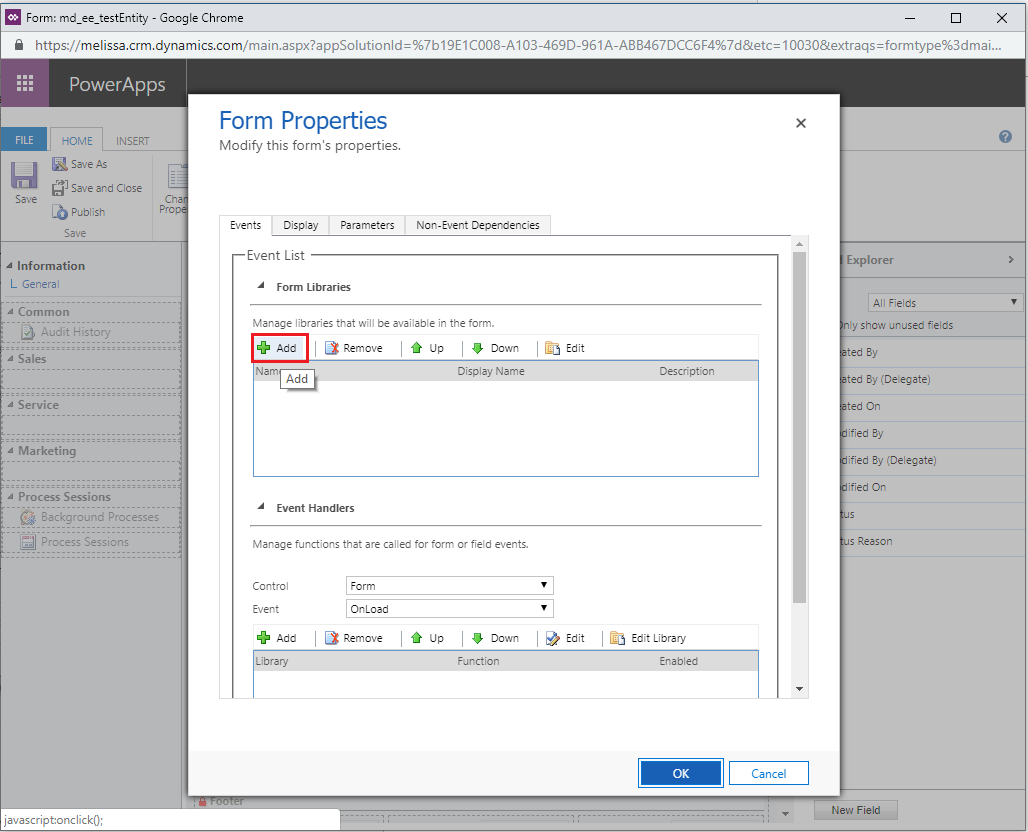
10. Click the Add button under Form Libraries.
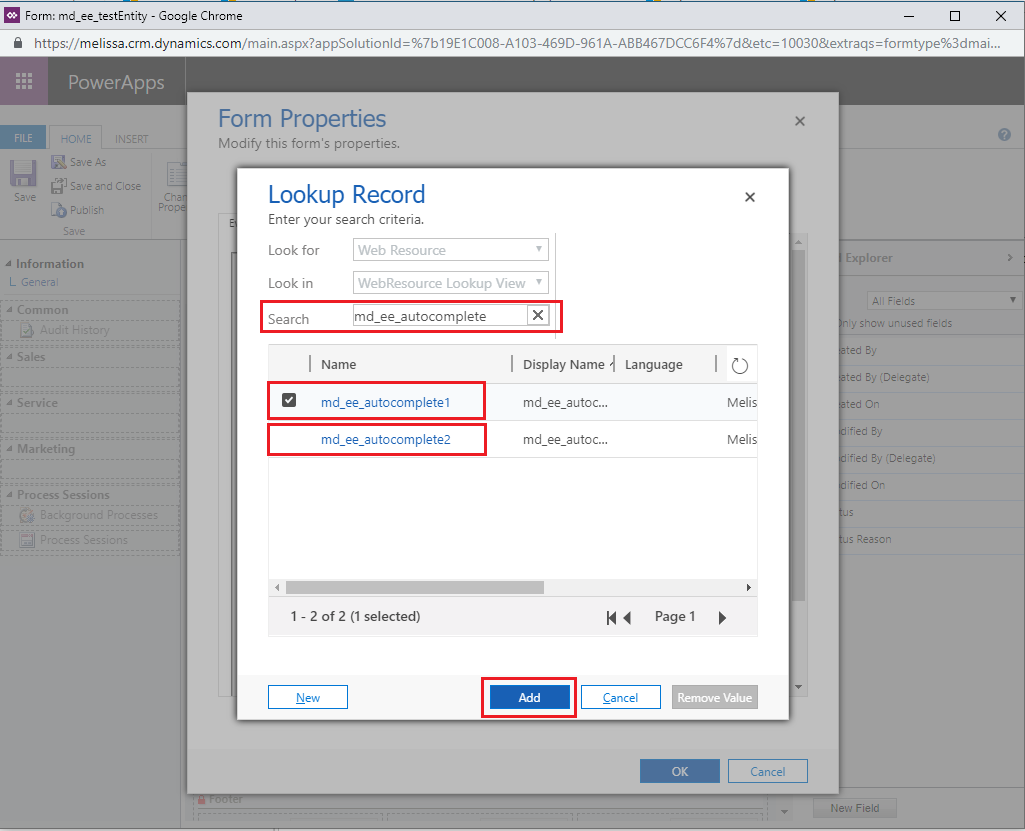
11. Search for md_ee_autocomplete. There should be two options available: md_ee_autocomplete1 and md_ee_autocomplete2. Add both of these resources to the form properties. Dynamics requires these resources to be added one at a time.
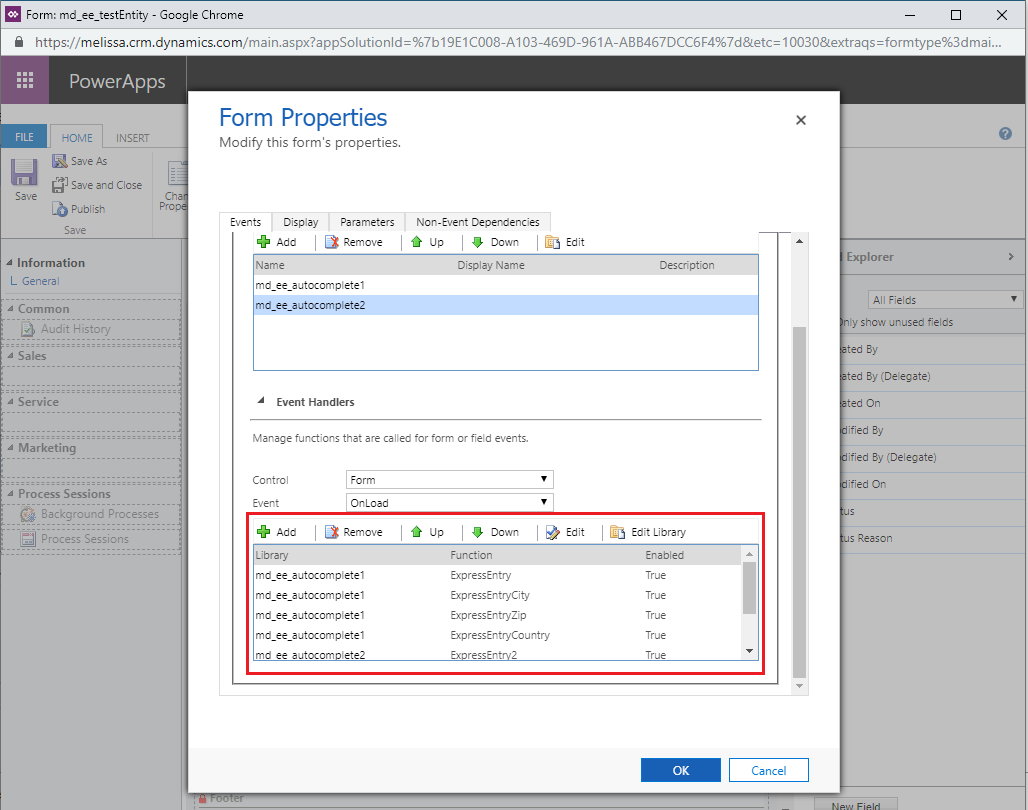
12. Once the libraries are added, click the Add button under the Event Handlers section of Form Properties.

13. In the Handler Properties window pop-up, add the following functions:
- Library: md_ee_autcomplete1
- ExpressEntry
- ExpressEntryCity
- ExpressEntryZip
- ExpressEntryCountry
- Library: md_ee_autocomplete2
- ExpressEntry2
- ExpressEntryCity2
- ExpressEntryZip2
- ExpressEntryCountry2
14. Save then Publish these customizations.

15. Make sure the entity has the correct mappings and Express Entry should be working on the new entity.