This wiki is no longer being updated as of December 10, 2025.
|
Tutorial:Data quality project using Address Check: Difference between revisions
No edit summary |
No edit summary |
||
| (15 intermediate revisions by the same user not shown) | |||
| Line 1: | Line 1: | ||
==Getting Started== | ==Getting Started== | ||
Data Quality Services uses a knowledge base to compare against a data set you provide to run a data quality project. So you must first set up a knowledge base and then run a data quality project. | Data Quality Services uses a knowledge base to compare against a data set you provide to run a data quality project. So you must first set up a knowledge base and then run a data quality project. | ||
[[File:TUT_DQS_AddressCheck_01-01.jpg|600px]] | |||
==Knowledge base management== | ==Knowledge base management== | ||
| Line 10: | Line 9: | ||
===Setting up a new knowledge base=== | ===Setting up a new knowledge base=== | ||
[[File:TUT_DQS_AddressCheck_01-02.jpg|600px]] | |||
<ol> | <ol> | ||
| Line 26: | Line 25: | ||
===Setting up new domains=== | ===Setting up new domains=== | ||
[[File:TUT_DQS_AddressCheck_01-05.jpg|600px]] | |||
<ol> | <ol> | ||
<li>Select the '''Create a domain''' icon.</li> | <li>Select the '''Create a domain''' icon. [[File:TUT_DQS_AddressCheck_01-03.jpg|28px]]</li> | ||
<li>Enter a '''Domain Name''' and '''Description''' for the new domain.</li> | <li>Enter a '''Domain Name''' and '''Description''' for the new domain.</li> | ||
<li>Click '''OK'''.</li> | <li>Click '''OK'''.</li> | ||
| Line 39: | Line 35: | ||
In order to group the domains you create a composite domain: | In order to group the domains you create a composite domain: | ||
<li>Click the '''Create a composite domain''' icon.</li> | <li>Click the '''Create a composite domain''' icon.[[File:TUT_DQS_AddressCheck_01-04.jpg|28px]]</li> | ||
<li>Enter a '''Composite Domain Name''' and '''Description'''.</li> | <li>Enter a '''Composite Domain Name''' and '''Description'''.</li> | ||
<li>Select which domains you want to add to the composite domain by selecting the domain in the '''Domains List''', then clicking the arrow to move the domain to '''Domains in Composite Domain'''.</li> | <li>Select which domains you want to add to the composite domain by selecting the domain in the '''Domains List''', then clicking the arrow to move the domain to '''Domains in Composite Domain'''.</li> | ||
| Line 64: | Line 57: | ||
This decimal value sets the minimum confidence required for a record to be considered valid. All other records will be set as invalid and not correctable | This decimal value sets the minimum confidence required for a record to be considered valid. All other records will be set as invalid and not correctable | ||
[[File:TUT_DQS_AddressCheck_01-06.jpg|600px]] | |||
<ol> | <ol> | ||
| Line 73: | Line 66: | ||
</ol> | </ol> | ||
[[ | ==Data quality projects== | ||
:[[Category:Tutorial]] | Once you have set up a knowledge base you need to make a data quality project to compare your data against the knowledge base. | ||
[[Category:Data Quality | |||
===Setting up a data quality project=== | |||
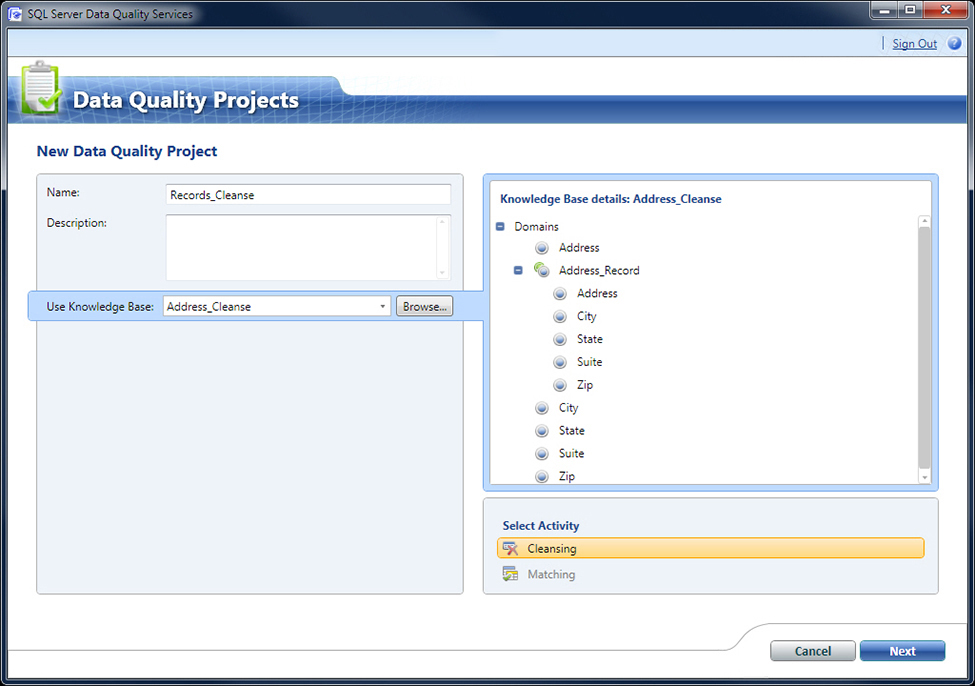
[[File:TUT_DQS_AddressCheck_01-07.jpg|600px]] | |||
<ol> | |||
<li>Select New Data Quality Project.</li> | |||
<li>Enter a '''Name''' and '''Description''' for the new data quality project.</li> | |||
<li>Then under the Use Knowledge Base drop-down menu, select the Knowledge Base you created.</li> | |||
*Ensure that Cleansing is selected under Select Activity. | |||
<li>Click '''Next'''.</li> | |||
</ol> | |||
===Map=== | |||
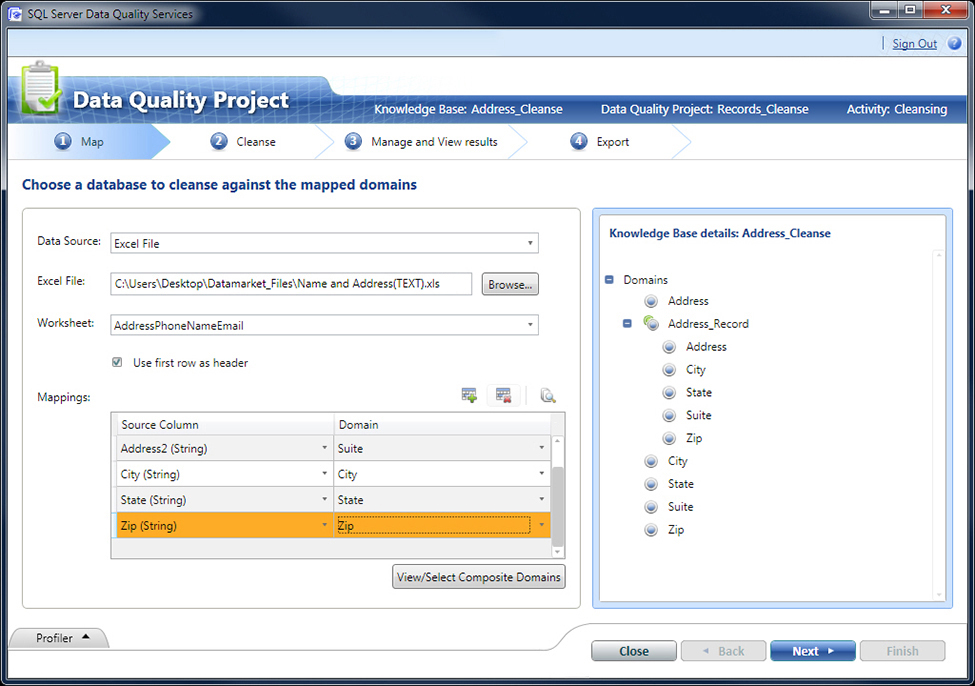
You must map your data source to the knowledge base. | |||
[[File:TUT_DQS_AddressCheck_01-08.jpg|600px]] | |||
<ol> | |||
<li>Select a '''Data Source'''.</li> | |||
<li>If you select SQL Server:</li> | |||
*Set the '''Database''' and '''Table/View'''. | |||
<li>If you select an Excel File:</li> | |||
*Click '''Browse...''' and select the desired excel file. | |||
*Select '''the Worksheet''' you will use. | |||
<li>For both Data Sources, under Mappings, map the '''Source Columns''' to the corresponding '''Domain'''.</li> | |||
*To remove a mapping, click the '''Remove selected column mapping''' icon to the top-right of the Mappings section. | |||
*You may click the '''Preview data source...''' icon to the top-right of the Mappings section | |||
<li>Click '''Next'''.</li> | |||
</ol> | |||
===Cleanse=== | |||
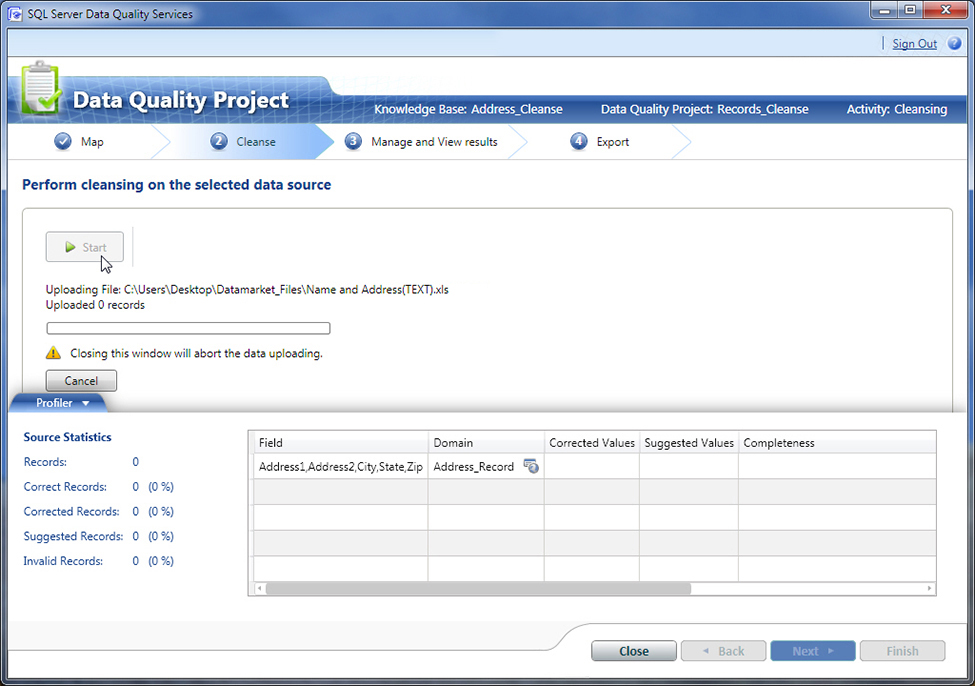
[[File:TUT_DQS_AddressCheck_01-09.jpg|600px]] | |||
<ol> | |||
<li>Click '''Start''' to begin cleansing the data.</li> | |||
*This will take some time to begin the upload and then cleanse the data. The Profiler willl show statistics on the data during the operation. | |||
<li>When this is finished, click '''Next'''.</li> | |||
</ol> | |||
===Manage and View results=== | |||
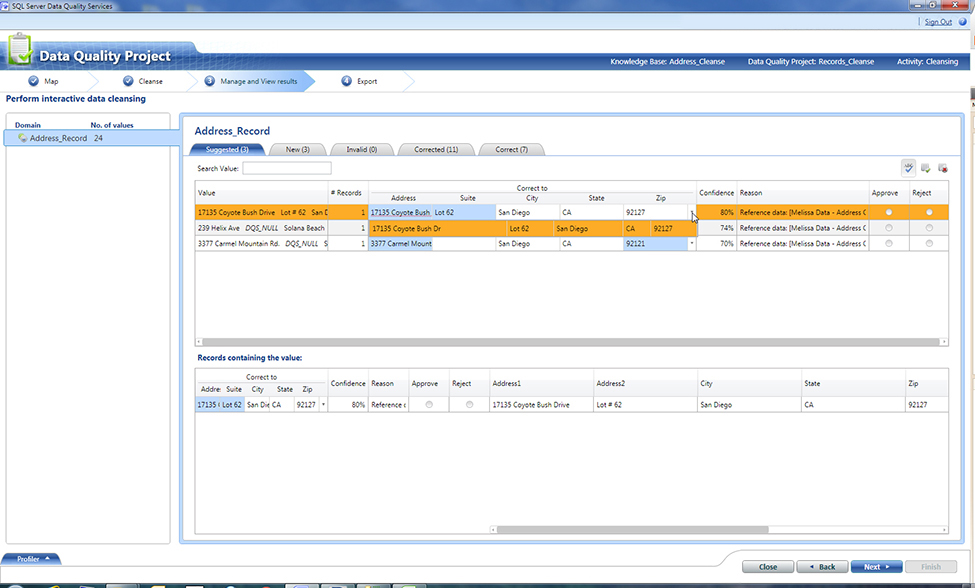
In this step you need to manage your data cleansing. | |||
Under the selected domain name there are five tabs: Suggested, New, Invalid, Corrected, and Correct. | |||
The validity of records highly depends on what values you chose under '''Domain Management > Reference Data > Provider Settings'''. | |||
[[File:TUT_DQS_AddressCheck_01-10.jpg|600px]] | |||
====Suggested==== | |||
This tab contains the records that are invalid but have suggestions for correction. | |||
====New==== | |||
This tab contains records that are not in the knowledge base and cannot be verified. | |||
====Invalid==== | |||
This tab contains records that could not be verified and are invalid. | |||
====Corrected==== | |||
This tab contains records that had invalid data and were corrected. When you approve records in the Suggested tab they are moved to this tab. | |||
====Correct==== | |||
This tab contains records that have been verified as correct. | |||
Once you have chosen how to proceed with the data cleansing, click '''Next'''. | |||
===Export=== | |||
In this step you export your cleansed data into one of three Destination Types: SQL Server, CSV File, Excel File. | |||
*If you are using 64-bit Excel, you cannot export the cleansed data to an Excel file. | |||
<ol> | |||
<li>Enter a '''Name''' (or names, depending on your destination type) for your cleansed data.</li> | |||
<li>Click '''Export'''.</li> | |||
*Once the file download is complete, the progress bar will display 100% complete. | |||
<li>Click '''Close'''.</li> | |||
<li>Click '''Finish''' to complete your data cleansing operation.</li> | |||
</ol> | |||
[[Category:Tutorial]] | |||
[[Category:Data Quality Services]] | |||
[[Category:Address Check]] | |||
Latest revision as of 19:19, 20 January 2014
Getting Started
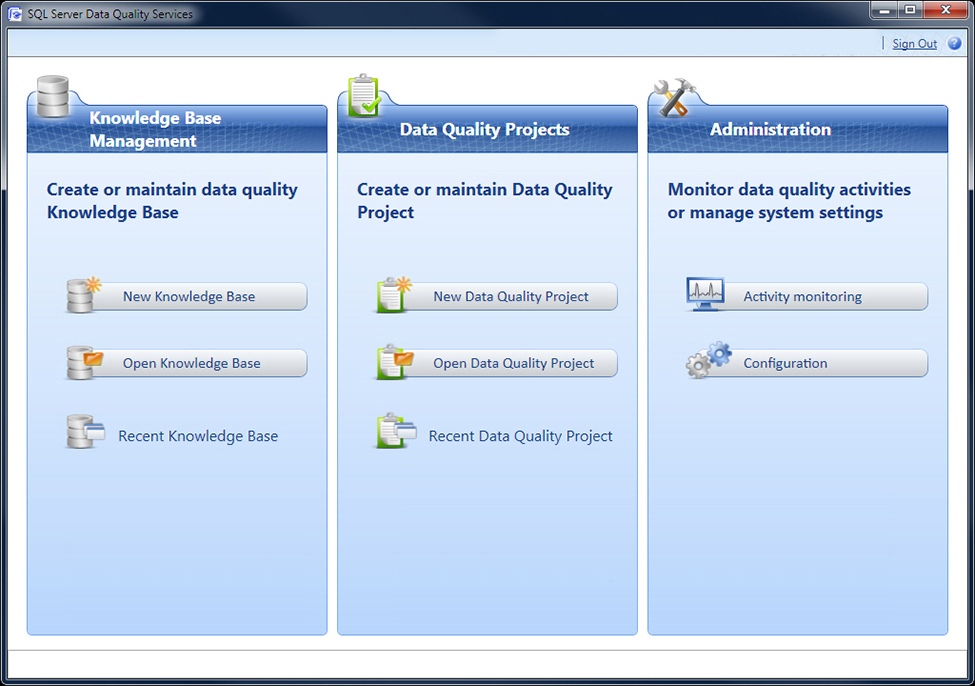
Data Quality Services uses a knowledge base to compare against a data set you provide to run a data quality project. So you must first set up a knowledge base and then run a data quality project.
Knowledge base management
The knowledge base is what you will compare your data to, so it is important to note that your data cleansing will only be as good as your knowledge base.
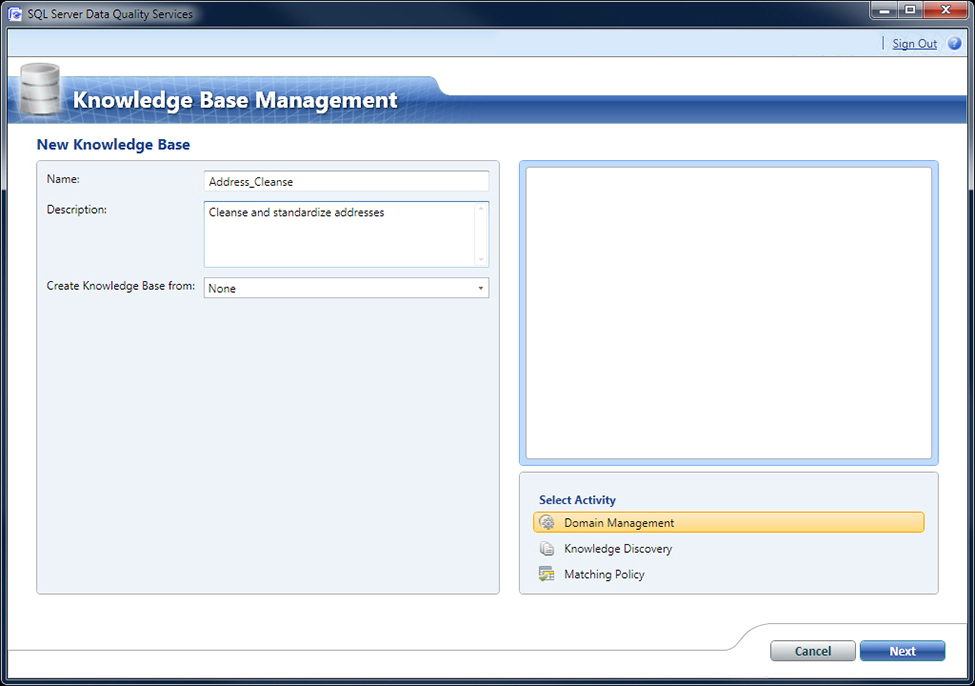
Setting up a new knowledge base
- Select New Knowledge Base.
- Enter a Name and Description for the New Knowledge Base.
- Ensure that Domain Management is selected.
- Click Next.
- Wait a few moments for the new knowledge base to be created.
Domain management
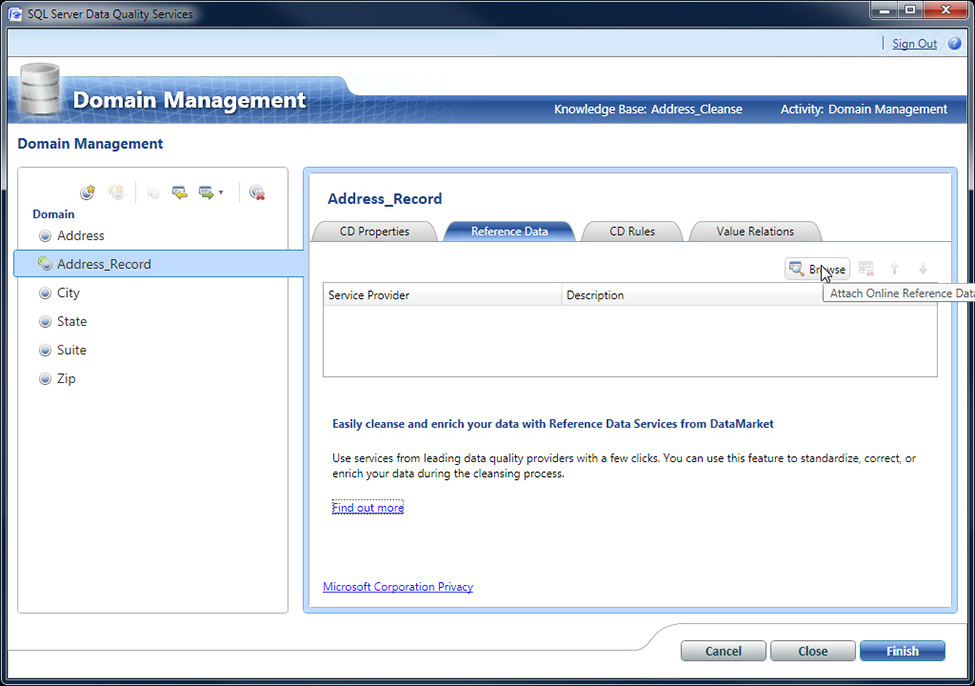
A domain is a named data set, and a composite domain is a grouping of domains. For instance, as a domain you can have: Address, City, State, and Zip. Then for a composite domain you group these four domains under Address Record.
Setting up new domains
- Select the Create a domain icon.

- Enter a Domain Name and Description for the new domain.
- Click OK.
- Make as many new domains as you need. In order to group the domains you create a composite domain:
- Click the Create a composite domain icon.

- Enter a Composite Domain Name and Description.
- Select which domains you want to add to the composite domain by selecting the domain in the Domains List, then clicking the arrow to move the domain to Domains in Composite Domain.
- Click OK.
- Make as many new composite domains as you need.
- Under each composite domain, select the Reference Data tab.
- Click Browse and check the check box next to Melissa Data - Address Check.
- Under the Melissa Data - Address Check section, map the RDS Schema to the Domains you created and placed under this Composite Domain.
- For example: Map AddressLine (M) to Address.
- Click Add Schema Entry to map additional schema to domains.
- When you are done mapping the schema, click OK.
Providers settings
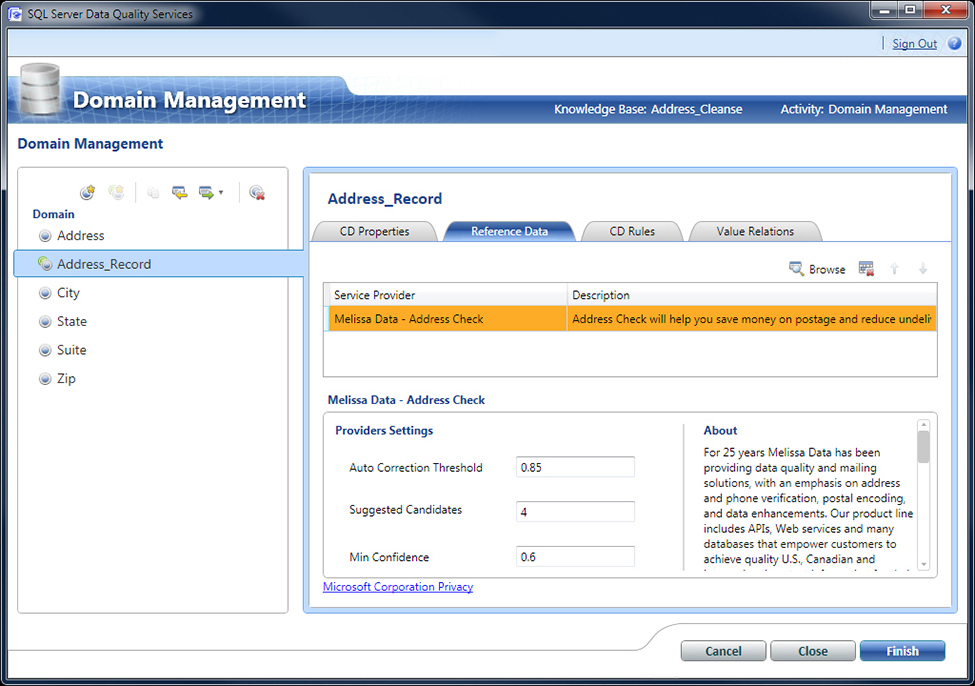
With a composite domain selected, you can modify the settings of the Melissa Data - Address Check service. This includes the Auto Correction Threshold, Suggested Candidates, and Min Confidence.
Auto Correction Threshold
This decimal value sets the confidence threshold for records to be automatically corrected by Melissa Data.
Suggested Candidates
This determines the number of possible suggestions you will receive for an invalid record that can be corrected.
Min Confidence
This decimal value sets the minimum confidence required for a record to be considered valid. All other records will be set as invalid and not correctable
- Once you are satisfied with your Domain Management, click Finish.
- You will then be prompted to publish the Knowledge Base with the latest changes.
- Click Publish.
- Click OK.
Data quality projects
Once you have set up a knowledge base you need to make a data quality project to compare your data against the knowledge base.
Setting up a data quality project
- Select New Data Quality Project.
- Enter a Name and Description for the new data quality project.
- Then under the Use Knowledge Base drop-down menu, select the Knowledge Base you created.
- Ensure that Cleansing is selected under Select Activity.
- Click Next.
Map
You must map your data source to the knowledge base.
- Select a Data Source.
- If you select SQL Server:
- Set the Database and Table/View.
- If you select an Excel File:
- Click Browse... and select the desired excel file.
- Select the Worksheet you will use.
- For both Data Sources, under Mappings, map the Source Columns to the corresponding Domain.
- To remove a mapping, click the Remove selected column mapping icon to the top-right of the Mappings section.
- You may click the Preview data source... icon to the top-right of the Mappings section
- Click Next.
Cleanse
- Click Start to begin cleansing the data.
- This will take some time to begin the upload and then cleanse the data. The Profiler willl show statistics on the data during the operation.
- When this is finished, click Next.
Manage and View results
In this step you need to manage your data cleansing. Under the selected domain name there are five tabs: Suggested, New, Invalid, Corrected, and Correct.
The validity of records highly depends on what values you chose under Domain Management > Reference Data > Provider Settings.
Suggested
This tab contains the records that are invalid but have suggestions for correction.
New
This tab contains records that are not in the knowledge base and cannot be verified.
Invalid
This tab contains records that could not be verified and are invalid.
Corrected
This tab contains records that had invalid data and were corrected. When you approve records in the Suggested tab they are moved to this tab.
Correct
This tab contains records that have been verified as correct.
Once you have chosen how to proceed with the data cleansing, click Next.
Export
In this step you export your cleansed data into one of three Destination Types: SQL Server, CSV File, Excel File.
- If you are using 64-bit Excel, you cannot export the cleansed data to an Excel file.
- Enter a Name (or names, depending on your destination type) for your cleansed data.
- Click Export.
- Once the file download is complete, the progress bar will display 100% complete.
- Click Close.
- Click Finish to complete your data cleansing operation.
