Magento Plugin:Installation: Difference between revisions
Created page with "{{MagentoPluginNav |IntroductionCollapse= }} {{CustomTOC}} Follow the steps below to install the Magento plugin. ==Sign Up== First, you need to sign up for the plugin. Go t..." |
No edit summary |
||
| (9 intermediate revisions by the same user not shown) | |||
| Line 8: | Line 8: | ||
==Sign Up== | ==Sign Up== | ||
First, you need to sign up for the plugin. Go to | 1. First, you need to sign up for the plugin. Go to https://www.melissa.com/magento to sign up. | ||
A Melissa Data account is required at this point. You will be prompted to log in or create a Melissa Data account if you don’t already have one. | A Melissa Data account is required at this point. You will be prompted to log in or create a Melissa Data account if you don’t already have one. After you do this, you will receive an email with your License Key – the instructions for downloading the plugin itself follow below. | ||
==Download== | ==Download== | ||
Download the plugin | 2. Download the plugin from ftp://ftp.melissadata.com/updates/MelissaDataMagentoPluginv1.2.6b.tar.gz and save to the Magento root directory (usually /var/www/magento/, yours may vary). | ||
==Unpack== | |||
3. Use the tar command to unpack the file in the Magento root directory as follows: ‘tar xvfz MelissaDataMagentoPluginv1.2.6b.tar.gz’ | |||
==Login== | ==Login== | ||
Login to the Magento Admin Panel with | 4. Login to the Magento Admin Panel with your administrator username and password. | ||
[[File:Magento_LoginAdmin.png|link=]] | [[File:Magento_LoginAdmin.png|link=]] | ||
== | ==Verify== | ||
5. From the admin panel, go to '''System''' | '''Configuration''': | |||
[[File:Magento_ConfigurationMenu.png|link=]] | |||
Select ‘Catalog’ on the left. | |||
[[File:Magento_Catalog.png|link=]] | |||
Finally, select ‘Melissa Data Magento Plugin’ | |||
[[File:Magento_ConfigurationMenuList.png|link=]] | |||
==Configuration== | |||
From this page you can enter your License Key, configure options, and enable global email as desired. | |||
For more information, see [[Magento Plugin:Configuration|Configuration]]. | |||
[[File: | [[File:Magento_PluginConfiguration.png|link=]] | ||
[[Category:Magento Plugin]] | [[Category:Magento Plugin]] | ||
Latest revision as of 00:05, 31 December 2019
| Magento Plugin Navigation | ||||
|---|---|---|---|---|
| ||||
| Tutorial |
Follow the steps below to install the Magento plugin.
Sign Up
1. First, you need to sign up for the plugin. Go to https://www.melissa.com/magento to sign up.
A Melissa Data account is required at this point. You will be prompted to log in or create a Melissa Data account if you don’t already have one. After you do this, you will receive an email with your License Key – the instructions for downloading the plugin itself follow below.
Download
2. Download the plugin from ftp://ftp.melissadata.com/updates/MelissaDataMagentoPluginv1.2.6b.tar.gz and save to the Magento root directory (usually /var/www/magento/, yours may vary).
Unpack
3. Use the tar command to unpack the file in the Magento root directory as follows: ‘tar xvfz MelissaDataMagentoPluginv1.2.6b.tar.gz’
Login
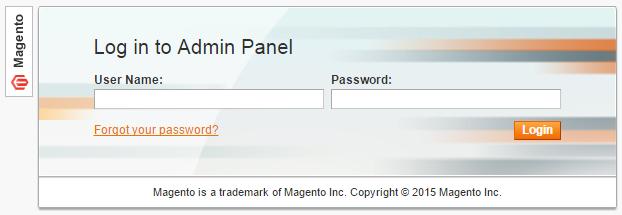
4. Login to the Magento Admin Panel with your administrator username and password.

Verify
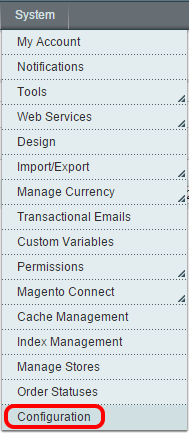
5. From the admin panel, go to System | Configuration:

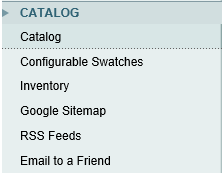
Select ‘Catalog’ on the left.

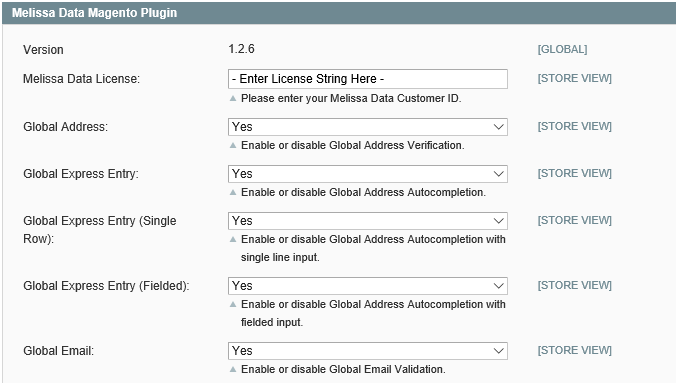
Finally, select ‘Melissa Data Magento Plugin’

Configuration
From this page you can enter your License Key, configure options, and enable global email as desired.
For more information, see Configuration.
