This wiki is no longer being updated as of December 10, 2025.
|
Listware:Formatting Fields
Formatting Fields in Microsoft Excel Files for ListWare®
ListWare is a software program that converts a comma-delimited file to xBase (.dbf) format for processing. Once processing is completed, the file can be exported out to your preferred file format. Your file needs to be in a .dbf format in order to add, change, and update fields in ListWare. Excel, and ASCII fixed-length text files do not allow fields to be added or changed once they are opened in ListWare. Therefore, it is necessary to add the update fields before opening your file in ListWare.
Download these instructions, with graphics, in a printable .pdf file: Listware Formatting
- Note
We recommend always saving a backup copy of your file before making any changes.
Listware Update Fields
Please click on the ListWare service below to view the Update Fields required for updating your file.
- Change of Address Services
- Address Correction Services
- Duplicate Check Services
- Residential Address Append Service
- Phone & FAX Append Services
- Area Code Update Service
- Consumer Enhancement Service
- Business Append Service
Following are two sets of instructions for easily managing the fields in your original file for efficient processing:
You have already submitted this file for processing using ListWare
Since ListWare has already identified the beginning and end fields in your file, it will not recognize any new fields added to the end of the file. The New Fields must be inserted between existing columns.
- Open your file in Excel, not ListWare.
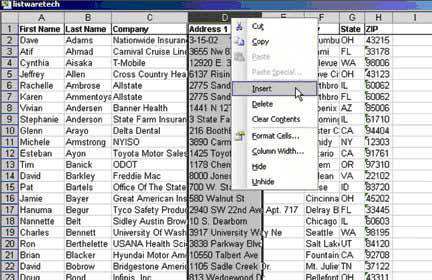
- Insert the vertical fields between existing columns of information as shown below.
- Right click on any particular vertical field in the middle of your file. This column becomes highlighted and a pull-down menu appears. (Figure #1)
- Click on Insert. A new vertical column will be inserted to the left of the highlighted column.
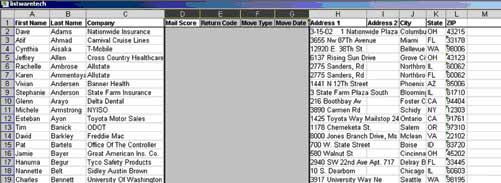
- Label this new field with one of the headers from the Update Fields box on the next page specific to your processing.
- Repeat the insertion step as many times as required to include all the necessary update fields for the service you requested. (Figure #2)
- Be sure the new column cells are formatted as text.
- Save these changes to your file without changing the name of your original Excel file, and close.
- Open ListWare and click Update.
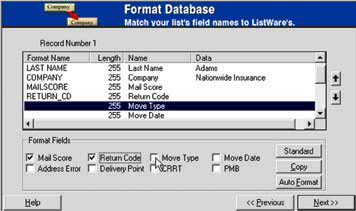
- Advance to the Format Database section and you will now see the update fields you just inserted from Excel. Check the boxes to match the field names between your file and ListWare. If you do not see all the required update fields (headers), click on Advanced and more update fields will appear. (Figure #3)
Example of update fields required to complete processing:
NCOALink TM 48 month processing demands 8 update fields. You will need to insert 8 new vertical columns into your Excel file and identify them with the appropriate headers as indicated:
- Mail Score
- Address Error
- Return Code
- Delivery Point
- Move Type
- CRRT
- Move Date
- PMB
You have not yet submitted your file.
- Insert these fields into your Excel file. The placement does not matter, you may insert them anyplace.
- Enter the appropriate headers so you can easily identify them to format in ListWare. (Figure #4)
- Be sure the new column cells are formatted as text.
- Save and close your Excel file.
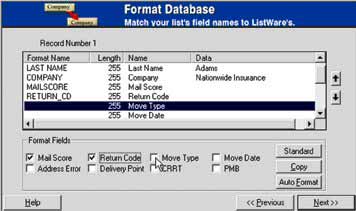
- Now that you have these update fields in place, open your file in ListWare. Advance to Format Database and format the new fields manually by checking the boxes with the matching field name.
- In the Format Database section, you will now see the update fields you just inserted from Excel. Check the boxes to match the field names between your file and ListWare. If you don’t see all the required update fields click on Advanced and more field names will appear. (Figure #5)
Now that all the appropriate fields are formatted, it will be easy to update your file.


