Difference between revisions of "Contact Zone:Contact Verify:Output Filter"
m |
|||
| Line 59: | Line 59: | ||
The Contact Verify Component will output records to one of two tables: the valid table and the invalid table. The Output Filter tab allows you to control which records go to which table. | The Contact Verify Component will output records to one of two tables: the valid table and the invalid table. The Output Filter tab allows you to control which records go to which table. | ||
[[File:CZ_CV_OutputFilter. | [[File:CZ_CV_OutputFilter.png|link=]] | ||
==Result Codes== | ==Result Codes== | ||
| Line 95: | Line 95: | ||
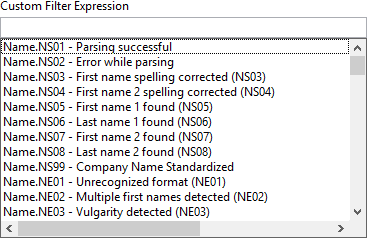
Select Customer Filter from the drop down and click Ctrl + Space in Customer Filter Expression text box to open an expression dialog drop down. These rules use Boolean operators ("OR," "AND," and "NOT") and the result codes to construct filters. Records matching the filter will be directed to the valid table while the rest are directed to the invalid table. | Select Customer Filter from the drop down and click Ctrl + Space in Customer Filter Expression text box to open an expression dialog drop down. These rules use Boolean operators ("OR," "AND," and "NOT") and the result codes to construct filters. Records matching the filter will be directed to the valid table while the rest are directed to the invalid table. | ||
[[File:CZ_CV_OutputFilter_CustomFilter. | [[File:CZ_CV_OutputFilter_CustomFilter.png|link=]] | ||
A custom rule that would be equivalent to Pre-built rule #2 would read: "(AS01 OR AS02)". This means that the conditions for the rules are met if either result code "AS01" or "AS02" were returned. | A custom rule that would be equivalent to Pre-built rule #2 would read: "(AS01 OR AS02)". This means that the conditions for the rules are met if either result code "AS01" or "AS02" were returned. | ||
===Validate Custom Rules=== | ===Validate Custom Rules=== | ||
[[File:CZ_CV_OutputFilter_ValidateRules. | [[File:CZ_CV_OutputFilter_ValidateRules.png|link=]] | ||
[[File:CZ_CV_OutputFilter_Validated. | [[File:CZ_CV_OutputFilter_Validated.png|link=]] | ||
A custom expression may be tested by clicking on the "Validate Custom Rule(s)" button. A pop-up dialog box will confirm whether or not the custom expression is acceptable. | A custom expression may be tested by clicking on the "Validate Custom Rule(s)" button. A pop-up dialog box will confirm whether or not the custom expression is acceptable. | ||
===Save Custom Rule=== | ===Save Custom Rule=== | ||
[[File:CZ_CV_OutputFilter_SaveRules. | [[File:CZ_CV_OutputFilter_SaveRules.png|link=]] | ||
Right-click the Custom Expression, then left-click Save Custom Rule... from the pop-up. Enter a name for the filter in the window and click OK. It will now be available as a Pre-Built Filter for subsequent components. | Right-click the Custom Expression, then left-click Save Custom Rule... from the pop-up. Enter a name for the filter in the window and click OK. It will now be available as a Pre-Built Filter for subsequent components. | ||
===Remove Selected Rule=== | ===Remove Selected Rule=== | ||
[[File:CZ_CV_OutputFilter_RemoveRules. | [[File:CZ_CV_OutputFilter_RemoveRules.png|link=]] | ||
[[File:CZ_CV_OutputFilter_RemoveConfirm. | [[File:CZ_CV_OutputFilter_RemoveConfirm.png|link=]] | ||
To remove a Pre-Built Filter, select the filter from the Pre-Built drop-down list, right-click the filter, and select Remove Selected Rule.... Click OK. After saving this component, it will no longer be available in new component configurations. | To remove a Pre-Built Filter, select the filter from the Pre-Built drop-down list, right-click the filter, and select Remove Selected Rule.... Click OK. After saving this component, it will no longer be available in new component configurations. | ||
Revision as of 17:23, 11 June 2014
| Contact Verify Navigation | |||||||||
|---|---|---|---|---|---|---|---|---|---|
| Overview | |||||||||
| Tutorial | |||||||||
| |||||||||
| |||||||||
|
The Contact Verify Component will output records to one of two tables: the valid table and the invalid table. The Output Filter tab allows you to control which records go to which table.

Result Codes
The output status of a record is returned via result codes returned by the underlying objects. The Component will combine them into a single, comma-delimited string and write them to the field mapped here. New field names can be created by typing the name into the Output Results Code box.
Output Filter
Select a filter to determine which records will be directed to a particular output stream. A custom filter may be created based on individual need, each pin filters the records in a cascading effect, where the results code is compared against the first expression (Pin 1) and then compared against Pin 2, and so on.
- No Filter
- All records are written to a single output stream.
- Pre-built Filter
- The Component comes with several pre-built filters for common applications:
- Full Address Matches - The record is valid only with a valid and deliverable mailing address.
- Street Address Matches - The record is valid if the street address is deliverable, even if the suite information is missing.
- Full Address Match and Deliverable by all carriers - The record is valid only with a valid and deliverable mailing address that is also served by alternate delivery services such as Fed Ex and UPS.
- Non-Questionable Names - The record is valid if the name information was complete and contains no questionable information (vulgarities or common nuisance names).
- Valid Email Domains - The record is valid if the domain for the email address was either confirmed to be valid or, at the very least, is not known to be invalid.
- Valid and Allowable Email Domains - The record is valid if the domain for the email address was either confirmed to be valid or is not known to be invalid, and is not a mobile email address (which are not deliverable per FCC regulations).
- Full Phone Matches - The record is valid only if the phone number was verified to the 10-digit level.
- Full and Partial Phone Matches - The record is valid if the phone number was verified to either the 10-digit or 7-digit level.
- Custom Filter
- A custom rule that would be equivalent to Pre-built rule #6 would read: “(ES01 OR ES03) AND NOT ES04.”
- This means that the conditions for the rules are met if either result code “ES01” or “ES03” were returned and the result code “ES04” was not returned.
- Custom rules are an advanced subject. You should be comfortable with Boolean operations before using custom rules in a production environment. For more information on the available result codes, see Custom Output Filters below.
Custom Output Filters
The Contact Verify Component will output records in up to four streams. Names and usage can be done in any manner. Filters are evaluated from the top down. A custom filter may be created based on individual need, each pin filters the records in a cascading effect, where the results code is compared against the first expression (Pin 1) and then compared against Pin 2, and so on.
Custom Filter
Select Customer Filter from the drop down and click Ctrl + Space in Customer Filter Expression text box to open an expression dialog drop down. These rules use Boolean operators ("OR," "AND," and "NOT") and the result codes to construct filters. Records matching the filter will be directed to the valid table while the rest are directed to the invalid table.
A custom rule that would be equivalent to Pre-built rule #2 would read: "(AS01 OR AS02)". This means that the conditions for the rules are met if either result code "AS01" or "AS02" were returned.
Validate Custom Rules
File:CZ CV OutputFilter ValidateRules.png
File:CZ CV OutputFilter Validated.png
A custom expression may be tested by clicking on the "Validate Custom Rule(s)" button. A pop-up dialog box will confirm whether or not the custom expression is acceptable.
Save Custom Rule
File:CZ CV OutputFilter SaveRules.png
Right-click the Custom Expression, then left-click Save Custom Rule... from the pop-up. Enter a name for the filter in the window and click OK. It will now be available as a Pre-Built Filter for subsequent components.
Remove Selected Rule
File:CZ CV OutputFilter RemoveRules.png
File:CZ CV OutputFilter RemoveConfirm.png
To remove a Pre-Built Filter, select the filter from the Pre-Built drop-down list, right-click the filter, and select Remove Selected Rule.... Click OK. After saving this component, it will no longer be available in new component configurations.