Difference between revisions of "Dynamics:Global Verify:Tutorial"
| Line 10: | Line 10: | ||
1. | 1. Begin by navigating to the '''Contacts''' section. To do this, click the down arrow next to '''Sales''', then click '''Sales''', and then click '''Contacts''' under the '''Customers''' category. | ||
[[File: | [[File:Dynamics_GlobalVerify_Tutorial_01_Contacts.png|frame|none|Click '''Contacts''']] | ||
2. | 2. Click '''New''' to create a new '''Contact'''. | ||
[[File: | [[File:Dynamics_GlobalVerify_Tutorial_02_New.png|frame|none|Click '''New''']] | ||
3. | 3. Enter the necessary input information. This includes Full Name, Email, Mobile Phone, and Address. | ||
[[File: | [[File:Dynamics_GlobalVerify_Tutorial_03_Input.png|frame|none|Enter input information]] | ||
4. | 4. Click the '''Global Verify''' button. | ||
[[File: | [[File:Dynamics_GlobalVerify_Tutorial_04_GlobalVerify.png|frame|none|Click the '''Global Verify''' button]] | ||
5. | 5. Ensure the '''Process Date''' field reflects the current date and time. | ||
[[File: | [[File:Dynamics_GlobalVerify_Tutorial_05_Verify.png|frame|none|Verify '''Process Date''']] | ||
6. | 6. Now you can review the processed input details. | ||
*Melissa Global Address Tab: | |||
:[[File:Dynamics_GlobalVerify_Tutorial_06a_Address.png|frame|none|Global Address Tab]] | |||
Melissa | *Melissa Global Email Tab: | ||
[[File: | :[[File:Dynamics_GlobalVerify_Tutorial_06b_Email.png|frame|none|Global Email Tab]] | ||
Melissa | *Melissa Global Phone Tab: | ||
[[File: | :[[File:Dynamics_GlobalVerify_Tutorial_06c_Phone.png|frame|none|Global Phone Tab]] | ||
Melissa | *Melissa Global Name Tab: | ||
[[File: | :[[File:Dynamics_GlobalVerify_Tutorial_06d_Name.png|frame|none|Global Name Tab]] | ||
Melissa Data Address Details | Note: If a second address was entered in the input fields above, it would be processed below in a Melissa Data Address 2 Details section. | ||
7. Click '''Overwrite Input''' button to view possible input value replacements. Select which fields you want to overwrite, and click '''Confirm''' to finalize the changes. | |||
[[File:Dynamics_GlobalVerify_Tutorial_07_Confirm.png|frame|none|Click '''Overwrite Input''' then '''Confirm''']] | |||
[[Category:Clean Suite for CRM:Dynamics]] | [[Category:Clean Suite for CRM:Dynamics]] | ||
[[Category:Dynamics Global Verify]] | [[Category:Dynamics Global Verify]] | ||
Revision as of 23:16, 21 March 2019
← Clean Suite for CRM:Dynamics
| Global Verify Navigation | ||
|---|---|---|
| Overview | ||
| Installation | ||
| Configuration | ||
| Custom Mapping | ||
| Tutorial | ||
| Fields | ||
|
Global Verify Tutorial
Note: In order to use the Global Verify service, you must first configure the License Key and options.
This tutorial will teach you how to use the Global Verify solution in Microsoft Dynamics CRM in the Contact entity.
1. Begin by navigating to the Contacts section. To do this, click the down arrow next to Sales, then click Sales, and then click Contacts under the Customers category.

2. Click New to create a new Contact.

3. Enter the necessary input information. This includes Full Name, Email, Mobile Phone, and Address.

4. Click the Global Verify button.

5. Ensure the Process Date field reflects the current date and time.

6. Now you can review the processed input details.
- Melissa Global Address Tab:
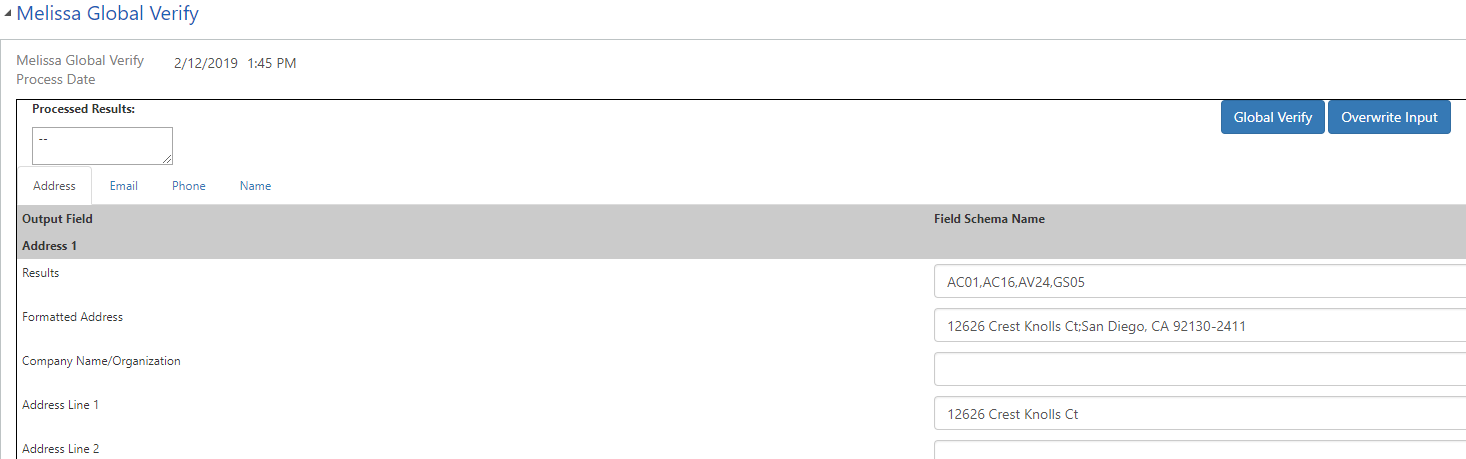 Global Address Tab

- Melissa Global Email Tab:
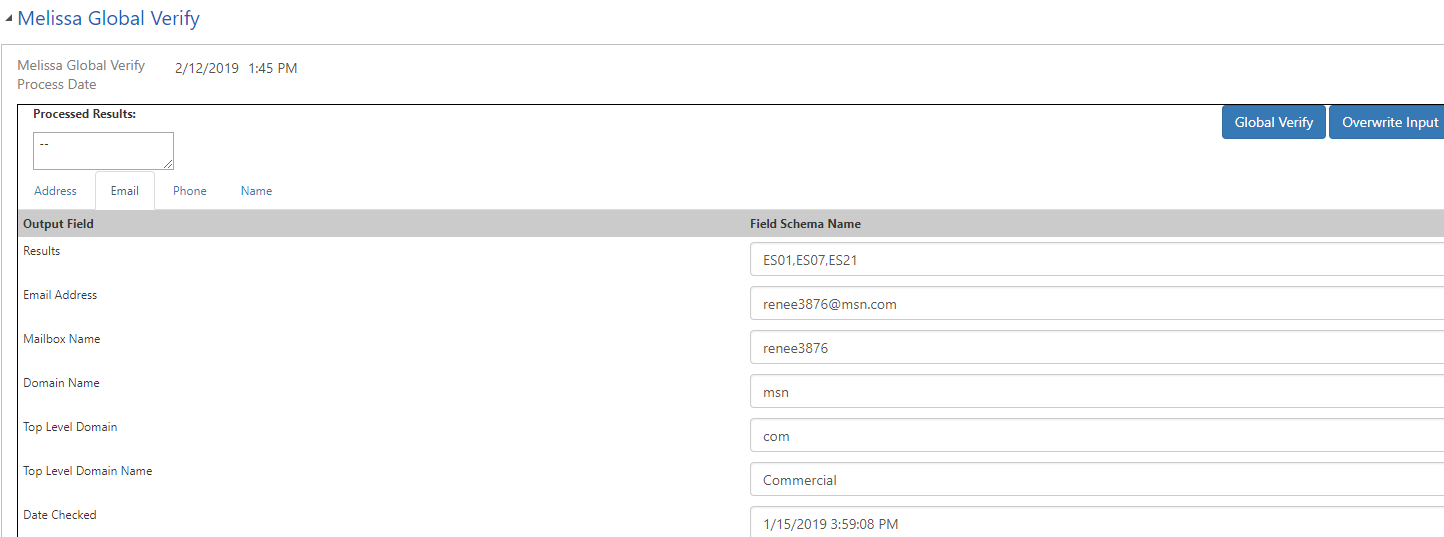 Global Email Tab

- Melissa Global Phone Tab:
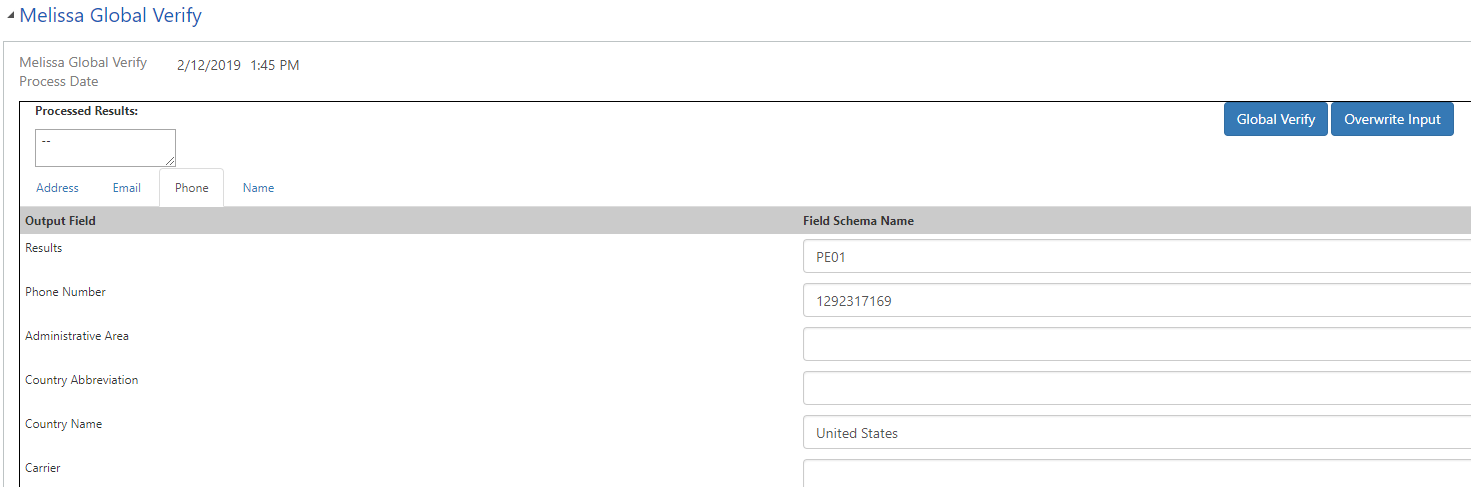 Global Phone Tab

- Melissa Global Name Tab:
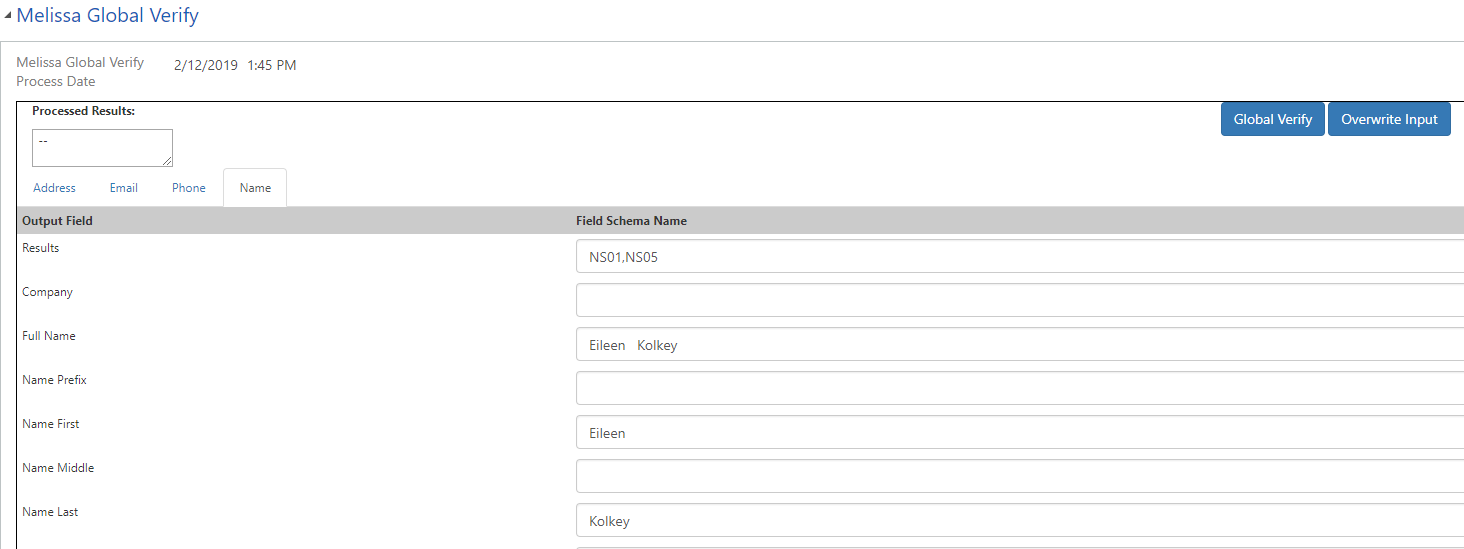 Global Name Tab

Note: If a second address was entered in the input fields above, it would be processed below in a Melissa Data Address 2 Details section.
7. Click Overwrite Input button to view possible input value replacements. Select which fields you want to overwrite, and click Confirm to finalize the changes.
