Difference between revisions of "Express Entry Desktop:Installation"
| (7 intermediate revisions by 2 users not shown) | |||
| Line 1: | Line 1: | ||
{{ExpressEntryDesktopNav | |||
|IntroCollapse= | |||
}} | |||
{{CustomTOC}} | |||
To install, run Setup.exe, and follow the on-screen prompts: | |||
1. Download ftp://ftp.melissadata.com/Updates/EEDesktop2.2.24.zip | |||
2. Extract the setup.exe file in the .zip, the zip password will be given by your sales rep. | |||
3. Follow the setup prompts, entering your License Key and installing Java as necessary (you might have to uninstall Java from your machine for this step, and let the installer download the correct version for Express Entry Desktop). | |||
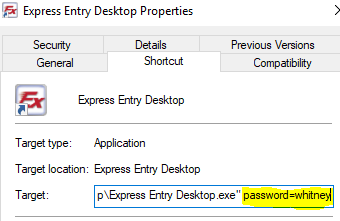
4. Once Express Entry Desktop is installed, go into the icon properties and for 'Target' add '<space>password=whitney' (without the quotes), or you will only see 'configuration' under 'settings' and won't be able to Manage Templates. | |||
:[[File:EEDesktop_Installation.png|link=]] | |||
5. At this point you should be ready to set up templates. If you are deploying to multiple machines, you can simply copy config.xml from the Express Entry Desktop directory to the target machines, and your License Key, input template, and output templates will be preserved. | |||
The | The License Key may be inserted during the Setup process, or upon first use of the software. | ||
[[Category:Express Entry Desktop]] | [[Category:Express Entry Desktop]] | ||
Latest revision as of 22:26, 5 June 2019
← Express Entry Desktop Reference
| Express Entry Desktop Navigation | ||||||
|---|---|---|---|---|---|---|
| ||||||
| Tutorial | ||||||
|
To install, run Setup.exe, and follow the on-screen prompts:
1. Download ftp://ftp.melissadata.com/Updates/EEDesktop2.2.24.zip
2. Extract the setup.exe file in the .zip, the zip password will be given by your sales rep.
3. Follow the setup prompts, entering your License Key and installing Java as necessary (you might have to uninstall Java from your machine for this step, and let the installer download the correct version for Express Entry Desktop).
4. Once Express Entry Desktop is installed, go into the icon properties and for 'Target' add '<space>password=whitney' (without the quotes), or you will only see 'configuration' under 'settings' and won't be able to Manage Templates.
5. At this point you should be ready to set up templates. If you are deploying to multiple machines, you can simply copy config.xml from the Express Entry Desktop directory to the target machines, and your License Key, input template, and output templates will be preserved.
The License Key may be inserted during the Setup process, or upon first use of the software.