Difference between revisions of "Express Entry Desktop:Main"
Jump to navigation
Jump to search
| Line 61: | Line 61: | ||
;Address1 | ;Address1 | ||
:The street address. This is usually the second step of express entry. | :The street address. This is usually the second step of express entry. | ||
;Clear | ;Clear | ||
| Line 66: | Line 67: | ||
;Verify | ;Verify | ||
:Click here to verify the entered address. | :Click here to verify the entered address. Any results will be shown in the Results section. | ||
;Send | ;Send | ||
| Line 73: | Line 74: | ||
==Results== | ==Results== | ||
This section shows the verification results of the address. Use this to determine the quality of the input address. | |||
[[Category:Express Entry Desktop]] | [[Category:Express Entry Desktop]] | ||
Revision as of 16:06, 1 July 2014
← Express Entry Desktop Reference
| Contact Verify Navigation | ||||||
|---|---|---|---|---|---|---|
| ||||||
| Tutorial | ||||||
|
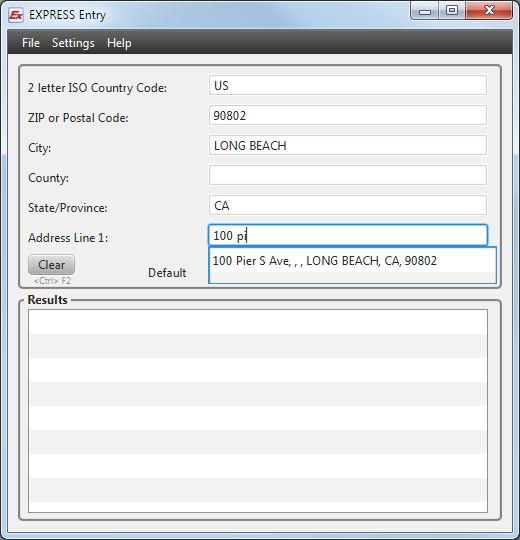
The main screen is where you will do the majority of your express entering.

Main
- Country
- The Country. US by default.
- Zip Code
- The ZIP Code of the address. Start your lookup by entering in the zip code here first.
- CIty
- The city associated with the zip code.
- State
- The state associated with the zip code.
- Address1
- The street address. This is usually the second step of express entry.
- Clear
- Click here to clear the form.
- Verify
- Click here to verify the entered address. Any results will be shown in the Results section.
- Send
- Click here to 'send' (copy) the data to the last used window, aside from Express Entry Desktop.
Results
This section shows the verification results of the address. Use this to determine the quality of the input address.