Difference between revisions of "Express Entry Desktop:Tutorial"
(Created page with "← Express Entry Desktop Reference {| class="mw-collapsible" cellspacing="2" style="background-color:#f9f9f9; border:1px solid #aaaaaa...") |
|||
| (16 intermediate revisions by 2 users not shown) | |||
| Line 1: | Line 1: | ||
{{ExpressEntryDesktopNav}} | |||
{{CustomTOC}} | |||
<span style="color:red;">'''Hotkeys! Be sure to set/use hotkeys to maximize your time. For more information, see [[Express Entry Desktop:Configuration|Configuration]]'''</span> | |||
==Configuration== | |||
Navigate to Settings > Configuration. | |||
[[File:EED_Config.png]] | |||
Set up the Express Entry Desktop Configuration. See [[Express Entry Desktop:Configuration|Configuration]] | |||
==Assign Output Templates== | |||
Assign output templates to F1-F5 Hotkeys. This will depend on the applications you are using in conjunction with Express Entry Desktop. | |||
[[File:EED_AssignOutputTemplates2.png]] | |||
===Manage Templates=== | |||
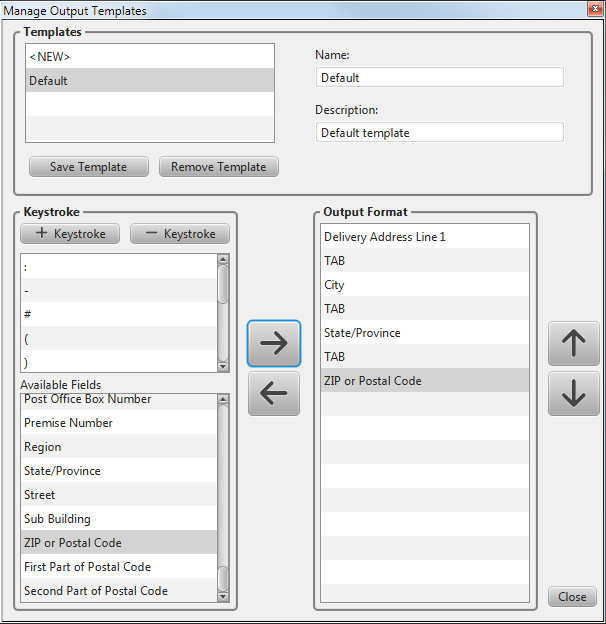
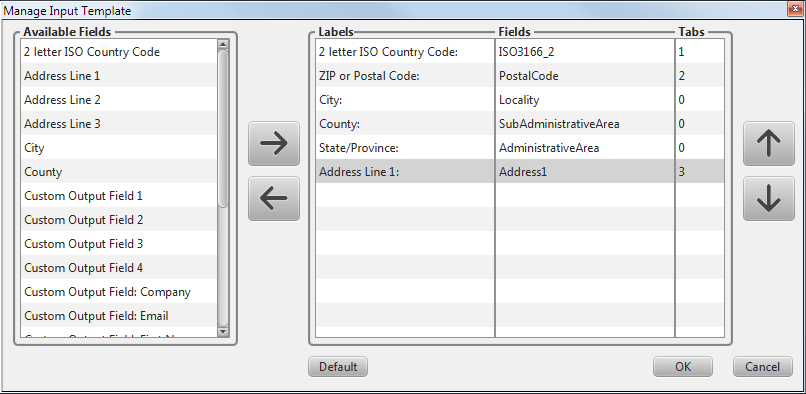
If you need to modify any input or output templates, use the [[Express Entry Desktop:Manage Input Template|Manage Input Template]] and [[Express Entry Desktop:Manage Output Templates|Manage Output Templates]] windows to setup the template. | |||
[[File:EED_ManageOutput.png|link=]] | |||
[[File:EED_ManageInput.png|link=]] | |||
==Enter Data== | |||
Start by entering a zip code, then select the desired city/state from the drop down that appears. Then move to the Address and start entering the address. Select the desired address from the drop down that appears. | |||
[[File:wikiEEDmainpage.png]] | |||
The DPV indicator lights when a U.S. address is chosen - all U.S. addresses in Express Entry are Delivery Point Verified. | |||
==Verify Data== | |||
Once you have an address filled out, verify the data. Either click the button or use the hotkey (Default is <Ctrl> F4). | |||
This will verify the data and show you results. | |||
Note: Certain fields in the output template require this verification step. The fields are: County (Subadministrative Area), Thoroughfare Pre Directional, Thoroughfare Leading Type, Thoroughfare Name, Thoroughfare Trailing Type, and Thoroughfare Post Directional, which are supported by certain countries in the service. | |||
==Use Data== | |||
Utilize the data. Click the hotkey with which you want to send the data. There are up to 5 hotkeys, and each can be assigned a different output template. Be sure to set up output templates to make the most of this functionality. | |||
[[Category:Express Entry Desktop]] | |||
Latest revision as of 22:16, 3 December 2015
← Express Entry Desktop Reference
| Express Entry Desktop Navigation | ||||||
|---|---|---|---|---|---|---|
| ||||||
| Tutorial | ||||||
|
Hotkeys! Be sure to set/use hotkeys to maximize your time. For more information, see Configuration
Configuration
Navigate to Settings > Configuration.

Set up the Express Entry Desktop Configuration. See Configuration
Assign Output Templates
Assign output templates to F1-F5 Hotkeys. This will depend on the applications you are using in conjunction with Express Entry Desktop.

Manage Templates
If you need to modify any input or output templates, use the Manage Input Template and Manage Output Templates windows to setup the template.
Enter Data
Start by entering a zip code, then select the desired city/state from the drop down that appears. Then move to the Address and start entering the address. Select the desired address from the drop down that appears.

The DPV indicator lights when a U.S. address is chosen - all U.S. addresses in Express Entry are Delivery Point Verified.
Verify Data
Once you have an address filled out, verify the data. Either click the button or use the hotkey (Default is <Ctrl> F4).
This will verify the data and show you results.
Note: Certain fields in the output template require this verification step. The fields are: County (Subadministrative Area), Thoroughfare Pre Directional, Thoroughfare Leading Type, Thoroughfare Name, Thoroughfare Trailing Type, and Thoroughfare Post Directional, which are supported by certain countries in the service.
Use Data
Utilize the data. Click the hotkey with which you want to send the data. There are up to 5 hotkeys, and each can be assigned a different output template. Be sure to set up output templates to make the most of this functionality.