Difference between revisions of "Magento Plugin:Configuration"
| Line 8: | Line 8: | ||
==System Configuration== | ==System Configuration== | ||
Note: If you are still in the Magento Connect Manager, Click ‘Return to Admin’ in the top right corner to return to the Admin Panel. | 1. Note: If you are still in the Magento Connect Manager, Click ‘Return to Admin’ in the top right corner to return to the Admin Panel. | ||
[[File:Magento_ReturnToAdmin.png|link=]] | [[File:Magento_ReturnToAdmin.png|link=]] | ||
From the Admin Panel, navigate to Configuration. This is located under '''System''' | '''Configuration'''. | 2. From the Admin Panel, navigate to Configuration. This is located under '''System''' | '''Configuration'''. | ||
[[File:Magento_ConfigurationMenu.png|link=]] | [[File:Magento_ConfigurationMenu.png|link=]] | ||
| Line 19: | Line 19: | ||
==Melissa Data Global Address== | ==Melissa Data Global Address== | ||
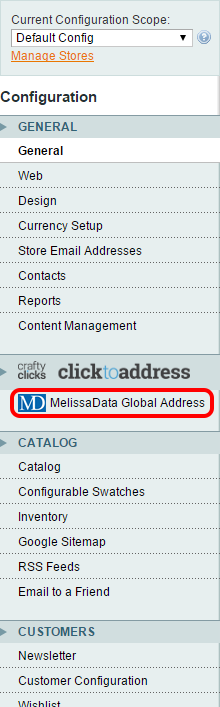
This will bring up the configuration panel on the left hand side. To configure the plugin, click ‘''Melissa Data Global Address’'' under the ''‘Crafty Clicks clicktoaddress’'' logo: | 3. This will bring up the configuration panel on the left hand side. To configure the plugin, click ‘''Melissa Data Global Address’'' under the ''‘Crafty Clicks clicktoaddress’'' logo: | ||
[[File:Magento_ClickToAddress.png|link=]] | [[File:Magento_ClickToAddress.png|link=]] | ||
| Line 30: | Line 30: | ||
===License Key=== | ===License Key=== | ||
Under '''General Configuration''', cut and paste your license string from the email sent to you by Melissa Data into the '''Melissa Key''' field. | 4. Under '''General Configuration''', cut and paste your license string from the email sent to you by Melissa Data into the '''Melissa Key''' field. | ||
===Loading Gif=== | ===Loading Gif=== | ||
You may also choose the loading gif (an animated graphic) that is displayed while the autocomplete service is sending and receiving data. The default is '''crafty_validate_busy.gif'''. | 5. You may also choose the loading gif (an animated graphic) that is displayed while the autocomplete service is sending and receiving data. The default is '''crafty_validate_busy.gif'''. | ||
| Line 39: | Line 39: | ||
[[File:Magento_GlobalAddress_Global-Multi.png|link=]] | [[File:Magento_GlobalAddress_Global-Multi.png|link=]] | ||
Under '''Global – Multi Row Autocomplete''', you can enable or disable address autocompletion for addresses in countries other than the United States. | 6. Under '''Global – Multi Row Autocomplete''', you can enable or disable address autocompletion for addresses in countries other than the United States. | ||
| Line 45: | Line 45: | ||
[[File:Magento_GlobalAddress_USA-Single.png|link=]] | [[File:Magento_GlobalAddress_USA-Single.png|link=]] | ||
Under '''USA – Single Row Autocomplete''', you can enable or disable single-row autocompletion for addresses in the United States. | 7. Under '''USA – Single Row Autocomplete''', you can enable or disable single-row autocompletion for addresses in the United States. | ||
| Line 51: | Line 51: | ||
[[File:Magento_GlobalAddress_Validation.png|link=]] | [[File:Magento_GlobalAddress_Validation.png|link=]] | ||
Under '''Global Address Validation''', there are options to control the text displayed in the post-checkout step when the address is not validated, and the Region Dropdown Override which allows manual entry of custom regions in the post-checkout step. Set '''Region Dropdown Override''' to '''yes''' to allow manual entry of Regions, or set it to '''no''' to force the use of the dropdown to set the region. | 8. Under '''Global Address Validation''', there are options to control the text displayed in the post-checkout step when the address is not validated, and the Region Dropdown Override which allows manual entry of custom regions in the post-checkout step. Set '''Region Dropdown Override''' to '''yes''' to allow manual entry of Regions, or set it to '''no''' to force the use of the dropdown to set the region. | ||
[[Category:Magento Plugin]] | [[Category:Magento Plugin]] | ||
Revision as of 23:23, 30 March 2015
| Magento Plugin Navigation | ||||
|---|---|---|---|---|
| ||||
| Tutorial |
Follow the steps below to configure the Magento plugin.
System Configuration
1. Note: If you are still in the Magento Connect Manager, Click ‘Return to Admin’ in the top right corner to return to the Admin Panel.

2. From the Admin Panel, navigate to Configuration. This is located under System | Configuration.

Melissa Data Global Address
3. This will bring up the configuration panel on the left hand side. To configure the plugin, click ‘Melissa Data Global Address’ under the ‘Crafty Clicks clicktoaddress’ logo:
Then this will bring up the configuration page.
General Configuration

License Key
4. Under General Configuration, cut and paste your license string from the email sent to you by Melissa Data into the Melissa Key field.
Loading Gif
5. You may also choose the loading gif (an animated graphic) that is displayed while the autocomplete service is sending and receiving data. The default is crafty_validate_busy.gif.
Global - Multi-Row Autocomplete

6. Under Global – Multi Row Autocomplete, you can enable or disable address autocompletion for addresses in countries other than the United States.
USA - Single Row Autocomplete

7. Under USA – Single Row Autocomplete, you can enable or disable single-row autocompletion for addresses in the United States.
Global Address Validation
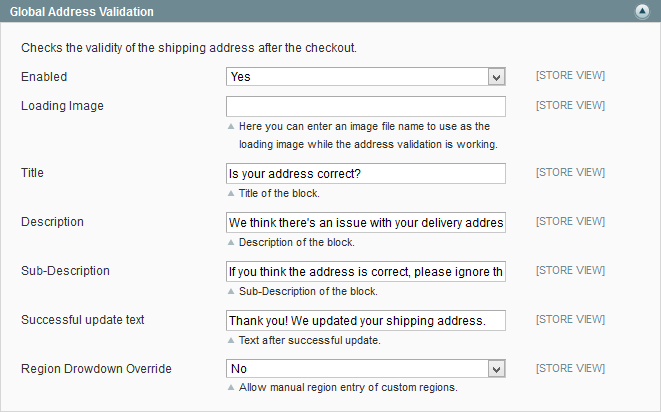
8. Under Global Address Validation, there are options to control the text displayed in the post-checkout step when the address is not validated, and the Region Dropdown Override which allows manual entry of custom regions in the post-checkout step. Set Region Dropdown Override to yes to allow manual entry of Regions, or set it to no to force the use of the dropdown to set the region.