Difference between revisions of "Mailers Online:Print Labels"
Jump to navigation
Jump to search
| Line 32: | Line 32: | ||
<ol> | <ol> | ||
<li>Open the extracted folder and double-click on the file usps4cb.ttf to open the USPS Fonts.</li> | <li>Open the extracted folder and double-click on the file "'''usps4cb.ttf'''" to open the USPS Fonts.</li> | ||
<li>Click "Install"</li> | <li>Click "'''Install'''"</li> | ||
| Line 41: | Line 41: | ||
==Open Word & Begin Mail Merge== | ==Open Word & Begin Mail Merge== | ||
:Open an existing Word document, or create a new one. | :Open an existing Word document, or create a new one. | ||
<ol> | <ol> | ||
<li>Click the "Mailings" tab.</li> | <li>Click the "'''Mailings'''" tab.</li> | ||
<li>Click the "Start Mail Merge" drop-down and select "Step-by-Step Mail Merge Wizard…"</li> | <li>Click the "'''Start Mail Merge'''" drop-down and select "'''Step-by-Step Mail Merge Wizard…'''"</li> | ||
| Line 58: | Line 58: | ||
<ol> | <ol> | ||
<li>Choose the type of document you want to create.</li> | <li>Choose the type of document you want to create.</li> | ||
:For example, select "Labels" | :For example, select "'''Labels'''". | ||
<li>Click Next: Starting document to move to Step 2.</li> | <li>Click "'''Next: Starting document'''" to move to Step 2.</li> | ||
| Line 72: | Line 72: | ||
For example: | For example: | ||
<li>Click "Label options" and select the labels that you purchased.</li> | <li>Click "'''Label options'''" and select the labels that you purchased.</li> | ||
<li>Select "Avery® US Letter – 15661 Easy Peel Address Labels" (Make sure the label you use is at least 1 inch x 3.5 inches.).</li> | <li>Select "'''Avery® US Letter – 15661 Easy Peel Address Labels'''" (Make sure the label you use is at least 1 inch x 3.5 inches.).</li> | ||
| Line 79: | Line 79: | ||
<li>Click "Next: Select recipients to move to Step 3".</li> | <li>Click "'''Next: Select recipients to move to Step 3'''".</li> | ||
</ol> | </ol> | ||
| Line 85: | Line 85: | ||
<h3 class="productfield">Step 3 - Select Recipients</h3> | <h3 class="productfield">Step 3 - Select Recipients</h3> | ||
<ol> | <ol> | ||
<li>Select "Use an existing List"</li> | <li>Select "'''Use an existing List'''"</li> | ||
<li>Click "Browse".</li> | <li>Click "'''Browse'''".</li> | ||
<li>Open the Results file from the recently extracted Mailers Online folder.</li> | <li>Open the Results file from the recently extracted Mailers Online folder.</li> | ||
<li>Click "OK".</li> | <li>Click "'''OK'''".</li> | ||
<li>Click "Next: Arrange Your Labels".</li> | <li>Click "'''Next: Arrange Your Labels'''".</li> | ||
| Line 98: | Line 98: | ||
<h3 class="productfield">Step 4 - Add Database Fields and Format Barcode</h3> | <h3 class="productfield">Step 4 - Add Database Fields and Format Barcode</h3> | ||
<ol> | <ol> | ||
<li>Add Database Fields by selecting "More Items" under | <li>Add Database Fields by selecting "'''More Items'''" under ''Arrange your Labels''.</li> | ||
<li>Select Insert: "Database Fields".</li> | <li>Select Insert: "'''Database Fields'''".</li> | ||
<li>Add each Field needed for Labels, in order. Spacing can be adjusted after the desired fields are added.</li> | <li>Add each Field needed for Labels, in order. Spacing can be adjusted after the desired fields are added.</li> | ||
| Line 106: | Line 106: | ||
For example | For example, add: Endorsement, FirstName, LastName, Address, City, State, Zip, Plus4, IMBAlphaCode | ||
:[[File:MO_Print_010-Example.png|350px|alt=Add Fields|link=]] | :[[File:MO_Print_010-Example.png|350px|alt=Add Fields|link=]] | ||
<li>Once you add all your fields, click "Close".</li> | <li>Once you add all your fields, click "'''Close'''".</li> | ||
<li>Add the spaces and separate each address line.</li> | <li>Add the spaces and separate each address line.</li> | ||
| Line 137: | Line 135: | ||
*If mail piece weighs more than 3 ounces, the barcode must be included in the Address Block. | *If mail piece weighs more than 3 ounces, the barcode must be included in the Address Block. | ||
<li>Format the Intelligent Mail Barcode by highlighting the MD_IMBALPH field and change | <li>Format the Intelligent Mail Barcode by highlighting the "'''MD_IMBALPH'''" or "'''MD_IMBAlphaCode'''" field, then right-click and change font to "'''USPS4CB'''" and size to "'''16'''".</li> | ||
<li>Click "'''OK'''" or press Enter.</li> | |||
<li>Click "OK" or press Enter.</li> | |||
<pre class="indent">«MD_IMBAlphaCode»</pre> | <pre class="indent">«MD_IMBAlphaCode»</pre> | ||
| Line 147: | Line 144: | ||
<li>Click "Update All Labels".</li> | <li>Click "'''Update All Labels'''".</li> | ||
<li>Click "Next: Complete the Merge".</li> | <li>Click "'''Next: Complete the Merge'''".</li> | ||
</ol> | </ol> | ||
| Line 156: | Line 153: | ||
For example: | For example: | ||
<li>Click "Print".</li> | <li>Click "'''Print'''".</li> | ||
<li>Select Print Records: "All" options and click "OK".</li> | <li>Select Print Records: "'''All'''" options and click "'''OK'''".</li> | ||
<li>Select Printer Name: "Microsoft Print to PDF" and click "OK".</li> | <li>Select Printer Name: "'''Microsoft Print to PDF'''" and click "'''OK'''".</li> | ||
<li>Enter File Name to save as and click "Save".</li> | <li>Enter File Name to save as and click "'''Save'''".</li> | ||
Latest revision as of 00:48, 29 April 2023
Mailers Online returns a Result file that can be uploaded into Microsoft Word’s - Mail Merge to Print Labels.
The following example demonstrates how to:
- Create a Mailing Label.
- How to merge the labels with a Recipient List (using the Mailers Online - Result file).
Before You Begin
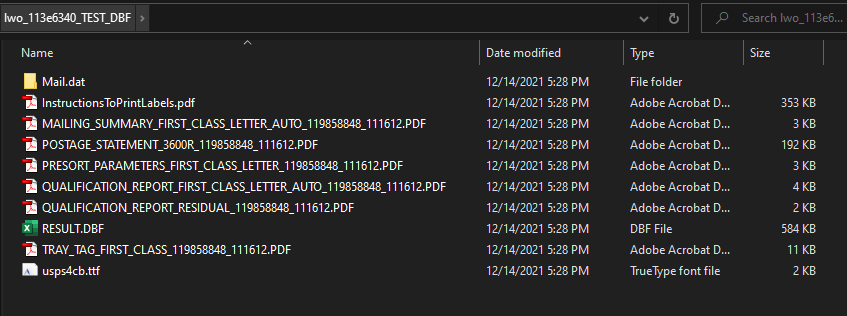
Download & Extract Presorted File
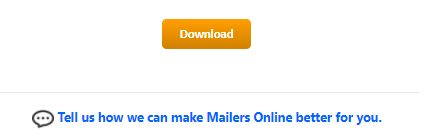
- Once the Mailers Online file is purchased, it can be downloaded directly from the Mailers Online - Dashboard.
- Click "Report" and select "Download" in the bottom-right section of the page.
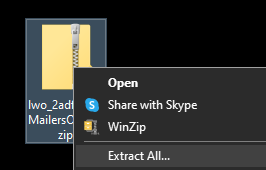
- Right-click the ZIP folder and select "Extract All".
- Extract your file from the the downloaded file.
Install USPS Font
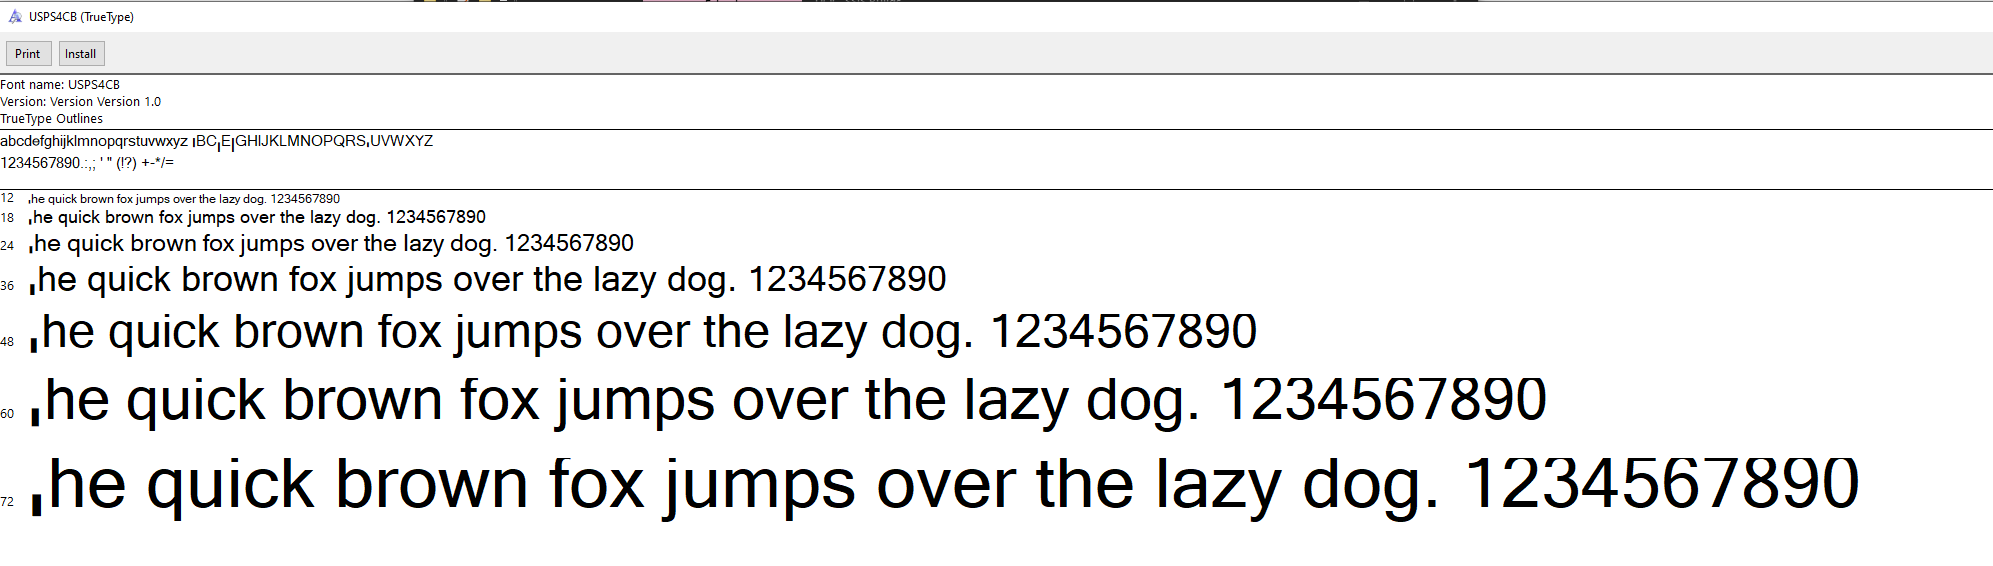
- If this is your first time doing a Mail Merge with the IMB®, perform the following steps to install the USPS4CB font.
- Open the extracted folder and double-click on the file "usps4cb.ttf" to open the USPS Fonts.
- Click "Install"
Open Word & Begin Mail Merge
- Open an existing Word document, or create a new one.
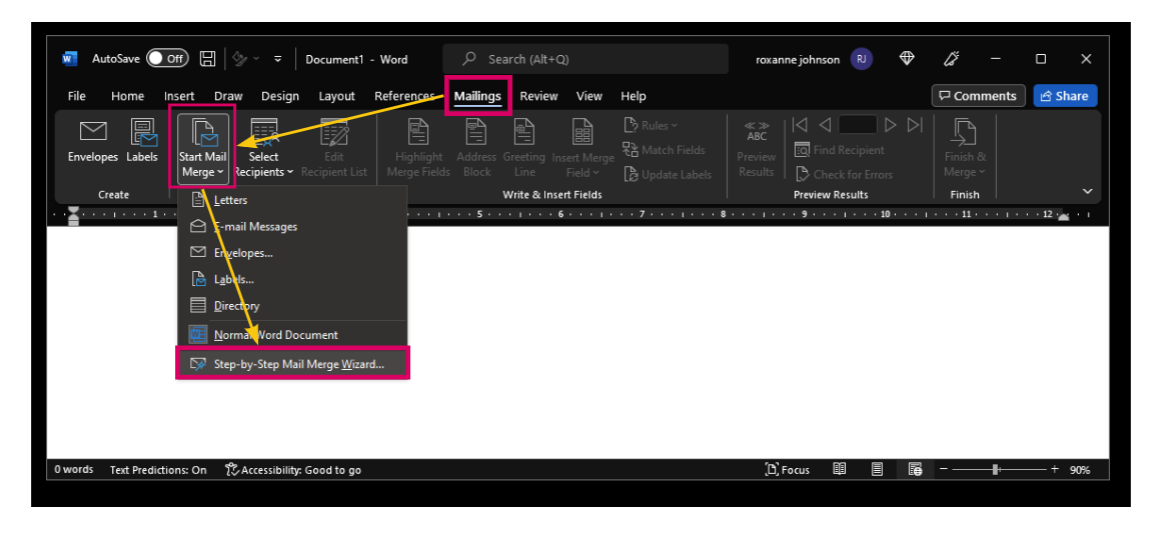
- Click the "Mailings" tab.
- Click the "Start Mail Merge" drop-down and select "Step-by-Step Mail Merge Wizard…"
- The Mail Merge will appear and guide you through the six (6) main steps to complete a merge. The following example demonstrates how to create a mailing label and merge the labels with a recipient list.
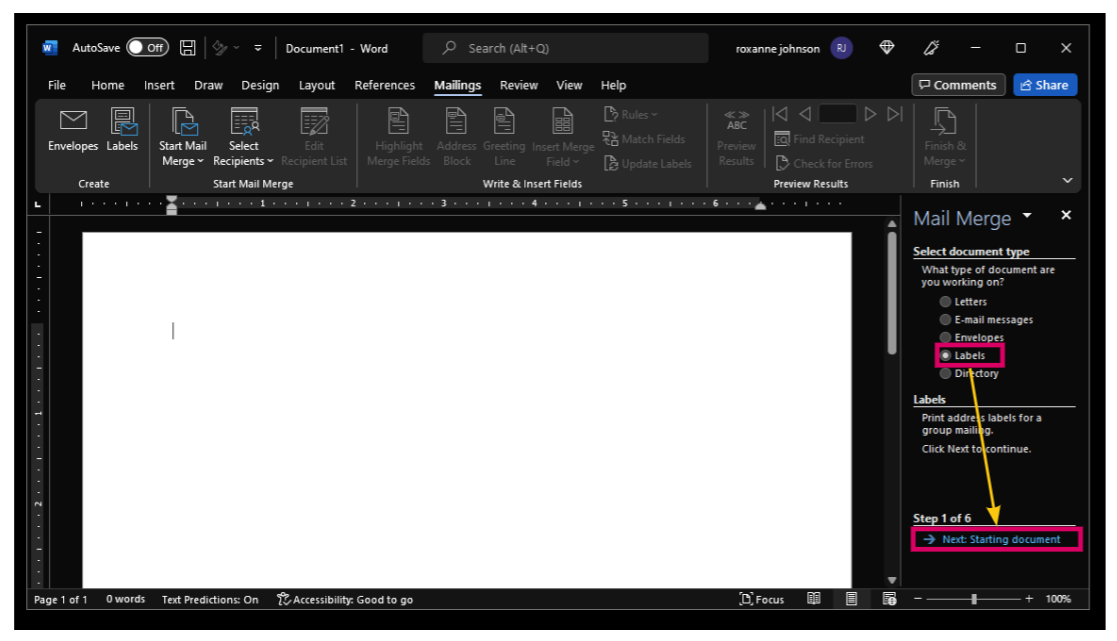
Step 1 - Select Document Type
- Choose the type of document you want to create.
- For example, select "Labels".
- Click "Next: Starting document" to move to Step 2.
Step 2 - Select Starting Document
-
Choose how you want to set up your mailing labels.
For example:
- Click "Label options" and select the labels that you purchased.
- Select "Avery® US Letter – 15661 Easy Peel Address Labels" (Make sure the label you use is at least 1 inch x 3.5 inches.).
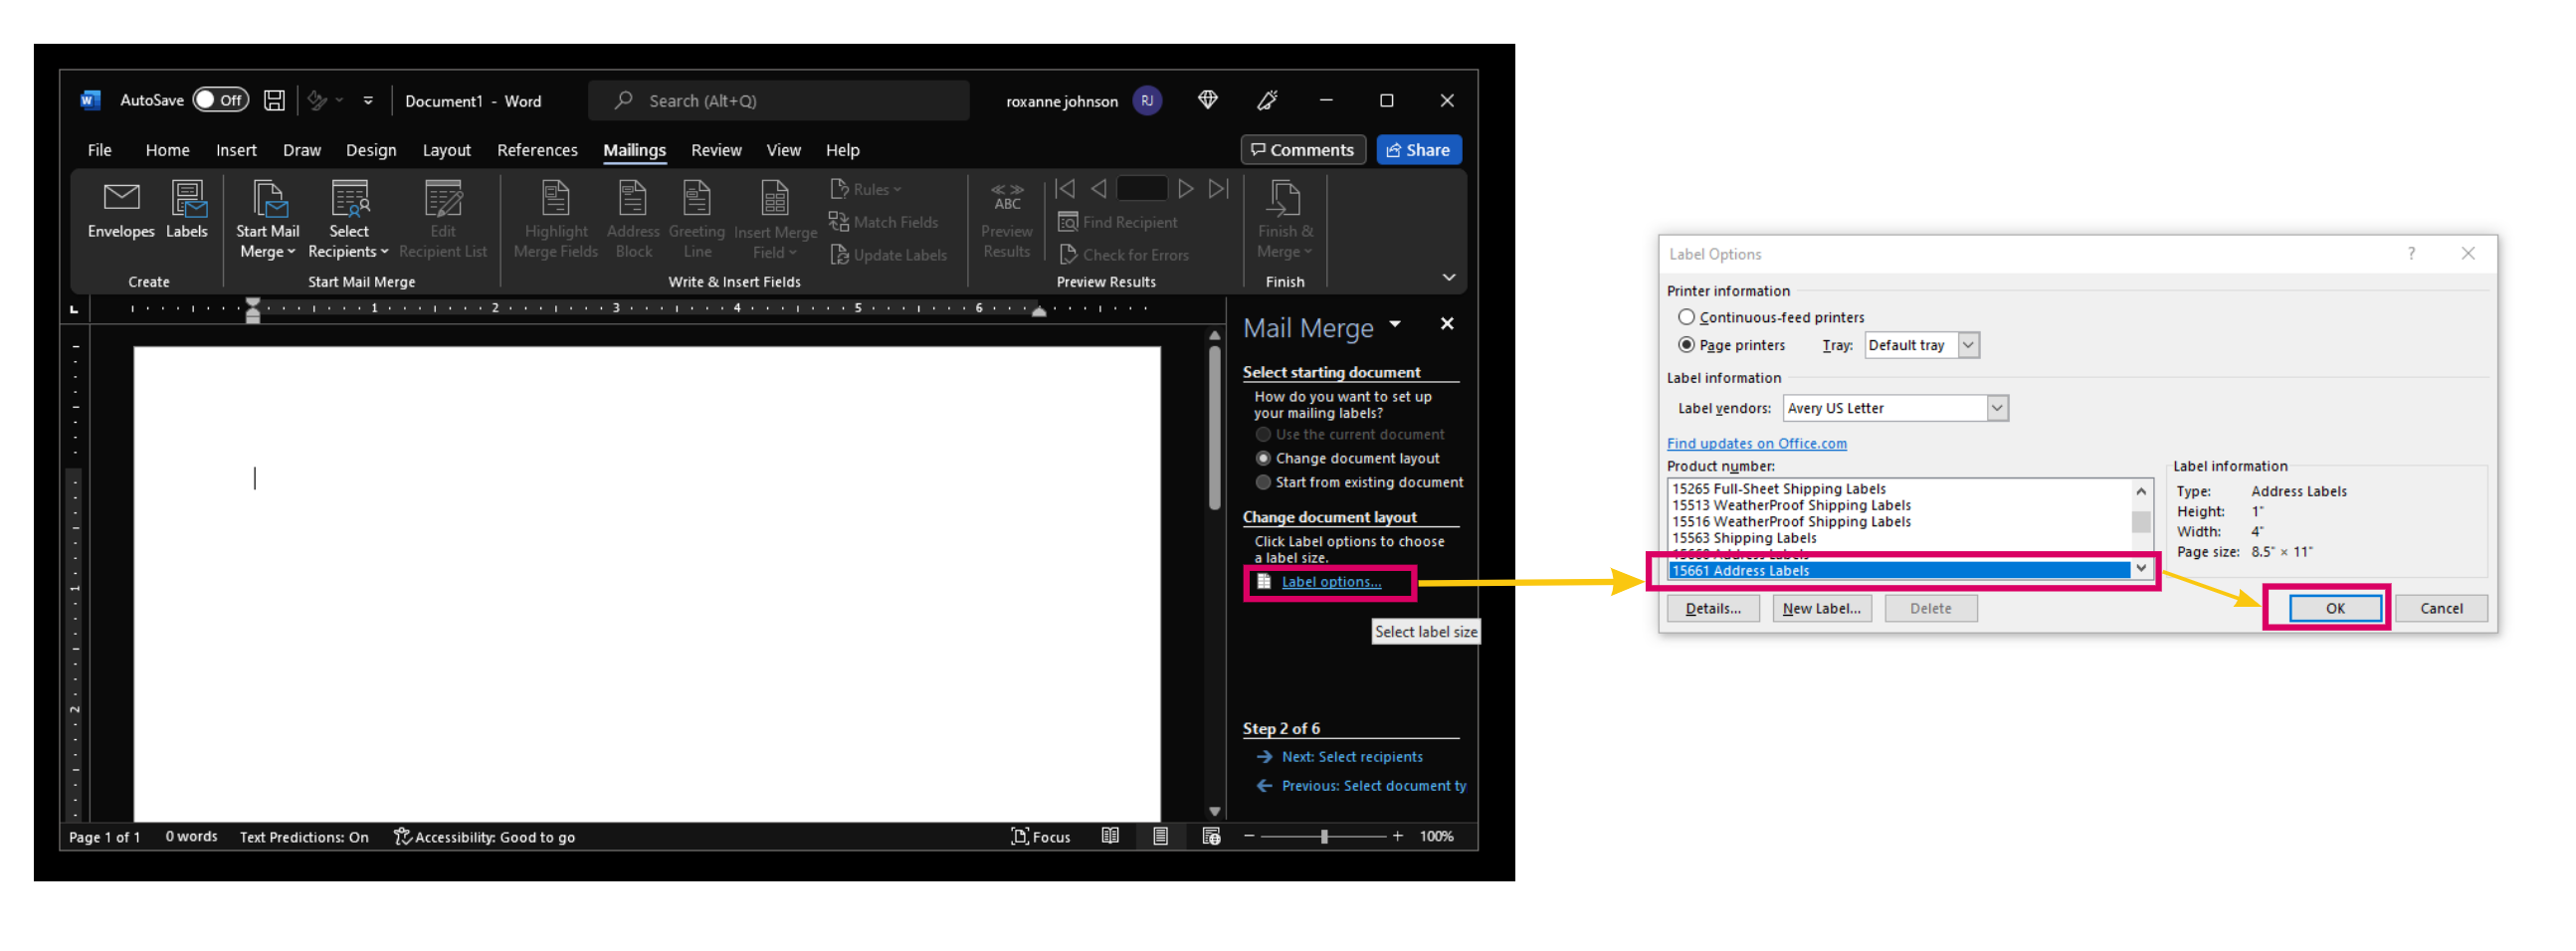
- Click "Next: Select recipients to move to Step 3".
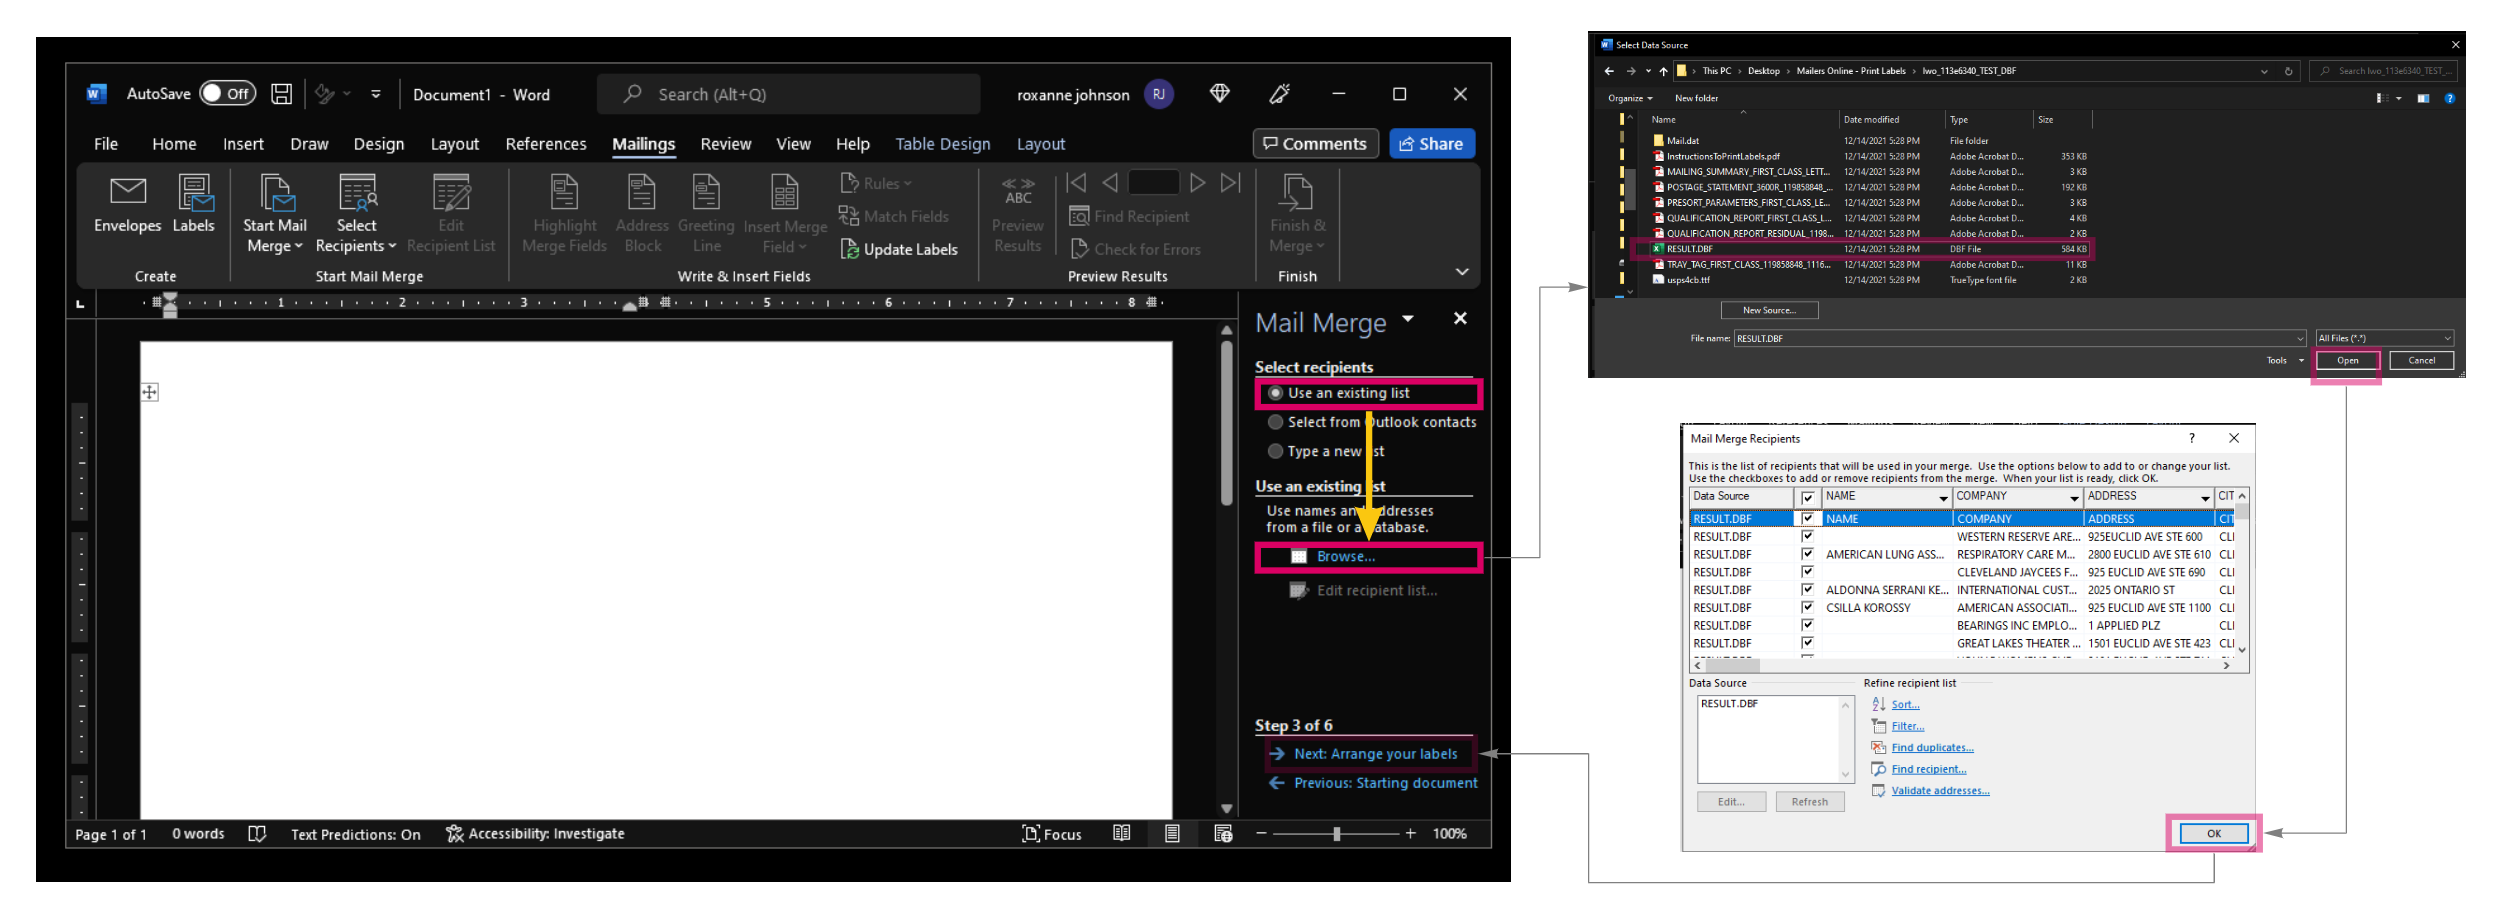
Step 3 - Select Recipients
- Select "Use an existing List"
- Click "Browse".
- Open the Results file from the recently extracted Mailers Online folder.
- Click "OK".
- Click "Next: Arrange Your Labels".
Step 4 - Add Database Fields and Format Barcode
- Add Database Fields by selecting "More Items" under Arrange your Labels.
- Select Insert: "Database Fields".
- Add each Field needed for Labels, in order. Spacing can be adjusted after the desired fields are added.
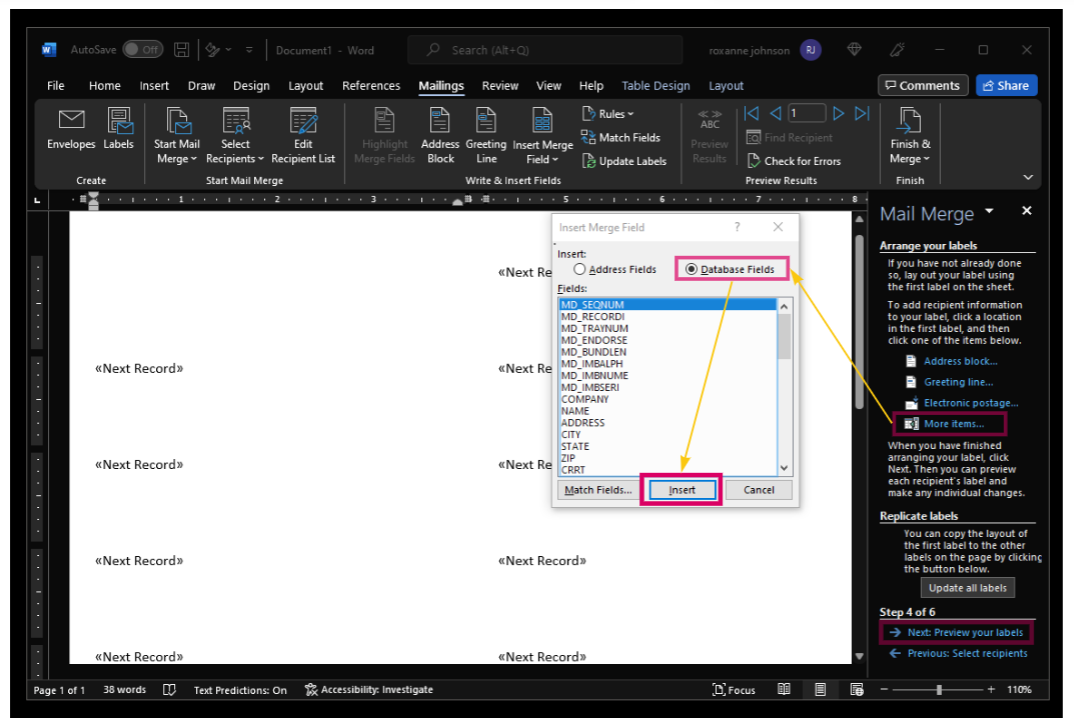

- Once you add all your fields, click "Close".
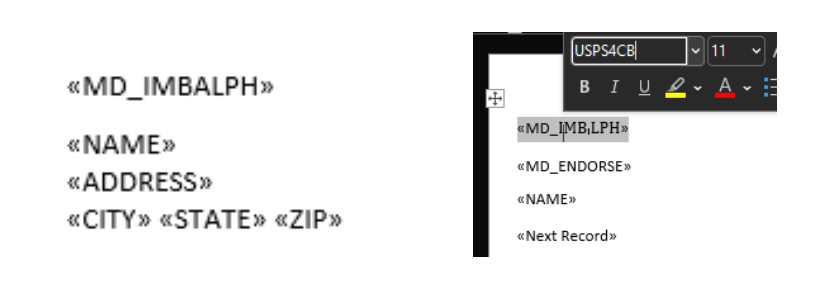
- Add the spaces and separate each address line. Example 1:
- All mail claimed at automation prices must bear an Intelligent Mail barcode in either the Address Block or the Barcode Clear Zone.
- If mail piece weighs more than 3 ounces, the barcode must be included in the Address Block.
- Format the Intelligent Mail Barcode by highlighting the "MD_IMBALPH" or "MD_IMBAlphaCode" field, then right-click and change font to "USPS4CB" and size to "16".
- Click "OK" or press Enter.
- Click "Update All Labels".
- Click "Next: Complete the Merge".
«MD_IMBAlphaCode»
«MD_Endorsement»
«MD_NameFirst» «MD_NameLast»
«MD_Address1»
«MD_City» «MD_State» «MD_PostalCode»-«MD_Plus4»
Example 2:
«MD_IMBAlphaCode»
«MD_NameFirst» «MD_NameLast»
«MD_Address1» «MD_Suite»
«MD_City» «MD_State» «MD_PostalCode»-«MD_Plus4»
An Intelligent Mail barcode is required to claim automation prices.
«MD_IMBAlphaCode»
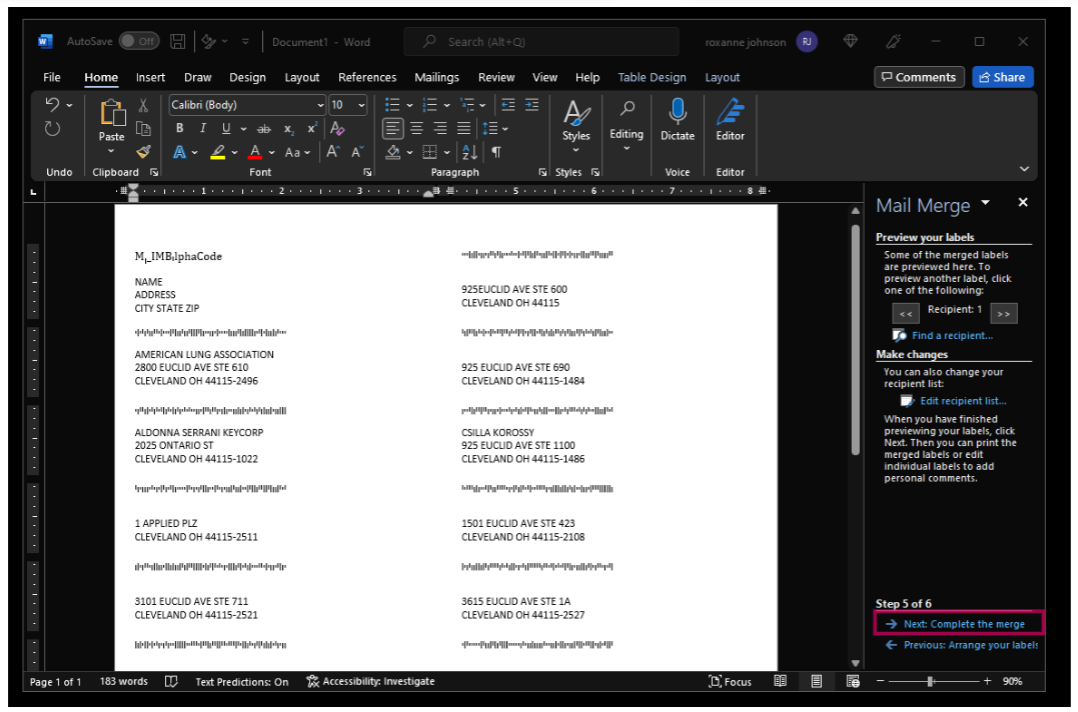
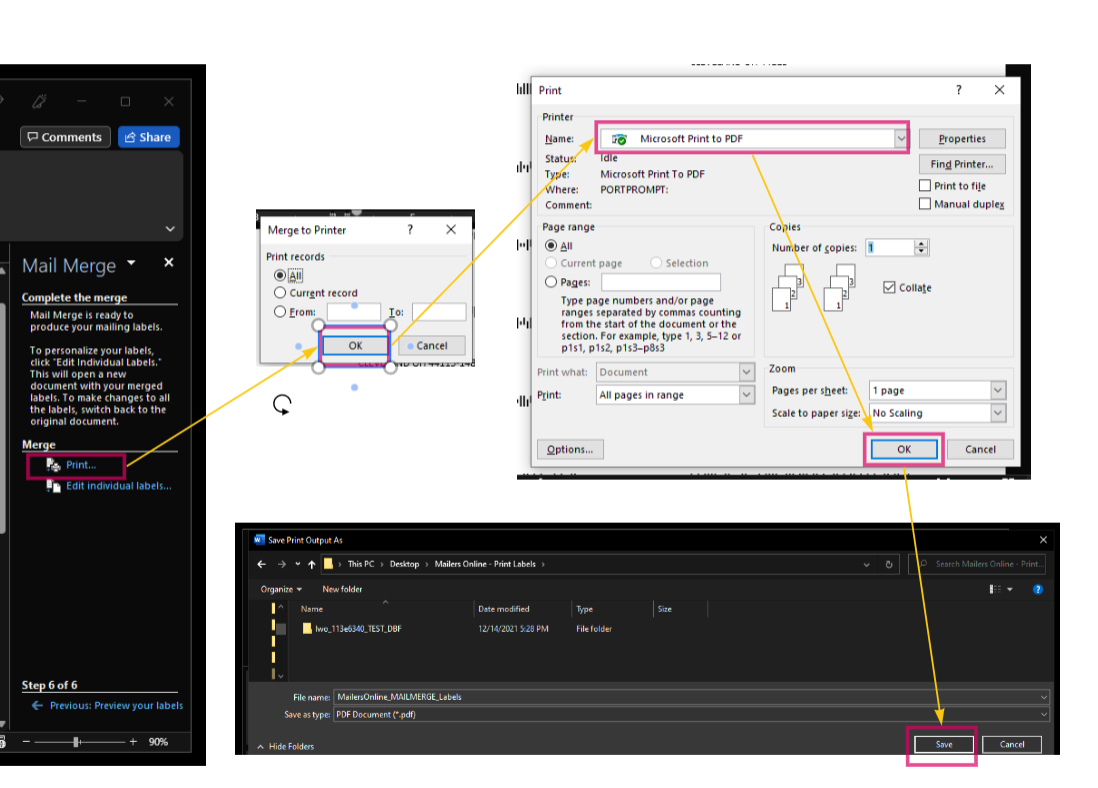
Step 5 - Complete the Merge & Print Labels
-
For example:
- Click "Print".
- Select Print Records: "All" options and click "OK".
- Select Printer Name: "Microsoft Print to PDF" and click "OK".
- Enter File Name to save as and click "Save".