Difference between revisions of "Salesforce:Express Entry Component"
Jump to navigation
Jump to search
(Created page with "{{ListwareForSalesforceNav}} {{CustomTOC}} Listware provides an Express Entry component that integrates address auto completion virtually on any text field within Salesforce...") |
|||
| Line 3: | Line 3: | ||
{{CustomTOC}} | {{CustomTOC}} | ||
Listware provides an | Listware provides an ExpressEntry component that integrates address auto completion within Salesforce. To begin installing this component, access your Setup menu. | ||
Here’s a guide to find this within Salesforce: https://help.salesforce.com/HTViewHelpDoc?id=basics_nav_setup.htm&language=en_US | Here’s a guide to find this within Salesforce: https://help.salesforce.com/HTViewHelpDoc?id=basics_nav_setup.htm&language=en_US | ||
[[File: | ==Method #1 – Override New/Edit Actions== | ||
#In Setup, go to Customize -> Contacts -> Buttons, Links, and Actions: | |||
#:[[File:LWS_ExpressEntry_Method1Step1.png|frame|none|Customize > Contacts > Buttons, Links, and Actions]] | |||
#Click the blue Edit link next to New in the Label column: | |||
#:[[File:LWS_ExpressEntry_Method1Step2.png|frame|none|Edit link]] | |||
#Next to Override With, select Visualforce Page and then select MD_expressContactEdit from the dropdown: | |||
#:[[File:LWS_ExpressEntry_Method1Step3.png|frame|none|Select MD_expressContactEdit]] | |||
#:Click Save. You can also repeat steps 2 & 3 for the Edit action. | |||
#Create a new contact in Salesforce. When creating a new contact, ensure that you see apex/MD_expressContactEdit somewhere in your URL to make sure that the Visualforce page selected in step 3 is being used. | |||
#:For example: | |||
#:[[File:LWS_ExpressEntry_Method1Step4.png|frame|none|Create a new contact]] | |||
#On the New contact page, we will now begin mapping the fields on this page. To map in the Mailing address fields, start off by getting the ID’s of each input element. Getting the ID’s will differ between browsers. As an example, in Chrome you can right click on the text field then click on Inspect element. This will bring up a panel in Chrome where you can find the id (id=”….) in the selected element: | |||
#:[[File:LWS_ExpressEntry_Method1Step5.png|frame|none|Inspect Element]] | |||
#On a separate browser window or tab, go to the tab '''Listware Express Entry Maps''' and then click on the '''New''' button to create a new Express Entry map: | |||
#:[[File:LWS_ExpressEntry_Method1Step6.png|frame|none|Listware Express Entry Maps]] | |||
#On the Express Entry Map Edit page, give the new mapping a name (something like Contact MailingStreet) and then for Object Prefix enter in apex. For the street, city, state, zip & country fields, copy and paste in the id’s that you’ve extracted from the other browser tab/window as detailed back in step 5. Save the mapping when finished: | |||
#:[[File:LWS_ExpressEntry_Method1Step7.png|frame|none|Contact MailingStreet]] | |||
#After saving the mapping, if you now reload the new contact page or create a new contact, clicking on the Mailing Street field will now auto populate the Mailing Country field with the default country specified in Listware Administration->Express Entry->Default country. Typing in the Mailing Street field will return suggestions based on the country entered in the Mailing Country field. Double clicking on the street field will clear out input fields. If this all works, then you have set up Express Entry successfully. For the Contact object, you can create a new Express Entry map for the Other address fields. Simply just follow the same steps that was done in this tutorial for the Mailing address fields. | |||
2 | ==Method #2 – Add component to page layout== | ||
If overriding the New/Edit actions of your objects is not a viable option, the other method is to add an Express Entry component in to your Salesforce object’s page layout (what you see when you view the record). Using the Contact object as an example: | |||
[[File: | #In Setup, go to Customize -> Contacts ->Page Layouts: | ||
#:[[File:LWS_ExpressEntry_Method2Step1.png|frame|none|Customize > Contacts > Page Layouts]] | |||
#Edit the page layout that you want to add the Express Entry component to: | |||
#:[[File:LWS_ExpressEntry_Method2Step2.png|frame|none|Edit the page layout]] | |||
#On the '''Edit Page Layout''' page, you’ll most likely want to create a new 1-Column Visualforce Page section in your page layout to contain the ExpressEntry component: | |||
#:[[File:LWS_ExpressEntry_Method2Step3.png|frame|none|Create a new 1-Column Visualforce Page]] | |||
#From the Visualforce Pages category, drag and drop MD_expressEntry to the new section created in the previous step: | |||
#:[[File:LWS_ExpressEntry_Method2Step4.png|frame|none|Drag and drop MD_expressEntry]] | |||
#:Save the page layout. | |||
#On a separate browser window or tab, go to the tab '''Listware Express Entry Maps''' and then click on the '''New''' button to create a new Express Entry map: | |||
#:[[File:LWS_ExpressEntry_Method2Step5.png|frame|none|Listware Express Entry Maps]] | |||
#The Visualforce page that we added into the page layout back in step 4 contains two instances of the Express Entry Visualforce component (one for Mailing and another for Other). Therefore, create two mappings as such depicted below: | |||
#;Contact Mailing | |||
#:[[File:LWS_ExpressEntry_Method2Step6-1.png|frame|none|Contact Mailing]] | |||
#;Contact Other | |||
#:[[File:LWS_ExpressEntry_Method2Step6-2.png|frame|none|Contact Other]] | |||
#After creating and saving both of these mappings, if you now view a Contact record the Express Entry components will now function: | |||
#:[[File:LWS_ExpressEntry_Method2Step7.png|frame|none|Express Entry Components]] | |||
==Mobile== | |||
ExpressEntry is also available as a Salesforce1 mobile component. Using the Contact object as an example: | |||
[[File: | #Under Salesforce’s setup menu, go to Customize -> Contacts -> Page Layouts: | ||
#:[[File:LWS_ExpressEntry_MobileStep1.png|frame|none|Page Layouts]] | |||
#Edit the page layout that you want to add the Express Entry mobile component to: | |||
#:[[File:LWS_ExpressEntry_MobileStep2.png|frame|none|Contact Page Layouts]] | |||
#Go to the '''Buttons''' category and drag and drop '''ExpressEntry Mobile''' into the '''Custom Buttons''' section. Save the changes made to the layout: | |||
[[File: | #:[[File:LWS_ExpressEntry_MobileStep3.png|frame|none|Buttons > ExpressEntry Mobile]] | ||
#On a separate browser window or tab, go to the tab '''Listware Express Entry Maps''' and then click on the '''New''' button to create a new Express Entry map: | |||
#:[[File:LWS_ExpressEntry_MobileStep4.png|frame|none|Listware Express Entry Maps]] | |||
#The Visualforce page that we added into the page layout back in step 4 contains two instances of the Express Entry Visualforce component (one for Mailing and another for Other). Therefore, create two mappings as such depicted below: | |||
#;Contact Mailing | |||
[[File: | #:[[File:LWS_ExpressEntry_MobileStep5-1.png|frame|none|Contact Mailing]] | ||
#;Contact Other | |||
#:[[File:LWS_ExpressEntry_MobileStep5-2.png|frame|none|Contact Other]] | |||
#Go into Salesforce1 and try viewing a Contact. You will now see ExpressEntry mobile as one of the buttons available for Contacts: | |||
#:[[File:LWS_ExpressEntry_MobileStep6.png|frame|none|ExpressEntry Mobile Contacts]] | |||
#Clicking on the button will bring up the ExpressEntry component which you can then begin to type an address into: | |||
[[File: | #:[[File:LWS_ExpressEntry_MobileStep7.png|frame|none|ExpressEntry Mobile]] | ||
[[File: | |||
[[File: | |||
[[File: | |||
[[Category:Listware for Salesforce]] | [[Category:Listware for Salesforce]] | ||
Revision as of 18:02, 4 November 2015
← Clean Suite for CRM:Salesforce
Listware provides an ExpressEntry component that integrates address auto completion within Salesforce. To begin installing this component, access your Setup menu.
Here’s a guide to find this within Salesforce: https://help.salesforce.com/HTViewHelpDoc?id=basics_nav_setup.htm&language=en_US
Method #1 – Override New/Edit Actions
- In Setup, go to Customize -> Contacts -> Buttons, Links, and Actions:
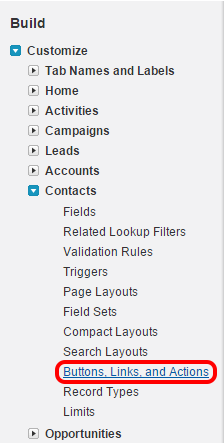 Customize > Contacts > Buttons, Links, and Actions
- Click the blue Edit link next to New in the Label column:
 Edit link
- Next to Override With, select Visualforce Page and then select MD_expressContactEdit from the dropdown:
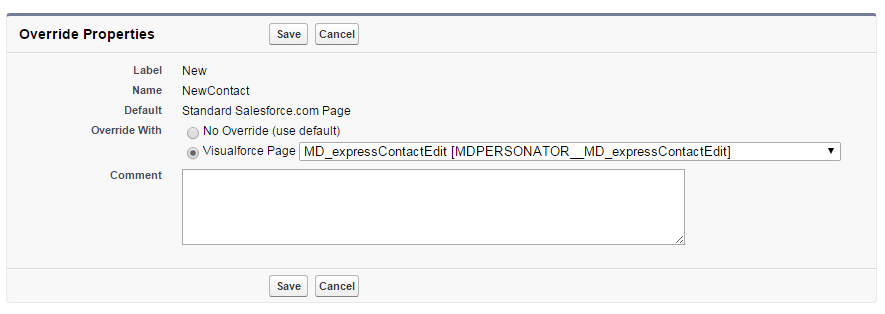 Select MD_expressContactEdit
- Click Save. You can also repeat steps 2 & 3 for the Edit action.
- Create a new contact in Salesforce. When creating a new contact, ensure that you see apex/MD_expressContactEdit somewhere in your URL to make sure that the Visualforce page selected in step 3 is being used.
- For example:
 Create a new contact
- On the New contact page, we will now begin mapping the fields on this page. To map in the Mailing address fields, start off by getting the ID’s of each input element. Getting the ID’s will differ between browsers. As an example, in Chrome you can right click on the text field then click on Inspect element. This will bring up a panel in Chrome where you can find the id (id=”….) in the selected element:
 Inspect Element
- On a separate browser window or tab, go to the tab Listware Express Entry Maps and then click on the New button to create a new Express Entry map:
 Listware Express Entry Maps
- On the Express Entry Map Edit page, give the new mapping a name (something like Contact MailingStreet) and then for Object Prefix enter in apex. For the street, city, state, zip & country fields, copy and paste in the id’s that you’ve extracted from the other browser tab/window as detailed back in step 5. Save the mapping when finished:
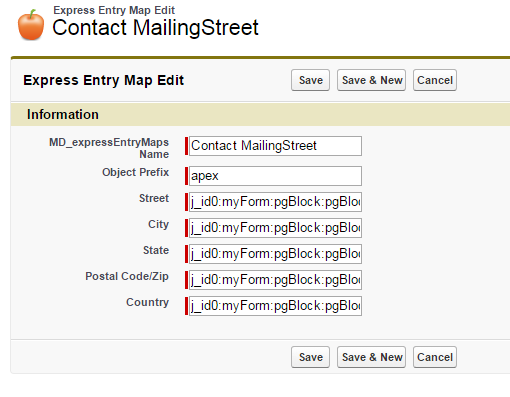 Contact MailingStreet
- After saving the mapping, if you now reload the new contact page or create a new contact, clicking on the Mailing Street field will now auto populate the Mailing Country field with the default country specified in Listware Administration->Express Entry->Default country. Typing in the Mailing Street field will return suggestions based on the country entered in the Mailing Country field. Double clicking on the street field will clear out input fields. If this all works, then you have set up Express Entry successfully. For the Contact object, you can create a new Express Entry map for the Other address fields. Simply just follow the same steps that was done in this tutorial for the Mailing address fields.


Method #2 – Add component to page layout
If overriding the New/Edit actions of your objects is not a viable option, the other method is to add an Express Entry component in to your Salesforce object’s page layout (what you see when you view the record). Using the Contact object as an example:
- In Setup, go to Customize -> Contacts ->Page Layouts:
 Customize > Contacts > Page Layouts
- Edit the page layout that you want to add the Express Entry component to:
 Edit the page layout
- On the Edit Page Layout page, you’ll most likely want to create a new 1-Column Visualforce Page section in your page layout to contain the ExpressEntry component:
 Create a new 1-Column Visualforce Page
- From the Visualforce Pages category, drag and drop MD_expressEntry to the new section created in the previous step:
 Drag and drop MD_expressEntry
- Save the page layout.
- On a separate browser window or tab, go to the tab Listware Express Entry Maps and then click on the New button to create a new Express Entry map:
 Listware Express Entry Maps
- The Visualforce page that we added into the page layout back in step 4 contains two instances of the Express Entry Visualforce component (one for Mailing and another for Other). Therefore, create two mappings as such depicted below:
- Contact Mailing
 Contact Mailing
- Contact Other
 Contact Other
- After creating and saving both of these mappings, if you now view a Contact record the Express Entry components will now function:
 Express Entry Components


Mobile
ExpressEntry is also available as a Salesforce1 mobile component. Using the Contact object as an example:
- Under Salesforce’s setup menu, go to Customize -> Contacts -> Page Layouts:
 Page Layouts
- Edit the page layout that you want to add the Express Entry mobile component to:
 Contact Page Layouts
- Go to the Buttons category and drag and drop ExpressEntry Mobile into the Custom Buttons section. Save the changes made to the layout:
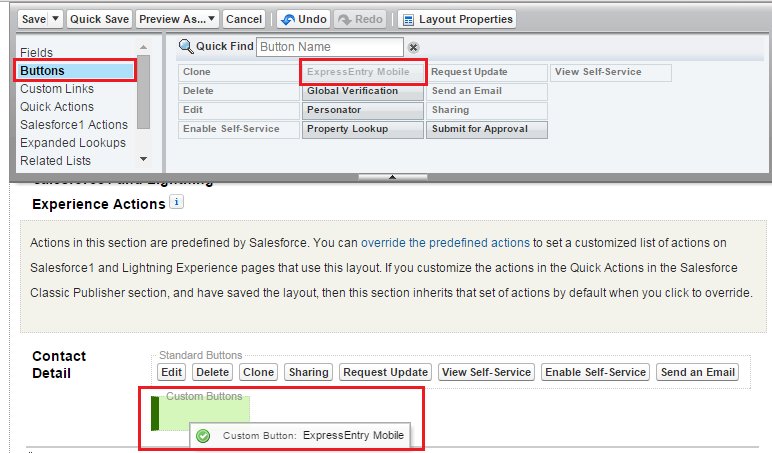 Buttons > ExpressEntry Mobile
- On a separate browser window or tab, go to the tab Listware Express Entry Maps and then click on the New button to create a new Express Entry map:
 Listware Express Entry Maps
- The Visualforce page that we added into the page layout back in step 4 contains two instances of the Express Entry Visualforce component (one for Mailing and another for Other). Therefore, create two mappings as such depicted below:
- Contact Mailing
 Contact Mailing
- Contact Other
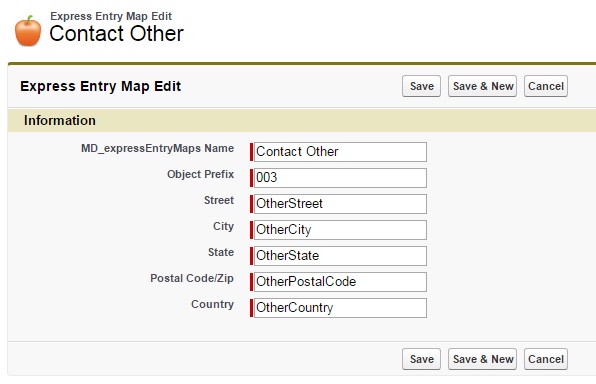 Contact Other
- Go into Salesforce1 and try viewing a Contact. You will now see ExpressEntry mobile as one of the buttons available for Contacts:
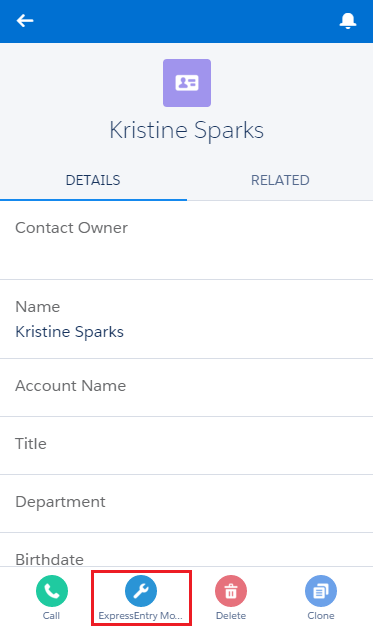 ExpressEntry Mobile Contacts
- Clicking on the button will bring up the ExpressEntry component which you can then begin to type an address into:
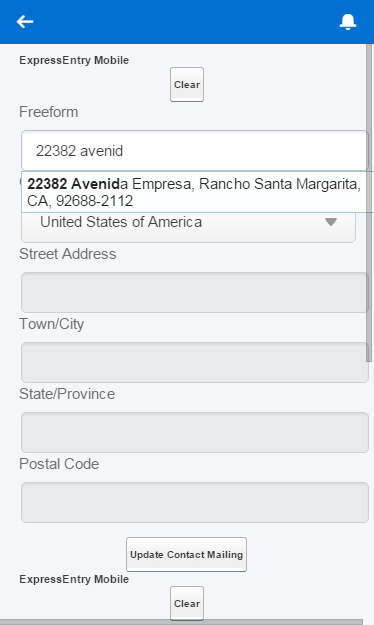 ExpressEntry Mobile


