Difference between revisions of "Salesforce:Getting Started"
| Line 3: | Line 3: | ||
==Package Installation== | ==Package Installation== | ||
Once you choose to install Listware for Salesforce, you will be directed to the Package Installation Details page. This page displays the package name, publisher, and description. | Once you choose to install Listware for Salesforce, you will be directed to the Package Installation Details page. This page displays the package name, publisher, and description. | ||
1. Click the '''Continue''' Button | 1. Click the '''Continue''' Button | ||
[[File:ListwareSalesforce_GS_01_PackageInstallation.png|frame|none|Begin Package Installation]] | [[File:ListwareSalesforce_GS_01_PackageInstallation.png|frame|none|Begin Package Installation]] | ||
===Approve Third-Party Access=== | ===Approve Third-Party Access=== | ||
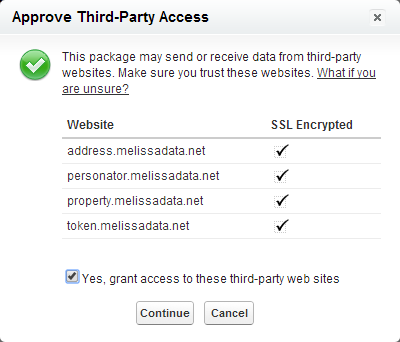
Listware for Salesforce needs access to certain web sites. This page asks for your permission to allow Listware access. | Listware for Salesforce needs access to certain web sites. This page asks for your permission to allow Listware access. | ||
2. Be sure to check "Yes, grant access to these third-party web sites" and click '''Continue'''. | 2. Be sure to check "Yes, grant access to these third-party web sites" and click '''Continue'''. | ||
[[File:ListwareSalesforce_GS_02_ApproveAccess.png|frame|none|Approve Third-Party Access]] | [[File:ListwareSalesforce_GS_02_ApproveAccess.png|frame|none|Approve Third-Party Access]] | ||
===Approve Package API Access=== | ===Approve Package API Access=== | ||
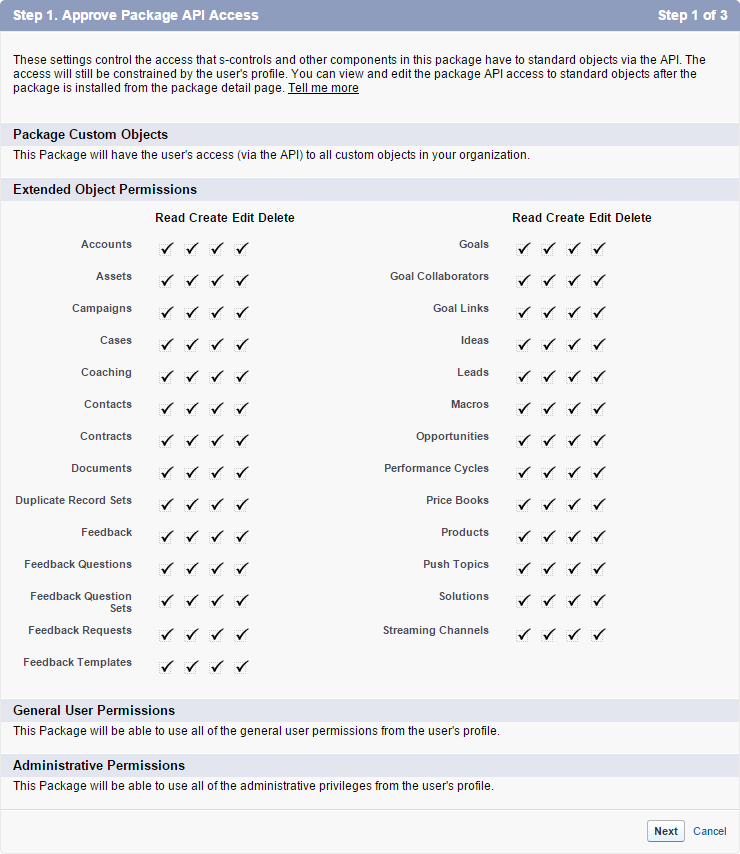
For Listware to function, it needs access to selected objects in the API. | For Listware to function, it needs access to selected objects in the API. | ||
3.Click '''Next''' to approve access and continue. | 3.Click '''Next''' to approve access and continue. | ||
[[File:ListwareSalesforce_GS_03_Permissions.png|frame|none|Approve Package API Access]] | [[File:ListwareSalesforce_GS_03_Permissions.png|frame|none|Approve Package API Access]] | ||
===Choose Security Level=== | ===Choose Security Level=== | ||
You may choose the sercurity level for who will have access to Listware for Salesforce here. | You may choose the sercurity level for who will have access to Listware for Salesforce here. | ||
4. Select a Security level and click '''Next'''. | 4. Select a Security level and click '''Next'''. | ||
[[File:ListwareSalesforce_GS_04_Security.png|frame|none|Choose Security Level]] | [[File:ListwareSalesforce_GS_04_Security.png|frame|none|Choose Security Level]] | ||
===Install the Package=== | ===Install the Package=== | ||
| Line 33: | Line 41: | ||
[[File:ListwareSalesforce_GS_05_Install.PNG|frame|none|Install the Package]] | [[File:ListwareSalesforce_GS_05_Install.PNG|frame|none|Install the Package]] | ||
====Wait for Installation==== | ====Wait for Installation==== | ||
| Line 38: | Line 47: | ||
[[File:ListwareSalesforce_GS_06_Processing.png|frame|none|Wait for Installation]] | [[File:ListwareSalesforce_GS_06_Processing.png|frame|none|Wait for Installation]] | ||
==Setup Listware for Salesforce== | ==Setup Listware for Salesforce== | ||
To begin using Listware for Salesforce, you must first complete a few simple setup steps. | To begin using Listware for Salesforce, you must first complete a few simple setup steps. | ||
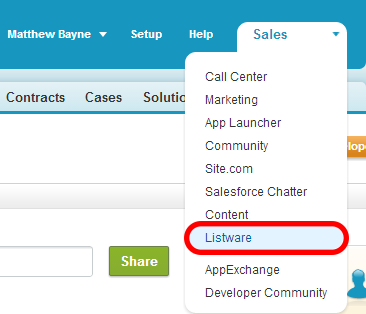
1. Select Listware from the Sales drop-down menu. | 1. Select Listware from the Sales drop-down menu. | ||
[[File:ListwareSalesforce_GS_07_NewApp.png|frame|none|Select Listware]] | [[File:ListwareSalesforce_GS_07_NewApp.png|frame|none|Select Listware]] | ||
===Enter a License String=== | ===Enter a License String=== | ||
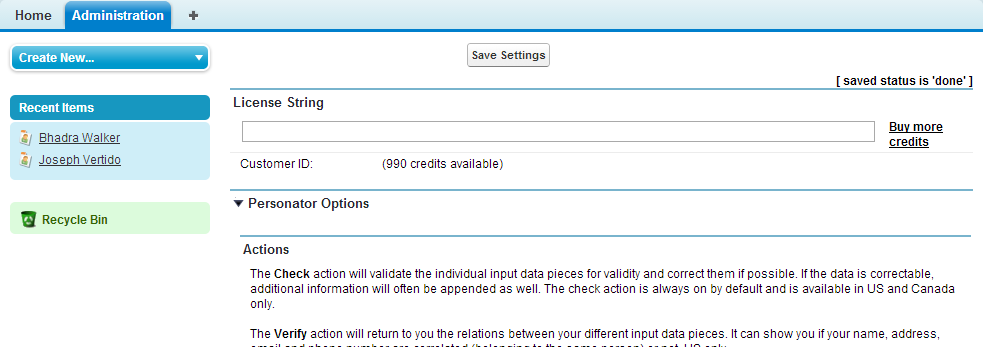
For Listware for Salesforce to work, you need a valid license string from Melissa Data. | For Listware for Salesforce to work, you need a valid license string from Melissa Data. | ||
You should have received one in your email from Melissa Data. If you did not receive a license string from Melissa Data please [[Support|contact us]]. | You should have received one in your email from Melissa Data. If you did not receive a license string from Melissa Data please [[Support|contact us]]. | ||
2. Enter your License String. Make sure to click '''Save Settings''' once you are done. | 2. Enter your License String. Make sure to click '''Save Settings''' once you are done. | ||
[[File:ListwareSalesforce_GS_08_LicenseString.png|frame|none|Enter a License String]] | [[File:ListwareSalesforce_GS_08_LicenseString.png|frame|none|Enter a License String]] | ||
===Modify your Contact Page Layout=== | ===Modify your Contact Page Layout=== | ||
To easily utilize Listware for Salesforce, you can add a button to your contact pages to quickly verify your data. | To easily utilize Listware for Salesforce, you can add a button to your contact pages to quickly verify your data. | ||
3. Select '''Page Layouts''' under Build > Customize > Contacts. | 3. Select '''Page Layouts''' under Build > Customize > Contacts. | ||
[[File:ListwareSalesforce_GS_09_AppSetup.png|frame|none|Select Page Layouts]] | [[File:ListwareSalesforce_GS_09_AppSetup.png|frame|none|Select Page Layouts]] | ||
====Edit the Contact Layout==== | ====Edit the Contact Layout==== | ||
| Line 65: | Line 81: | ||
[[File:ListwareSalesforce_GS_10_ContactLayout.png|frame|none|Edit the Contact Layout]] | [[File:ListwareSalesforce_GS_10_ContactLayout.png|frame|none|Edit the Contact Layout]] | ||
====Add a Button==== | ====Add a Button==== | ||
| Line 72: | Line 89: | ||
[[File:ListwareSalesforce_GS_11_DragNDrop.png|frame|none|Add a Button]] | [[File:ListwareSalesforce_GS_11_DragNDrop.png|frame|none|Add a Button]] | ||
==Use Listware for Salesforce== | ==Use Listware for Salesforce== | ||
To use Listware for Salesforce: | To use Listware for Salesforce: | ||
1. Navigate to a contact page. | 1. Navigate to a contact page. | ||
===Click the Added Button=== | ===Click the Added Button=== | ||
| Line 82: | Line 102: | ||
[[File:ListwareSalesforce_GS_12_ButtonExample.png|frame|none|Click the Added Button]] | [[File:ListwareSalesforce_GS_12_ButtonExample.png|frame|none|Click the Added Button]] | ||
===Click the Action Button=== | ===Click the Action Button=== | ||
Revision as of 17:41, 30 April 2014
Package Installation
Once you choose to install Listware for Salesforce, you will be directed to the Package Installation Details page. This page displays the package name, publisher, and description.
1. Click the Continue Button
Approve Third-Party Access
Listware for Salesforce needs access to certain web sites. This page asks for your permission to allow Listware access.
2. Be sure to check "Yes, grant access to these third-party web sites" and click Continue.
Approve Package API Access
For Listware to function, it needs access to selected objects in the API.
3.Click Next to approve access and continue.
Choose Security Level
You may choose the sercurity level for who will have access to Listware for Salesforce here.
4. Select a Security level and click Next.
Install the Package
5. Select Install to install the Listware for Salesforce package.
Wait for Installation
Depending on Salesforce, the installation process may take awhile. Salesforce will email you once installation is complete.
Setup Listware for Salesforce
To begin using Listware for Salesforce, you must first complete a few simple setup steps.
1. Select Listware from the Sales drop-down menu.
Enter a License String
For Listware for Salesforce to work, you need a valid license string from Melissa Data. You should have received one in your email from Melissa Data. If you did not receive a license string from Melissa Data please contact us.
2. Enter your License String. Make sure to click Save Settings once you are done.
Modify your Contact Page Layout
To easily utilize Listware for Salesforce, you can add a button to your contact pages to quickly verify your data.
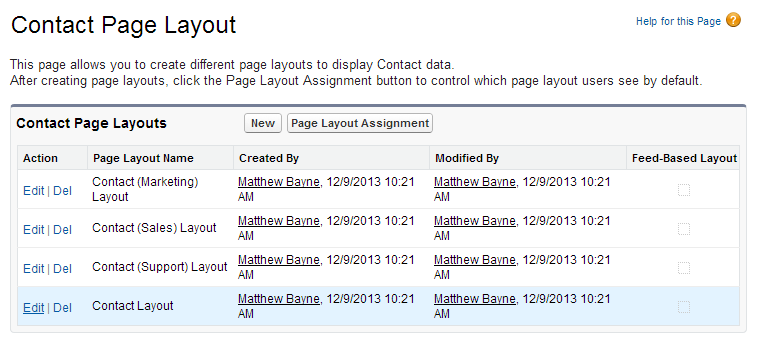
3. Select Page Layouts under Build > Customize > Contacts.
Edit the Contact Layout
4. Select Edit for the Contact Layout.
Add a Button
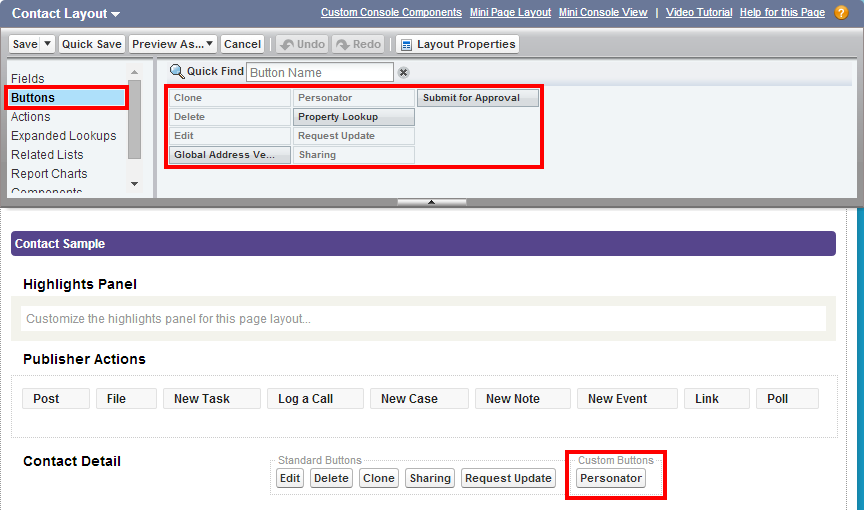
5. Select Buttons in the left column. 6. Choose which button you want. 7. Drag and drop your desired button to the Custom Buttons section.
Use Listware for Salesforce
To use Listware for Salesforce:
1. Navigate to a contact page.
Click the Added Button
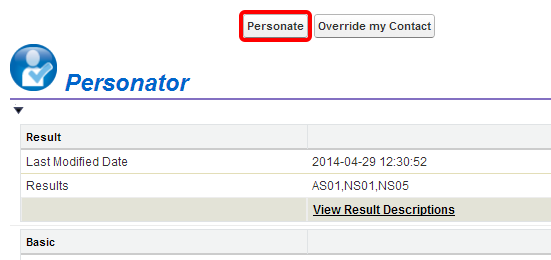
2. Click the button you added.
Click the Action Button
3. Click the action button to verify your data.

