Difference between revisions of "Salesforce:Lightning Quick Actions"
Jump to navigation
Jump to search
m (Admin moved page Salesforce:Lightning Components to Salesforce:Lightning Quick Actions without leaving a redirect) |
|||
| (One intermediate revision by the same user not shown) | |||
| Line 1: | Line 1: | ||
{{ListwareForSalesforceNav | |||
|LightningCollapse= | |||
}} | |||
{{CustomTOC}} | {{CustomTOC}} | ||
| Line 15: | Line 18: | ||
<li>Select '''Buttons, Links, and Actions''' and click '''New Action'''.</li> | <li>Select '''Buttons, Links, and Actions''' and click '''New Action'''.</li> | ||
[[File:ListwareSalesforce_LQA_01_NewAction.png|frame|none|Click '''New Action''']] | [[File:ListwareSalesforce_LQA_01_NewAction.png|frame|none|alt=ListwareSalesforce LQA 01 - New Action - Melissa Wiki|Click '''New Action''']] | ||
<li>In the '''Action Type''' dropdown choose '''Lightning Component'''.</li> | <li>In the '''Action Type''' dropdown choose '''Lightning Component'''.</li> | ||
| Line 21: | Line 24: | ||
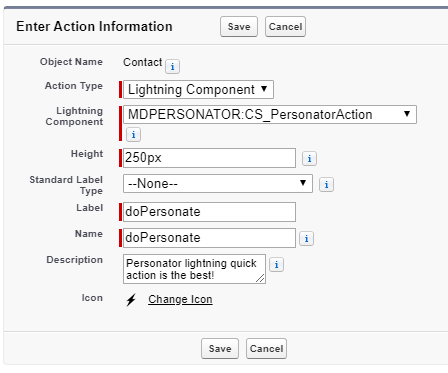
<li>In the '''Lightning Component''' dropdown set the component as desired. In this example, we are using Personator so we selected <code>MDPERSONATOR:CS_PersonatorAction</code>. Set Label, name, and description as desired. ''Note that the Label field is how the button will display to your users.'' Click '''Save''' when you are done.</li> | <li>In the '''Lightning Component''' dropdown set the component as desired. In this example, we are using Personator so we selected <code>MDPERSONATOR:CS_PersonatorAction</code>. Set Label, name, and description as desired. ''Note that the Label field is how the button will display to your users.'' Click '''Save''' when you are done.</li> | ||
[[File:ListwareSalesforce_LQA_02_SetupComponent.png|frame|none|Setup the component]] | [[File:ListwareSalesforce_LQA_02_SetupComponent.png|frame|none|alt=ListwareSalesforce LQA 02 - Setup Component - Melissa Wiki|Setup the component]] | ||
<li>Navigate back to the Object Manager and select the object we were working with again. In this example we select Contact because we are working with the Contact Object.</li> | <li>Navigate back to the Object Manager and select the object we were working with again. In this example we select Contact because we are working with the Contact Object.</li> | ||
| Line 27: | Line 30: | ||
<li>Select '''Page Layouts''' and choose the Layout you wish to modify.</li> | <li>Select '''Page Layouts''' and choose the Layout you wish to modify.</li> | ||
[[File:ListwareSalesforce_LQA_03_PageLayouts.png|frame|none|Select '''Page Layouts''']] | [[File:ListwareSalesforce_LQA_03_PageLayouts.png|frame|none|alt=ListwareSalesforce LQA 03 - Page Layouts - Melissa Wiki|Select '''Page Layouts''']] | ||
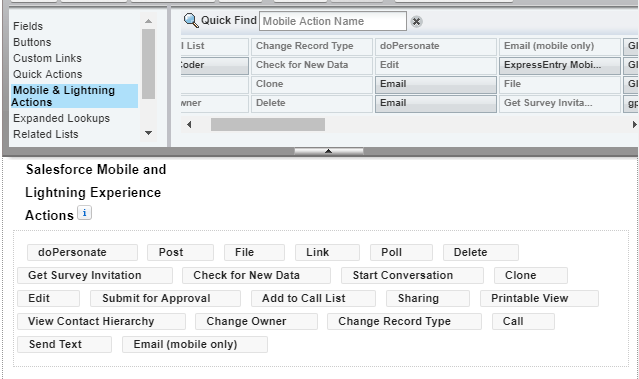
<li>In the Layout menu, select the '''Mobile & Lightning Actions''' category. Find the button we created in step #4 and drag it into the '''Salesforce Mobile and Lightning Experience Actions''' section as desired. When done, click '''Save''' at the top.</li> | <li>In the Layout menu, select the '''Mobile & Lightning Actions''' category. Find the button we created in step #4 and drag it into the '''Salesforce Mobile and Lightning Experience Actions''' section as desired. When done, click '''Save''' at the top.</li> | ||
[[File:ListwareSalesforce_LQA_04_Drag.png|frame|none|Drag to '''Salesforce Mobile and Lightning Experience Actions''']] | [[File:ListwareSalesforce_LQA_04_Drag.png|frame|none|alt=ListwareSalesforce LQA 04 - Drag - Melissa Wiki|Drag to '''Salesforce Mobile and Lightning Experience Actions''']] | ||
<li>Navigate to the object we just modified and confirm that our lightning quick action is available.</li> | <li>Navigate to the object we just modified and confirm that our lightning quick action is available.</li> | ||
[[File:ListwareSalesforce_LQA_05_Confirm.png|frame|none|Confirm Quick Action]] | [[File:ListwareSalesforce_LQA_05_Confirm.png|frame|none|alt=ListwareSalesforce LQA 05 - Confirm - Melissa Wiki|Confirm Quick Action]] | ||
</ol> | </ol> | ||
[[Category:Clean Suite for CRM:Salesforce]] | [[Category:Clean Suite for CRM:Salesforce]] | ||
Latest revision as of 18:18, 18 January 2022
← Clean Suite for CRM:Salesforce
Quick Actions
Quick actions allow CleanSuite users to quickly process single records on demand in one click of the mouse.
These actions are available for the following CleanSuite services: Personator, BusinessCoder, Global Address, Global Email, and Global Phone.
Set Up
Setting up quick actions is fast and easy.
- Start by navigating into Salesforce Setup, then head into the Object Manager and select the object you wish to add a Lightning Quick Action to. In this example we are using the Contact object.
- Select Buttons, Links, and Actions and click New Action.
- In the Action Type dropdown choose Lightning Component.
- In the Lightning Component dropdown set the component as desired. In this example, we are using Personator so we selected
MDPERSONATOR:CS_PersonatorAction. Set Label, name, and description as desired. Note that the Label field is how the button will display to your users. Click Save when you are done. - Navigate back to the Object Manager and select the object we were working with again. In this example we select Contact because we are working with the Contact Object.
- Select Page Layouts and choose the Layout you wish to modify.
- In the Layout menu, select the Mobile & Lightning Actions category. Find the button we created in step #4 and drag it into the Salesforce Mobile and Lightning Experience Actions section as desired. When done, click Save at the top.
- Navigate to the object we just modified and confirm that our lightning quick action is available.


