Difference between revisions of "Tutorial:Using SmartMover for Excel"
(Created page with "Getting Started SmartMover for Excel is a powerful tool that is quick and easy to use. This tutorial will guide you through a simple usage scenario, checking a list of address...") |
|||
| (9 intermediate revisions by the same user not shown) | |||
| Line 1: | Line 1: | ||
Getting Started | ==Getting Started== | ||
SmartMover for Excel is a powerful tool that is quick and easy to use. This tutorial will guide you through a simple usage scenario, checking a list of addresses against the NCOALink database. The sample screen shots for this tutorial are on Windows 7 with Microsoft Excel 2007. | SmartMover for Excel is a powerful tool that is quick and easy to use. This tutorial will guide you through a simple usage scenario, checking a list of addresses against the NCOALink database. The sample screen shots for this tutorial are on Windows 7 with Microsoft Excel 2007. | ||
Opening Excel | |||
Open Microsoft Excel. | |||
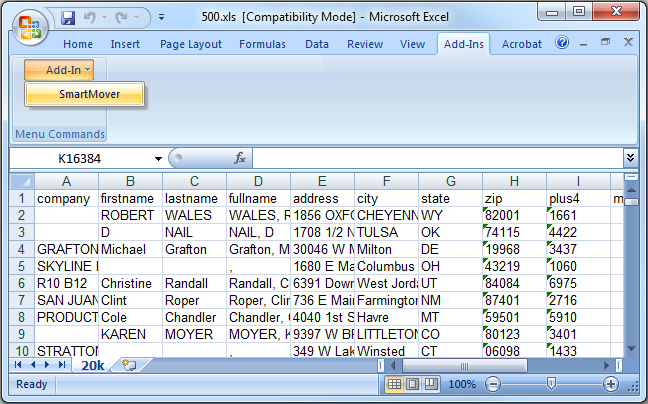
Open a database in Microsoft Excel. | ==Opening Excel== | ||
Click on the Add-Ins ribbon. | #Open '''Microsoft Excel'''. | ||
Select SmartMover from the Add-In drop-down menu. | #Open a '''database''' in Microsoft Excel. | ||
#Click on the '''Add-Ins''' ribbon. | |||
#Select '''SmartMover''' from the Add-In drop-down menu. | |||
[[File:TUT_SmartMover_Excel_01-02.jpg|600px]] | [[File:TUT_SmartMover_Excel_01-02.jpg|600px]] | ||
Starting with SmartMover | |||
==Starting with SmartMover== | |||
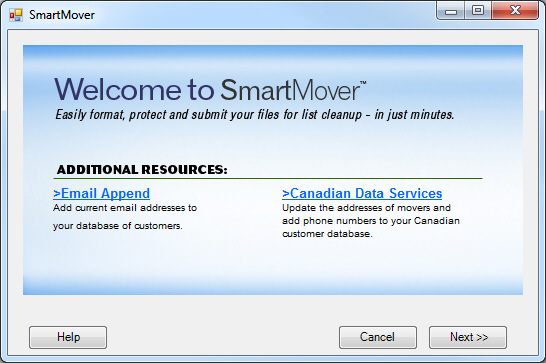
After selecting SmartMover from the Add-In drop-down menu, the Welcome to SmartMover screen will display. | After selecting SmartMover from the Add-In drop-down menu, the Welcome to SmartMover screen will display. | ||
Click Next. | #Click '''Next'''. | ||
[[File:TUT_SmartMover_Excel_01-03.jpg|546px]] | [[File:TUT_SmartMover_Excel_01-03.jpg|546px]] | ||
Entering your information | |||
Purchase Info Window | |||
==Entering your information== | |||
===Purchase Info Window=== | |||
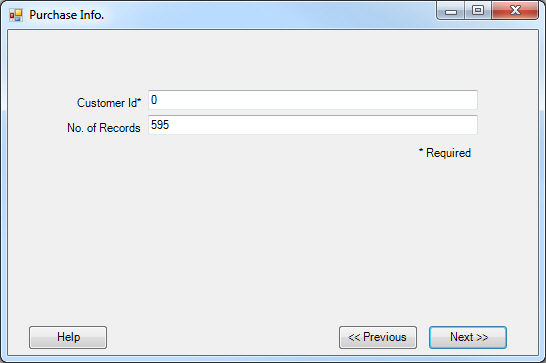
Next is the Purchase Info window. | Next is the Purchase Info window. | ||
Enter your | #Enter your '''License Key''' that was provided to you by your Customer Representative. | ||
Enter the Number of Records you will process. | #Enter the '''Number of Records''' you will process. | ||
Click Next. | #Click '''Next'''. | ||
[[File:TUT_SmartMover_Excel_01-04.jpg|546px]] | [[File:TUT_SmartMover_Excel_01-04.jpg|546px]] | ||
Contact Information Window | |||
===Contact Information Window=== | |||
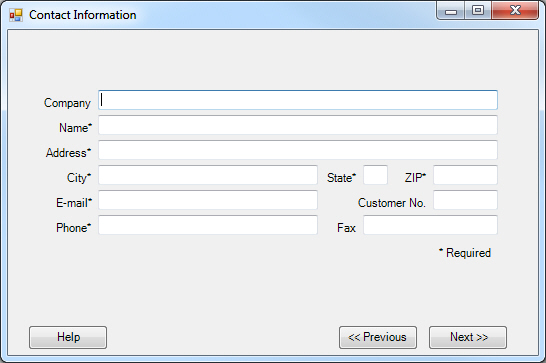
Next is the Contact Information Window. | Next is the Contact Information Window. | ||
Enter your contact information. | #'''Enter''' your contact information. | ||
Click Next. | #Click '''Next'''. | ||
[[File:TUT_SmartMover_Excel_01-05.jpg|546px]] | [[File:TUT_SmartMover_Excel_01-05.jpg|546px]] | ||
Choosing Your Settings | |||
Service Format Window | |||
==Choosing Your Settings== | |||
===Service Format Window=== | |||
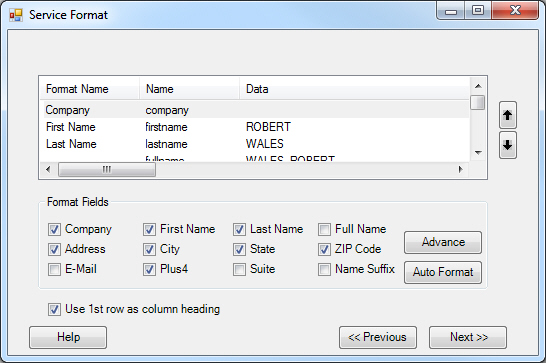
Next is the Service Format window. | Next is the Service Format window. | ||
This is where you will choose which fields are to be used in the operation. | <ol> | ||
If your database has the first row as a heading, you can check "Use 1st row as column heading" and then click Auto Format to have SmartMover detect which fields to use. | <li>This is where you will choose which fields are to be used in the operation.</li> | ||
It is important to note that you must use the First Name and Last Name fields, OR the Full Name field. Never use all three fields at the same time. | *If your database has the first row as a heading, you can check "Use 1st row as column heading" and then click Auto Format to have SmartMover detect which fields to use. | ||
Click Next. | *It is important to note that you must use the First Name and Last Name fields, OR the Full Name field. Never use all three fields at the same time. | ||
<li>Click '''Next'''.</li> | |||
</ol> | |||
[[File:TUT_SmartMover_Excel_01-06.jpg|546px]] | [[File:TUT_SmartMover_Excel_01-06.jpg|546px]] | ||
Add Fields to Database Window | |||
===Add Fields to Database Window=== | |||
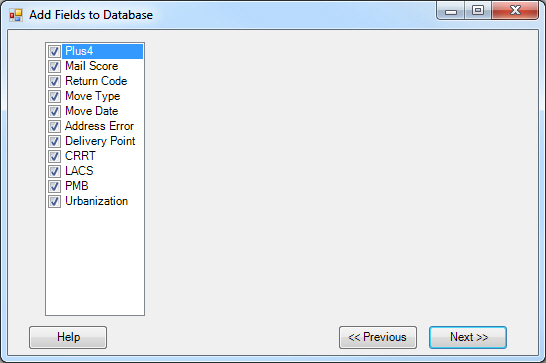
Next is the Add Fields to Database window. | Next is the Add Fields to Database window. | ||
Select which fields you want to be appended to your database. | <ol> | ||
All are selected by default. | <li>Select which '''fields''' you want to be appended to your database.</li> | ||
Click Next. | *All are selected by default. | ||
<li>Click '''Next'''.</li> | |||
Mail Score | </ol> | ||
Return Code | ====Fields==== | ||
The following fields are available to be added to your database: [[Plus4 (SmartMover for Excel)|Plus4]], [[Mail Score (SmartMover for Excel)|Mail Score]], [[Return Code (SmartMover for Excel)|Return Code]], [[Move Type (SmartMover for Excel)|Move Type]], [[Move Date (SmartMover for Excel)|Move Date]], [[Address Error (SmartMover for Excel)|Address Error]], [[Delivery Point (SmartMover for Excel)|Delivery Point]], [[CRRT (SmartMover for Excel)|CRRT]], [[LACS (SmartMover for Excel)|LACS]], [[PMB (SmartMover for Excel)|PMB]], and [[Urbanization (SmartMover for Excel)|Urbanization]]. | |||
Move Type | |||
Move Date | |||
Address Error | |||
Delivery Point | |||
CRRT | |||
LACS | |||
PMB | |||
[[File:TUT_SmartMover_Excel_01-07.jpg|546px]] | [[File:TUT_SmartMover_Excel_01-07.jpg|546px]] | ||
Update Options Window | |||
===Update Options Window=== | |||
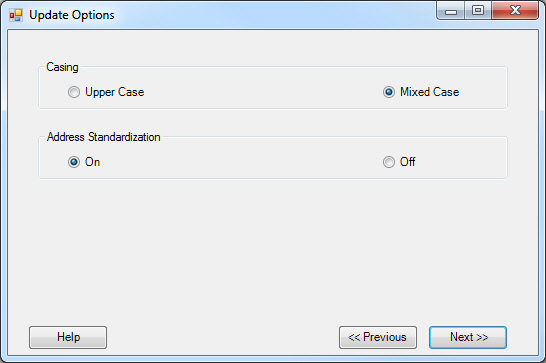
Next is the Update Options window. | Next is the Update Options window. | ||
Select which style of Casing you want. | #Select which style of '''Casing''' you want. | ||
Select whether or not you want Address Standardization to be applied to your database. | #Select whether or not you want '''Address Standardization''' to be applied to your database. | ||
Click Next to start the operation. | #Click '''Next''' to start the operation. | ||
[[File:TUT_SmartMover_Excel_01-08.jpg|546px]] | [[File:TUT_SmartMover_Excel_01-08.jpg|546px]] | ||
NCOALink Basic Processing | |||
==NCOALink Basic Processing== | |||
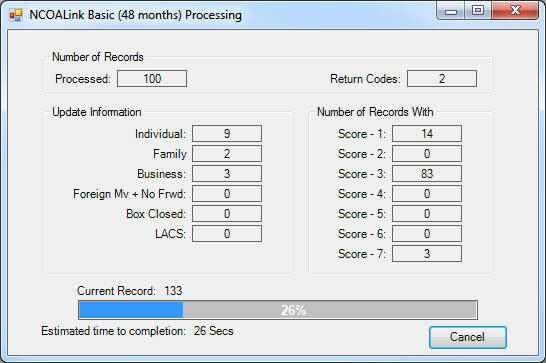
Once you click Next, the NCOALink Basic Processing will begin. | Once you click Next, the NCOALink Basic Processing will begin. | ||
The processing speed will vary depending on your internet connection, number of records to be processed, and the quality of those records. | The processing speed will vary depending on your internet connection, number of records to be processed, and the quality of those records. | ||
While you wait, the window will constantly update with the status of your database. | While you wait, the window will constantly update with the status of your database. | ||
Once the operation displays 100%, the new data will be appended to your database. Be patient while this data is being written. | Once the operation displays 100%, the new data will be appended to your database. Be patient while this data is being written. | ||
Return Codes | ====Return Codes==== | ||
This displays the number of return codes. These codes indicate the level of matching between the current records and the NCOALink database. | This displays the number of return codes. These codes indicate the level of matching between the current records and the NCOALink database. | ||
LACS | ====LACS==== | ||
See LACS above. | See LACS above. | ||
Mail Score | ====Mail Score==== | ||
See Mail Score above. | See Mail Score above. | ||
[[File:TUT_SmartMover_Excel_01-09.jpg|546px]] | [[File:TUT_SmartMover_Excel_01-09.jpg|546px]] | ||
NCOALink Results | |||
===NCOALink Results=== | |||
Upon completion of the NCOALink Basic Processing, the NCOALink Results window will appear. | Upon completion of the NCOALink Basic Processing, the NCOALink Results window will appear. | ||
This window displays information about your database: How many records were actually processed, how many were updated, and total processing time. | This window displays information about your database: How many records were actually processed, how many were updated, and total processing time. | ||
A CASS Summary Report and a NCOALink Processing Summary Report will be generated in HTML format and saved to the same directory as your database. This is done automatically. | A CASS Summary Report and a NCOALink Processing Summary Report will be generated in HTML format and saved to the same directory as your database. This is done automatically. | ||
Click Exit. | #Click '''Exit'''. | ||
[[File:TUT_SmartMover_Excel_01-10.jpg|546px]] | [[File:TUT_SmartMover_Excel_01-10.jpg|546px]] | ||
Save | |||
==Save== | |||
Upon clicking Exit you will have Excel open with your updated database. | Upon clicking Exit you will have Excel open with your updated database. | ||
This has not yet been saved. | '''This has not yet been saved.''' | ||
Save your updated database. | #'''Save''' your updated database. | ||
If you wish to keep the old database as well, make sure you Save As... to specify a new file name and not overwrite your old database. | :'''If you wish to keep the old database as well, make sure you Save As...''' to specify a new file name and not overwrite your old database. | ||
[[Category:Tutorial]] | |||
[[Category:Tutorials:SmartMover for Excel]] | |||
[[Category:SmartMover for Excel]] | |||
Latest revision as of 21:02, 22 December 2016
Getting Started
SmartMover for Excel is a powerful tool that is quick and easy to use. This tutorial will guide you through a simple usage scenario, checking a list of addresses against the NCOALink database. The sample screen shots for this tutorial are on Windows 7 with Microsoft Excel 2007.
Opening Excel
- Open Microsoft Excel.
- Open a database in Microsoft Excel.
- Click on the Add-Ins ribbon.
- Select SmartMover from the Add-In drop-down menu.
Starting with SmartMover
After selecting SmartMover from the Add-In drop-down menu, the Welcome to SmartMover screen will display.
- Click Next.
Entering your information
Purchase Info Window
Next is the Purchase Info window.
- Enter your License Key that was provided to you by your Customer Representative.
- Enter the Number of Records you will process.
- Click Next.
Contact Information Window
Next is the Contact Information Window.
- Enter your contact information.
- Click Next.
Choosing Your Settings
Service Format Window
Next is the Service Format window.
- This is where you will choose which fields are to be used in the operation.
- If your database has the first row as a heading, you can check "Use 1st row as column heading" and then click Auto Format to have SmartMover detect which fields to use.
- It is important to note that you must use the First Name and Last Name fields, OR the Full Name field. Never use all three fields at the same time.
- Click Next.
Add Fields to Database Window
Next is the Add Fields to Database window.
- Select which fields you want to be appended to your database.
- All are selected by default.
- Click Next.
Fields
The following fields are available to be added to your database: Plus4, Mail Score, Return Code, Move Type, Move Date, Address Error, Delivery Point, CRRT, LACS, PMB, and Urbanization.
Update Options Window
Next is the Update Options window.
- Select which style of Casing you want.
- Select whether or not you want Address Standardization to be applied to your database.
- Click Next to start the operation.
NCOALink Basic Processing
Once you click Next, the NCOALink Basic Processing will begin. The processing speed will vary depending on your internet connection, number of records to be processed, and the quality of those records. While you wait, the window will constantly update with the status of your database. Once the operation displays 100%, the new data will be appended to your database. Be patient while this data is being written.
Return Codes
This displays the number of return codes. These codes indicate the level of matching between the current records and the NCOALink database.
LACS
See LACS above.
Mail Score
See Mail Score above.
NCOALink Results
Upon completion of the NCOALink Basic Processing, the NCOALink Results window will appear. This window displays information about your database: How many records were actually processed, how many were updated, and total processing time. A CASS Summary Report and a NCOALink Processing Summary Report will be generated in HTML format and saved to the same directory as your database. This is done automatically.
- Click Exit.
Save
Upon clicking Exit you will have Excel open with your updated database. This has not yet been saved.
- Save your updated database.
- If you wish to keep the old database as well, make sure you Save As... to specify a new file name and not overwrite your old database.
