This wiki is no longer being updated as of December 10, 2025.
|
Salesforce:Custom Visualforce Pages: Difference between revisions
m Admin moved page Listware for Salesforce:Custom Visualforce Pages to Salesforce:Custom Visualforce Pages |
No edit summary |
||
| Line 5: | Line 5: | ||
{{CustomTOC}} | {{CustomTOC}} | ||
==Custom Visualforce Pages== | ==Custom Visualforce Pages== | ||
Clean Suite already provides Visualforce pages to use with Contact objects within Salesforce. If you would like to apply your own customizations or create new pages for other objects, please follow this guide as a model for customization. In this section, we will be creating a new Visualforce to use with Lead objects, using one of the included Visualforce pages for Personator as a template. | |||
1. To start off, go to your Setup menu. | 1. To start off, go to your Setup menu. | ||
| Line 17: | Line 17: | ||
3. You should see a list of Visualforce pages that currently exist within your Salesforce organization. The ones installed by | 3. You should see a list of Visualforce pages that currently exist within your Salesforce organization. The ones installed by Clean Suite will exist within the MDPESRONATOR namespace. Go ahead and click on the name MD_personatorContact. | ||
[[File:LWS_Menu_Build-DP-PersonatorContact.png|frame|none|Select MD_personatorContact]] | [[File:LWS_Menu_Build-DP-PersonatorContact.png|frame|none|Select MD_personatorContact]] | ||
| Line 36: | Line 36: | ||
[[File:LWS_Visualforce_Edit.png|frame|none|Paste the Markup]] | [[File:LWS_Visualforce_Edit.png|frame|none|Paste the Markup]] | ||
7. Save the new page. You can now add this Visualforce page to your Leads. For instructions on how to do this, see [[ | 7. Save the new page. You can now add this Visualforce page to your Leads. For instructions on how to do this, see [[Salesforce:Installing Visualforce Pages|Installing Visualforce Pages]]. | ||
[[Category:Clean Suite for CRM:Salesforce]] | [[Category:Clean Suite for CRM:Salesforce]] | ||
Latest revision as of 18:10, 12 April 2019
← Clean Suite for CRM:Salesforce
Custom Visualforce Pages
Clean Suite already provides Visualforce pages to use with Contact objects within Salesforce. If you would like to apply your own customizations or create new pages for other objects, please follow this guide as a model for customization. In this section, we will be creating a new Visualforce to use with Lead objects, using one of the included Visualforce pages for Personator as a template.
1. To start off, go to your Setup menu.
Here’s a guide to find this within Salesforce: https://help.salesforce.com/HTViewHelpDoc?id=basics_nav_setup.htm&language=en_US
2. Next, go to Develop -> Pages:

3. You should see a list of Visualforce pages that currently exist within your Salesforce organization. The ones installed by Clean Suite will exist within the MDPESRONATOR namespace. Go ahead and click on the name MD_personatorContact.

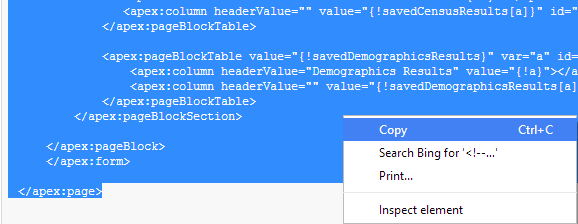
4. In the following page you should the markup for the MD_personatorContact Visualforce page. Highlight and select all the markup starting from <apex:page> down to the closing </apex:page> and copy it.

5. Go back to Develop->Pages and now click on the New button.

6. In the new window, paste in the Visualforce markup that we copied from MD_personatorContact. Replace the appearances of Contact in the markup with Lead. Give an appropriate Label and Name for the Visualforce page. Here’s an example of our new Personator Visualforce page for Leads:

7. Save the new page. You can now add this Visualforce page to your Leads. For instructions on how to do this, see Installing Visualforce Pages.