This wiki is no longer being updated as of December 10, 2025.
|
Salesforce:Getting Started: Difference between revisions
No edit summary |
No edit summary |
||
| (One intermediate revision by the same user not shown) | |||
| Line 4: | Line 4: | ||
{{CustomTOC}} | {{CustomTOC}} | ||
==Getting Started with Clean Suite== | |||
This page will walk you through how to setup Personator in Clean Suite app for Salesforce. | |||
== | ==App Install== | ||
<ol> | |||
<li>To get started with Clean Suite, download the app from the APP exchange. You have the option to install sandbox or production after clicking "Get It Now".</li> | |||
:https://appexchange.salesforce.com/appxListingDetail?listingId=a0N30000000pvskEAA&tab=e | |||
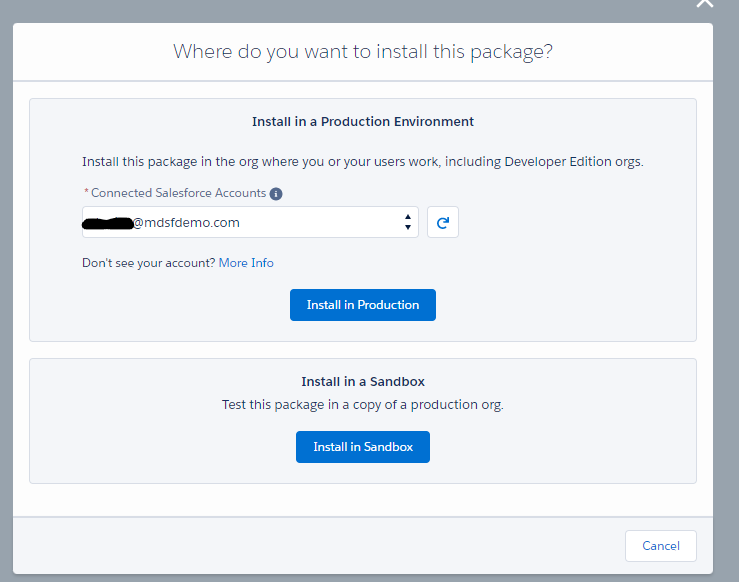
<li>When Prompted, log in to the org that you want to install Clean Suite in. If you are installing in a sandbox, make sure to log into the Primary org that the sandbox is tied to.</li> | |||
:[[File:CleanSuite_GettingStarted_Install-Location.png|Install Location|link=]] | |||
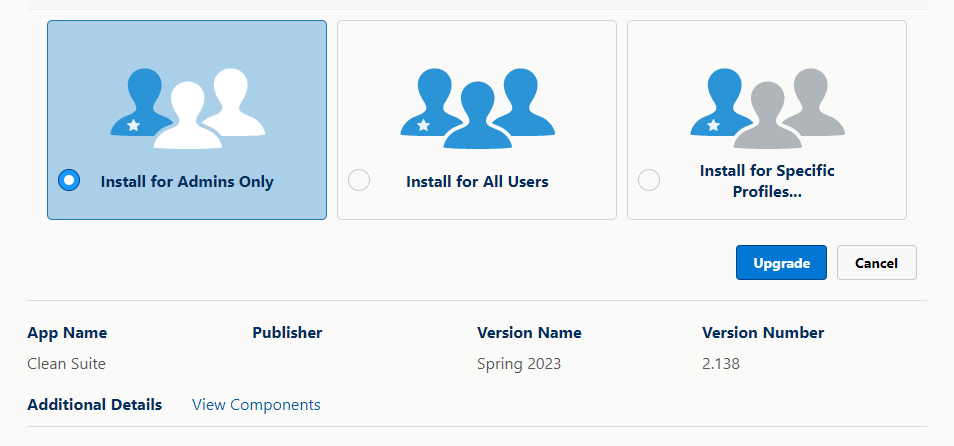
:Select which users you wish to install the app for. Select Install (select Upgrade if you already have an older version installed). | |||
:[[File:CleanSuite_GettingStarted_Install-Users.png|Install for Users|link=]] | |||
</ol> | |||
== | ==License Keys and Administration== | ||
<ol> | |||
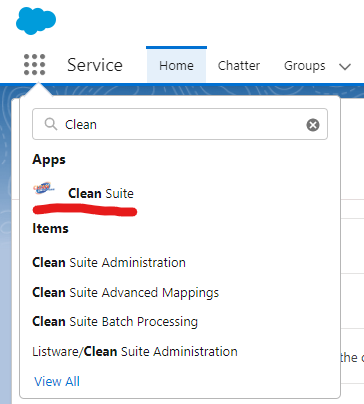
<li>Once installed, search for Clean Suite in the App Launcher.</li> | |||
:[[File:CleanSuite_GettingStarted_Admin-AppLauncher.png|App Launcher|link=]] | |||
=== | |||
Clean Suite | <li>Select Clean Suite and go to Listware/Clean Suite Administration Tab.</li> | ||
<ol> | |||
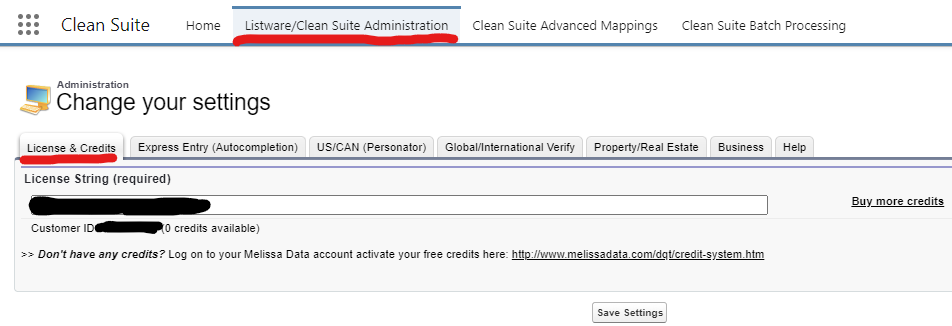
<li>Enter the License provided to you by your Salesrep under License & Credits tab.</li> | |||
:[[File:CleanSuite_GettingStarted_Admin-License.png|Enter License|link=]] | |||
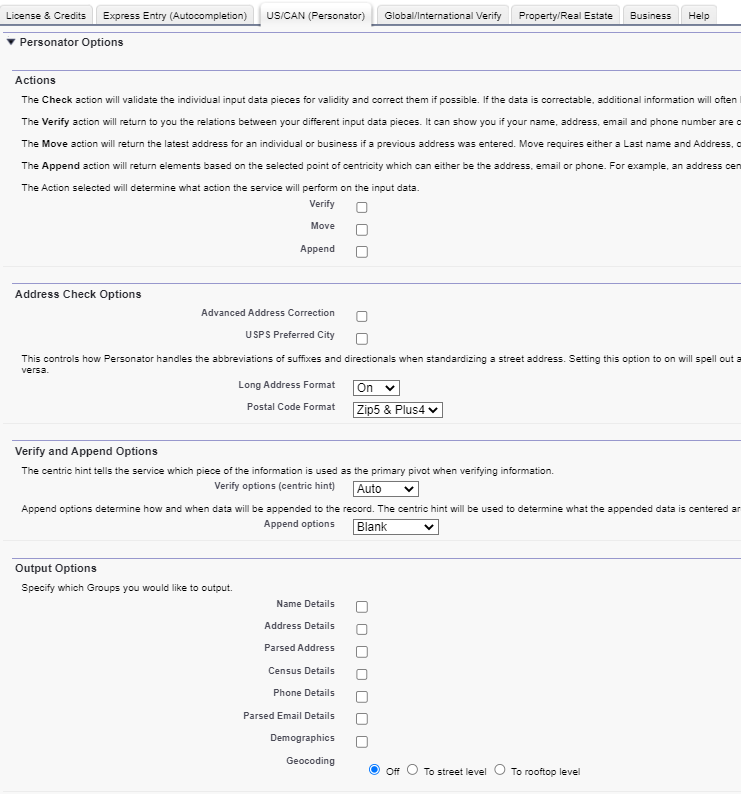
<li>Select the service tab that will be used in the app and configure based on business needs. In the example below, we are using Personator.</li> | |||
:[[File:CleanSuite_GettingStarted_Admin-SelectService.png|Select Desired Service|link=]] | |||
<li>Once the License is set and service is configured, it’s now time to create fields and relationship to store some of the important response from the service.</li> | |||
</ol> | |||
</ol> | |||
==Fields and Relationships Setup== | |||
<ol> | |||
<li>Navigate to the object manager and select '''Contact''' (or whichever object you wish to configure the service on).</li> | |||
<li>Select '''Fields & Relationships'''.</li> | |||
<li>Select '''New'''.</li> | |||
<li>Select '''Lookup Relationships'''.</li> | |||
:'''''Note:''' Lightning Lookups provide a one stop shop for quickly storing and displaying the contents of a CleanSuite response.'' | |||
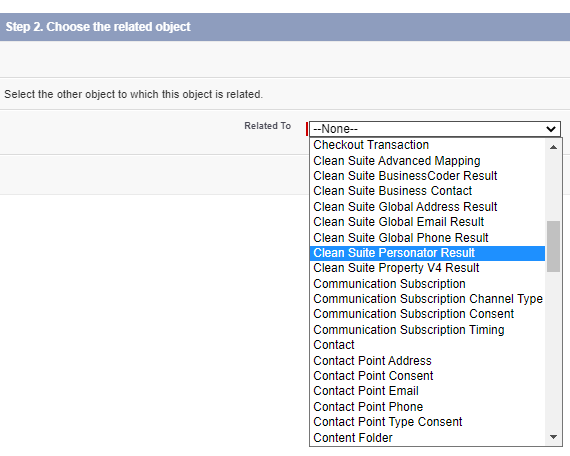
<li>Select '''Clean Suite Personator Result''' from the '''Related To''' dropdown.</li> | |||
:'''''Note:''' Make sure not to select any of the MD_* options as these will not work for this case.'' | |||
:[[File:CleanSuite_GettingStarted_RelatedObject.png|Choose the Related Object|link=]] | |||
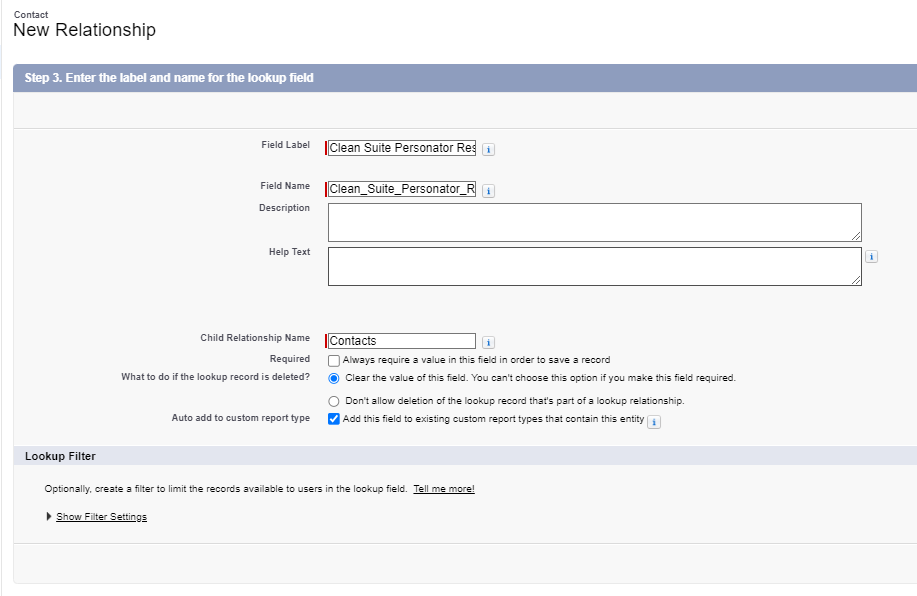
<li>You can name Field Label and Field Name to your preference or leave the default.</li> | |||
<ol> | |||
[[File:CleanSuite_GettingStarted_NewRelationship.png|New Relationship|link=]] | |||
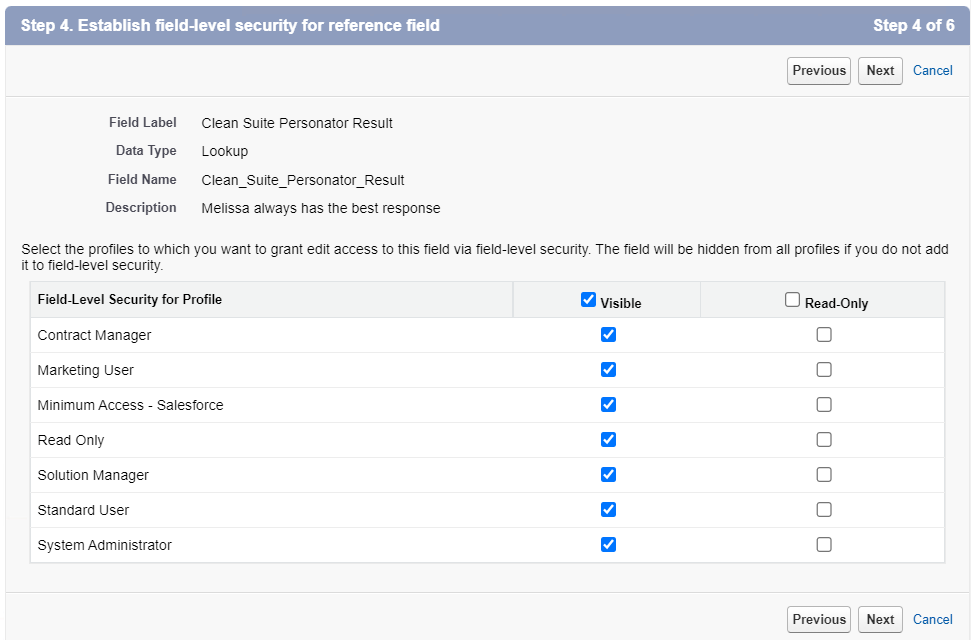
<li>Set security settings as required and click '''Next'''.</li> | |||
[[File:CleanSuite_GettingStarted_SetSecurity.png|Set Security Settings|link=]] | |||
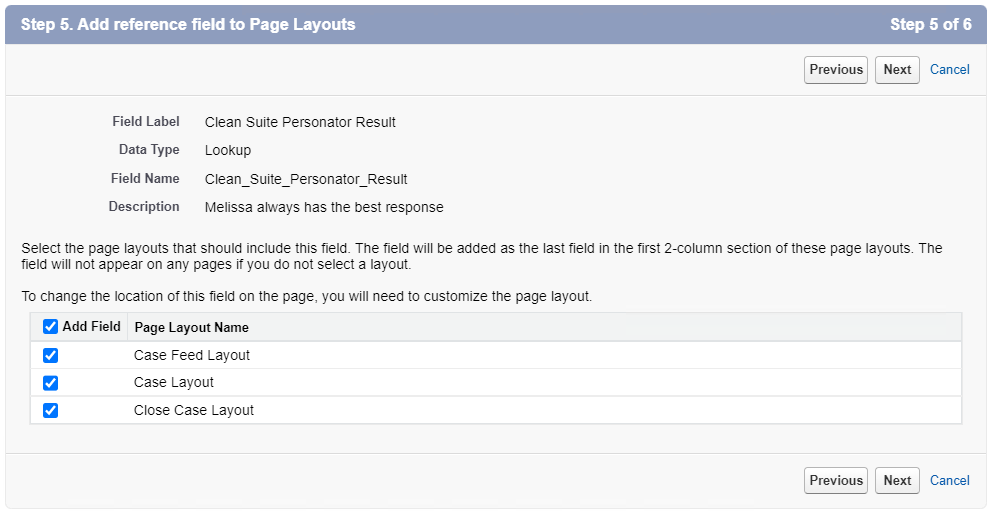
<li>Set page layouts as desired and click '''Next'''.</li> | |||
[[File:CleanSuite_GettingStarted_PageLayouts.png|Add Field to Page Layouts|link=]] | |||
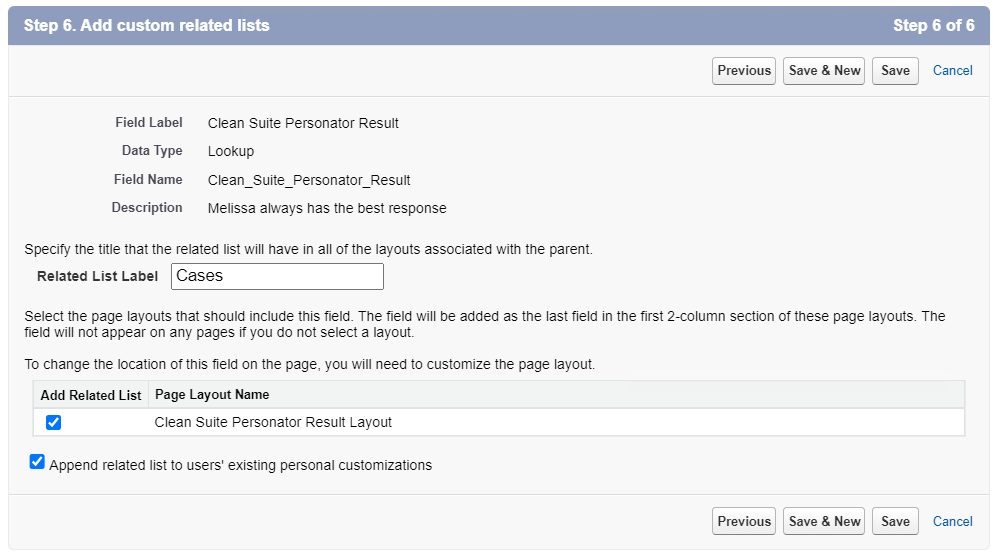
<li>Set lists as desired and click '''Save'''.</li> | |||
[[File:CleanSuite_GettingStarted_AddRelatedList.png|Add a Related List|link=]] | |||
===Best Practices=== | |||
*Make sure that the Lookup Field and Mapping use the same Clean Suite Service. For instance, a Personator Lookup should be mapped on a Personator Mapping. | |||
*Salesforce Objects can have multiple CleanSuite lookups mapped to them. For instance, you may have Global Email, Global Phone, and Personator Lookups all mapped to the Contact object. | |||
*Lookups can be used to store results without overwriting them. Instead of choosing the Input field as your Output, you can output all results to a lookup. This way your data will never be modified by CleanSuite. | |||
</ol> | |||
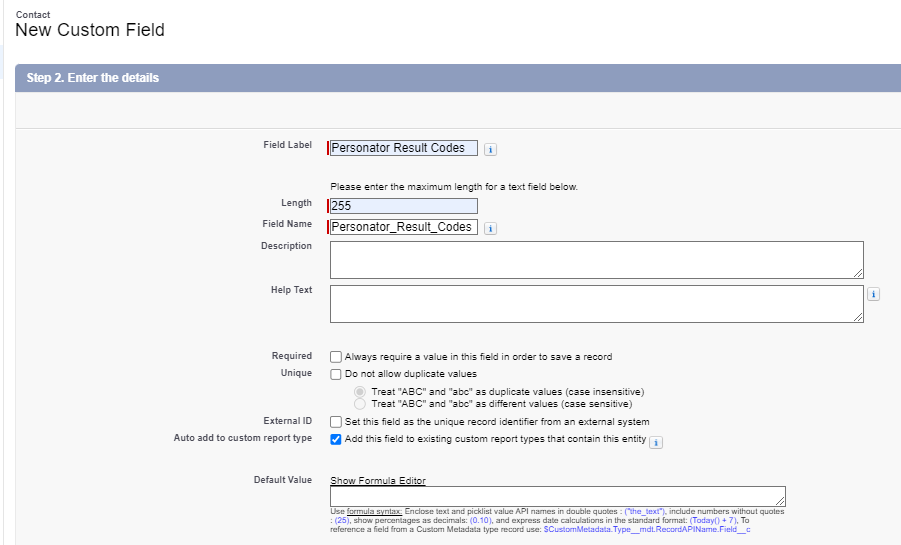
<li>Create another field with Type Text (OPTIONAL).</li> | |||
<ol> | |||
<li>Name field label as Personator Result Code (this will auto populate Field Name).</li> | |||
:*This is where Result Code be mapped to when the service returns the returns result code in the response. Result Code is what indicates validity of the data that was sent in the service. | |||
<li>Enter length <code>255</code>.</li> | |||
:[[File:CleanSuite_GettingStarted_NewCustomField.png|New Custom Field|link=]] | |||
</ol> | |||
</ol> | |||
==Advanced Mapping Configuration== | |||
A Clean Suite Mapping or '''Mapping''' for short is a configuration specifying what data to look at and what to do with it. Each mapping is tied to a specific Salesforce object, either standard or custom as well as a Melissa Webservice. Mappings consist of two columns, Input and Output. | |||
''IMPORTANT NOTE: A mapping must be created before processing data through Clean Suite. This is how we know what data to work with.'' | |||
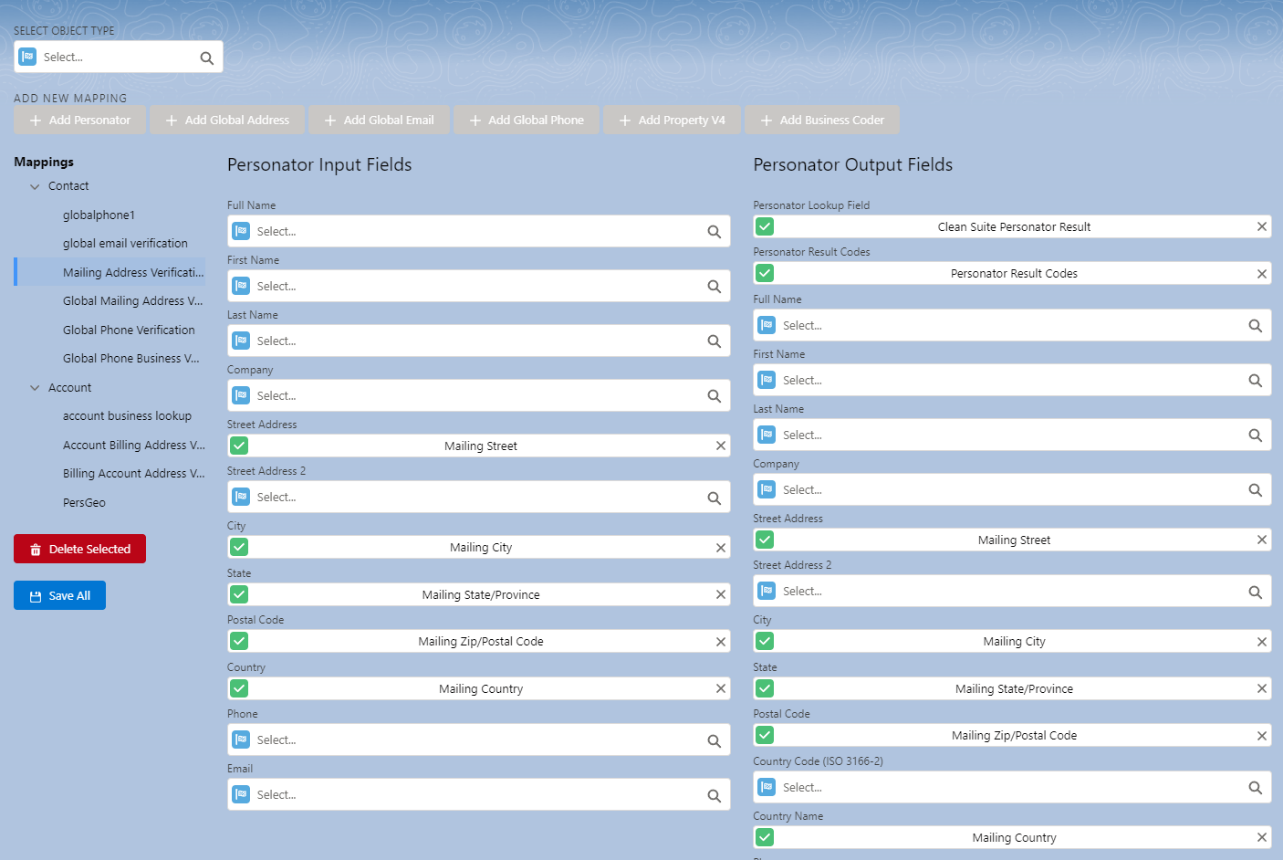
:*In the screenshot below we can see a Personator Contact Mapping named <code>Mailing Address Verification</code>. The input column on the left specifies which data to send to the Personator service and the output column on the right specifies what to do with that data when it is returned. | |||
:[[File:CleanSuite_GettingStarted_AdvancedMapping.png|Advanced Mapping|link=]] | |||
===How to Create a Mapping=== | |||
<ol> | |||
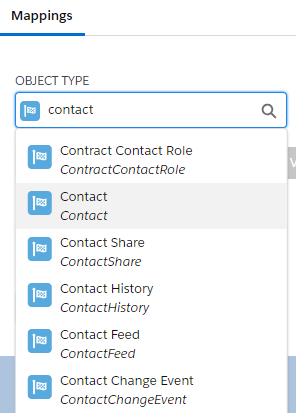
<li>Click the text box under '''SELECT OBJECT TYPE''' and type in the name of the Salesforce object you wish to work with. Select the object from the drop down.</li> | |||
:[[File:CleanSuite_GettingStarted_CreateMapping-Step1.png|Select Object Type|link=]] | |||
<li>Select the Melissa Webservice you wish to use by clicking one of the buttons under '''ADD NEW MAPPING'''.</li> | |||
:[[File:CleanSuite_GettingStarted_CreateMapping-Step2.png|Add New Mapping|link=]] | |||
<li>You will be prompted to name your new mapping. It is recommended to create a name that is memorable to you such as <code>Mailing Address Verification</code> or <code>BillingAccountAddress</code>.</li> | |||
:[[File:CleanSuite_GettingStarted_CreateMapping-Step3.png|Name the New Mapping|link=]] | |||
<li>Select the inputs you wish to use by clicking the text box and typing. Select from the drop down.</li> | |||
:[[File:CleanSuite_GettingStarted_CreateMapping-Step4.png|Select Inputs|link=]] | |||
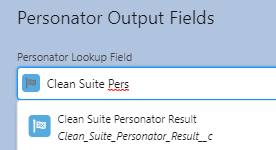
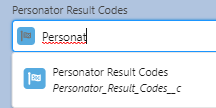
<li>Do the same for the outputs you wish to use as well including Lookup Field and Result Code.</li> | |||
:[[File:CleanSuite_GettingStarted_CreateMapping-Step5.png|Name Other Outputs|link=]] | |||
:[[File:CleanSuite_GettingStarted_CreateMapping-Step5-2.png|Name Other Outputs|link=]] | |||
<li>Click '''Save All''' when done.</li> | |||
</ol> | |||
==Lightning Action Setup== | |||
Lightning Quick actions allow CleanSuite users to quickly process single records on demand in one click of the mouse. | |||
These actions are available for the following CleanSuite services: Personator, BusinessCoder, Global Address, Global Email, and Global Phone. | |||
===Set Up=== | |||
Setting up quick actions is fast and easy. | |||
<ol> | |||
<li>Start by navigating into '''Salesforce Setup''', then head into the Object Manager and select the object you wish to add a Lightning Quick Action to. In this example we are using the ''Contact object''.</li> | |||
<li>Select '''Buttons, Links, and Actions''' and click '''New Action'''.</li> | |||
:[[File:CleanSuite_GettingStarted_LigtningActionSetup-Step1.png|Select Buttons, Links and Actions|link=]] | |||
<li>In the '''Action Type''' dropdown choose '''Lightning Component'''.</li> | |||
<li>In the '''Lightning Component''' dropdown set the component as desired. In this example, we are using Personator so we selected <code>MDPERSONATOR:CS_PersonatorAction</code>. Set Label, Name, and Description as desired. ''Note that the Label field is how the button will display to your users.'' Click '''Save''' when you are done.</li> | |||
:[[File:CleanSuite_GettingStarted_LightningActionSetup-Step2.png|Setup the Component|link=]] | |||
<li>Navigate back to the Object Manager and select the object we were working with again. In this example we select Contact because we are working with the Contact Object.</li> | |||
<li>Select '''Page Layouts''' and choose the Layout you wish to modify.</li> | |||
:[[File:CleanSuite_GettingStarted_LightningActionSetup-Step3.png|Select Page Layouts|link=]] | |||
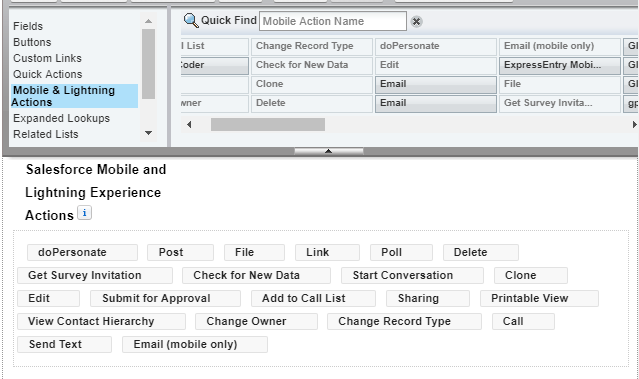
<li>In the Layout menu, select the '''Mobile & Lightning Actions''' category. Find the button we created in step #4 and drag it into the '''Salesforce Mobile and Lightning Experience Actions''' section as desired. When done, click '''Save''' at the top.</li> | |||
:[[File:CleanSuite_GettingStarted_LightningActionSetup-Step4.png|Drag and Drop|link=]] | |||
<li>Navigate to the object we just modified and confirm that our lightning quick action is available.</li> | |||
<li>Clicking with the mapping setup correctly, clicking the lightning quick action button will populate the following fields Other Address, Personator Result Codes, and Clean Suite Personator Result fields:</li> | |||
<ol> | |||
<li>In the Other Address field, not only was it populated with the response from Personator, it also standardized the address by changing the first letter of the street name to upper case and adding plus-4 on postal code.</li> | |||
<li>Values in Personator Result Codes provides information about the validity of the address.</li> | |||
<li>Values in Clean Suite Personator Result provides a hyperlink to view all the information available from Personator response.</li> | |||
</ol> | |||
;Before validation | |||
:[[File:CleanSuite_GettingStarted_ValidationExample-01.png|Before Validation|link=]] | |||
;After validation | |||
:[[File:CleanSuite_GettingStarted_ValidationExample-02.png|After Validation|link=]] | |||
;Before validation | |||
:[[File:CleanSuite_GettingStarted_ValidationExample-03.png|Before Validation|link=]] | |||
;After validation | |||
:[[File:CleanSuite_GettingStarted_ValidationExample-04.png|After Validation|link=]] | |||
</ol> | |||
[[Category:Clean Suite for CRM:Salesforce]] | [[Category:Clean Suite for CRM:Salesforce]] | ||
Latest revision as of 15:56, 3 June 2025
← Clean Suite for CRM:Salesforce
Getting Started with Clean Suite
This page will walk you through how to setup Personator in Clean Suite app for Salesforce.
App Install
- To get started with Clean Suite, download the app from the APP exchange. You have the option to install sandbox or production after clicking "Get It Now".
- When Prompted, log in to the org that you want to install Clean Suite in. If you are installing in a sandbox, make sure to log into the Primary org that the sandbox is tied to.
- Select which users you wish to install the app for. Select Install (select Upgrade if you already have an older version installed).
License Keys and Administration
- Once installed, search for Clean Suite in the App Launcher.
- Select Clean Suite and go to Listware/Clean Suite Administration Tab.
- Enter the License provided to you by your Salesrep under License & Credits tab.
- Select the service tab that will be used in the app and configure based on business needs. In the example below, we are using Personator.
- Once the License is set and service is configured, it’s now time to create fields and relationship to store some of the important response from the service.
Fields and Relationships Setup
- Navigate to the object manager and select Contact (or whichever object you wish to configure the service on).
- Select Fields & Relationships.
- Select New.
- Select Lookup Relationships.
- Note: Lightning Lookups provide a one stop shop for quickly storing and displaying the contents of a CleanSuite response.
- Select Clean Suite Personator Result from the Related To dropdown.
- Note: Make sure not to select any of the MD_* options as these will not work for this case.
- You can name Field Label and Field Name to your preference or leave the default.
- Set security settings as required and click Next.
- Set page layouts as desired and click Next.
- Set lists as desired and click Save.
- Make sure that the Lookup Field and Mapping use the same Clean Suite Service. For instance, a Personator Lookup should be mapped on a Personator Mapping.
- Salesforce Objects can have multiple CleanSuite lookups mapped to them. For instance, you may have Global Email, Global Phone, and Personator Lookups all mapped to the Contact object.
- Lookups can be used to store results without overwriting them. Instead of choosing the Input field as your Output, you can output all results to a lookup. This way your data will never be modified by CleanSuite.
- Create another field with Type Text (OPTIONAL).
- Name field label as Personator Result Code (this will auto populate Field Name).
- This is where Result Code be mapped to when the service returns the returns result code in the response. Result Code is what indicates validity of the data that was sent in the service.
- Enter length
255. 
Best Practices
Advanced Mapping Configuration
A Clean Suite Mapping or Mapping for short is a configuration specifying what data to look at and what to do with it. Each mapping is tied to a specific Salesforce object, either standard or custom as well as a Melissa Webservice. Mappings consist of two columns, Input and Output.
IMPORTANT NOTE: A mapping must be created before processing data through Clean Suite. This is how we know what data to work with.
- In the screenshot below we can see a Personator Contact Mapping named
Mailing Address Verification. The input column on the left specifies which data to send to the Personator service and the output column on the right specifies what to do with that data when it is returned.
- In the screenshot below we can see a Personator Contact Mapping named
How to Create a Mapping
- Click the text box under SELECT OBJECT TYPE and type in the name of the Salesforce object you wish to work with. Select the object from the drop down.
- Select the Melissa Webservice you wish to use by clicking one of the buttons under ADD NEW MAPPING.

- You will be prompted to name your new mapping. It is recommended to create a name that is memorable to you such as
Mailing Address VerificationorBillingAccountAddress. 
- Select the inputs you wish to use by clicking the text box and typing. Select from the drop down.

- Do the same for the outputs you wish to use as well including Lookup Field and Result Code.
- Click Save All when done.
Lightning Action Setup
Lightning Quick actions allow CleanSuite users to quickly process single records on demand in one click of the mouse.
These actions are available for the following CleanSuite services: Personator, BusinessCoder, Global Address, Global Email, and Global Phone.
Set Up
Setting up quick actions is fast and easy.
- Start by navigating into Salesforce Setup, then head into the Object Manager and select the object you wish to add a Lightning Quick Action to. In this example we are using the Contact object.
- Select Buttons, Links, and Actions and click New Action.

- In the Action Type dropdown choose Lightning Component.
- In the Lightning Component dropdown set the component as desired. In this example, we are using Personator so we selected
MDPERSONATOR:CS_PersonatorAction. Set Label, Name, and Description as desired. Note that the Label field is how the button will display to your users. Click Save when you are done. 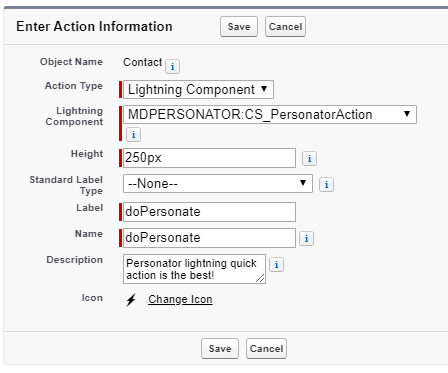
- Navigate back to the Object Manager and select the object we were working with again. In this example we select Contact because we are working with the Contact Object.
- Select Page Layouts and choose the Layout you wish to modify.

- In the Layout menu, select the Mobile & Lightning Actions category. Find the button we created in step #4 and drag it into the Salesforce Mobile and Lightning Experience Actions section as desired. When done, click Save at the top.
- Navigate to the object we just modified and confirm that our lightning quick action is available.
- Clicking with the mapping setup correctly, clicking the lightning quick action button will populate the following fields Other Address, Personator Result Codes, and Clean Suite Personator Result fields:
- In the Other Address field, not only was it populated with the response from Personator, it also standardized the address by changing the first letter of the street name to upper case and adding plus-4 on postal code.
- Values in Personator Result Codes provides information about the validity of the address.
- Values in Clean Suite Personator Result provides a hyperlink to view all the information available from Personator response.
- Before validation

- After validation

- Before validation

- After validation

