This wiki is no longer being updated as of December 10, 2025.
|
Salesforce:Result Code Status Indicator: Difference between revisions
Created page with "{{ListwareForSalesforceNav |LightningCollapse= }} {{CustomTOC}} The Clean Suite Result Code Indicator is a lightning component that can quickly display information to the user about the quality of a record. The component is drag and drop ready, and fully customizable. It can display various messages and colors depending on the value of a field. It is designed to work with [Melissa Result Codes] that return from webservice calls. However, it can be tied to any field yo..." |
No edit summary |
||
| (One intermediate revision by the same user not shown) | |||
| Line 65: | Line 65: | ||
[[File:Salesforce_ResultCode_SaveForm.png|Result Code Form Save|link=]] | [[File:Salesforce_ResultCode_SaveForm.png|Result Code Form Save|link=]] | ||
<br><br>One setup is complete, we should now see a status indicator displaying the appropriate message for our field’s value. In the example below, we have three components, displaying messages for Address, Phone, and Email. | |||
One setup is complete, we should now see a status indicator displaying the appropriate message for our field’s value. In the example below, we have three components, displaying messages for Address, Phone, and Email. | |||
[[File:Salesforce_ResultCode_VerificationLevelsExample.png|Result Code Verification Levels Example|link=]] | [[File:Salesforce_ResultCode_VerificationLevelsExample.png|Result Code Verification Levels Example|link=]] | ||
</ol> | </ol> | ||
==Recomended Patterns== | |||
The following patterns can be used as a starting point for users who are not sure what REGEX patterns to use. | |||
;Personator | |||
:Invalid: <code>AE</code> | |||
:Partially Valid: <code>AS0[2]</code> | |||
:Valid: <code>AS0[1,3]</code> | |||
;Global Address Verification | |||
:Invalid: <code>AE</code> | |||
:Partially Valid: <code>AV1[1-5]|AV2[1-3]</code> | |||
:Valid: <code>AV2[4-5]</code> | |||
;Global Email | |||
:Invalid: <code>EE</code> | |||
:Partially Valid: <code>ES03</code> | |||
:Valid: <code>ES01|ES2[1-2]</code> | |||
;Global Phone | |||
:Invalid: <code>PE</code> | |||
:Partially Valid: <code>PS20</code> | |||
:Valid: <code>PS01|PS22</code> | |||
[[Category:Clean Suite for CRM:Salesforce]] | [[Category:Clean Suite for CRM:Salesforce]] | ||
Latest revision as of 00:37, 12 August 2023
← Clean Suite for CRM:Salesforce
The Clean Suite Result Code Indicator is a lightning component that can quickly display information to the user about the quality of a record. The component is drag and drop ready, and fully customizable. It can display various messages and colors depending on the value of a field. It is designed to work with [Melissa Result Codes] that return from webservice calls. However, it can be tied to any field you wish within salesforce that contains a text value.

Setup
To set up the component, first visit a record for which you want to add the component to.
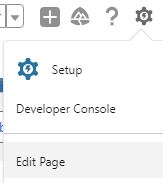
- Click the gear icon at the top right.
- Click
Edit Pagefrom the drop down menu. - On the left hand side in the Components tab, find the
CS ResultCodeIndicator. - Drag the component onto the page wherever, you would like on the page.

Configuring the component
While still on the page editor, we can now customize the component to our liking
- Click the newly added
Result Status Indicatorcomponent to open the settings. - On the right hand pane, you will see various text boxes and descriptions of what each option does.
- Title allows us to specify the tile for our component. In our case we chose
Address Verificationbecause we want to display address related messages. - Field Name is the field on our record that we wish the component to monitor. Make sure to use the fully verified API name for your field. In our case, we are using
MDPERSONATOR__PersonatorResults__c. This will vary depending on how you have configured your Salesforce org. - Invalid Record Message allows us to specify a message when the invalid formula is true.
- Invalid Record REGEX allows us to specify a regular expression, that matches against the Field Name set above. When this REGEX returns as a match, our message is displayed as well as the color we have defined. For this example, we chose
AEwhich matches any result code containingAEex: AE01, AE09, etc. - Invalid Record Color allows us to specify a HEX color that we wish for the Result Code Indicator to display, indicating we have a match. The color we have selected is a nice shade of RED.
- Continue customizing the form for
Partially ValidandValidfields. - When done, click the
SAVEbutton at the top right.


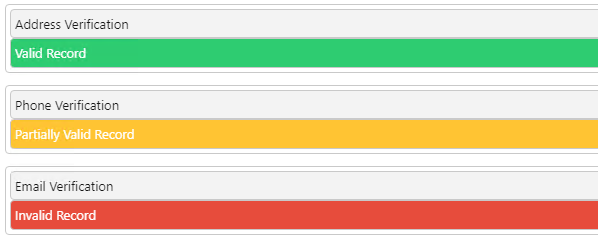
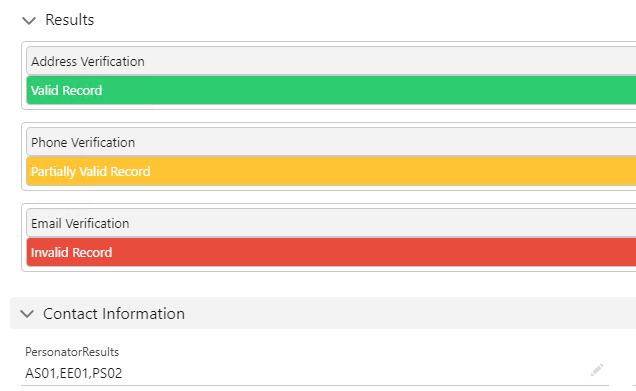
One setup is complete, we should now see a status indicator displaying the appropriate message for our field’s value. In the example below, we have three components, displaying messages for Address, Phone, and Email.

Recomended Patterns
The following patterns can be used as a starting point for users who are not sure what REGEX patterns to use.
- Personator
- Invalid:
AE - Partially Valid:
AS0[2] - Valid:
AS0[1,3]
- Global Address Verification
- Invalid:
AE - Partially Valid:
AV1[1-5]|AV2[1-3] - Valid:
AV2[4-5]
- Global Email
- Invalid:
EE - Partially Valid:
ES03 - Valid:
ES01|ES2[1-2]
- Global Phone
- Invalid:
PE - Partially Valid:
PS20 - Valid:
PS01|PS22