This wiki is no longer being updated as of December 10, 2025.
|
Dynamics:Global Verify:Tutorial: Difference between revisions
Created page with "{{DynamicsGlobalVerifyNav}} {{CustomTOC}} ==Global Verify Tutorial== Note: In order to use the Global Verify service, you must first configure the Customer ID and options. ..." |
No edit summary |
||
| Line 10: | Line 10: | ||
1. Hover over the ''' | 1. Hover over the '''Microsoft Dynamics CRM''' logo in the upper left hand corner and click the '''Sales''' button. | ||
[[File:Dynamics_GlobalVerify_Tutorial_01.png|frame|none|Click ''' | [[File:Dynamics_GlobalVerify_Tutorial_01.png|frame|none|Click '''Sales''']] | ||
2. | 2. Hover over the '''Sales''' button on the top ribbion. Then click '''Contacts'''. | ||
[[File:Dynamics_GlobalVerify_Tutorial_02.png|frame|none|Click ''' | [[File:Dynamics_GlobalVerify_Tutorial_02.png|frame|none|Click '''Contacts''']] | ||
3. | 3. Click '''New''' to create a new '''Contact'''. | ||
[[File:Dynamics_GlobalVerify_Tutorial_03.png|frame|none| | [[File:Dynamics_GlobalVerify_Tutorial_03.png|frame|none|Click '''New''' to create a new '''Contact''']] | ||
4. Enter the input information | 4. Enter all the necessary input information. | ||
[[File:Dynamics_GlobalVerify_Tutorial_04.png|frame|none|Enter input information]] | [[File:Dynamics_GlobalVerify_Tutorial_04.png|frame|none|Enter input information]] | ||
5. Click the '''Verify | 5. Click the '''Global Verify''' button in the top ribbion. | ||
[[File:Dynamics_GlobalVerify_Tutorial_05.png|frame|none|Click '''Verify | [[File:Dynamics_GlobalVerify_Tutorial_05.png|frame|none|Click the '''Global Verify''' button]] | ||
6. | 6. Ensure the '''Process Date''' field reflects the current date and time. | ||
[[File:Dynamics_GlobalVerify_Tutorial_06.png|frame|none|Verify '''Process Date''']] | [[File:Dynamics_GlobalVerify_Tutorial_06.png|frame|none|Verify '''Process Date''']] | ||
7. | 7. All of the processed input details are located near the bottom of the form. | ||
[[File:Dynamics_GlobalVerify_Tutorial_07.png|frame|none| | Melissa Data Global Name Details: | ||
[[File:Dynamics_GlobalVerify_Tutorial_07.png|frame|none|Global Name Details]] | |||
Melissa Data Global Email Details: | |||
[[File:Dynamics_GlobalVerify_Tutorial_08.png|frame|none|Global Email Details]] | |||
Melissa Data Global Phone Details: | |||
[[File:Dynamics_GlobalVerify_Tutorial_09.png|frame|none|Global Phone Details]] | |||
Melissa Data Address Details: | |||
[[File:Dynamics_GlobalVerify_Tutorial_10.png|frame|none|Address Details]] | |||
Note: If a second address was entered in the input fileds above, it would be processed below in a Melissa Data Address 2 Details section. | |||
[[Category:Dynamics CRM]] | [[Category:Dynamics CRM]] | ||
[[Category:Dynamics Global Verify]] | [[Category:Dynamics Global Verify]] | ||
Revision as of 18:20, 15 August 2016
← Clean Suite for CRM:Dynamics
| Global Verify Navigation | ||
|---|---|---|
| Overview | ||
| Installation | ||
| Configuration | ||
| Custom Mapping | ||
| Tutorial | ||
| Fields | ||
|
Global Verify Tutorial
Note: In order to use the Global Verify service, you must first configure the Customer ID and options.
This tutorial will teach you how to use the Global Verify solution in Microsoft Dynamics CRM in the Contact entity.
1. Hover over the Microsoft Dynamics CRM logo in the upper left hand corner and click the Sales button.
2. Hover over the Sales button on the top ribbion. Then click Contacts.
3. Click New to create a new Contact.
4. Enter all the necessary input information.
5. Click the Global Verify button in the top ribbion.
6. Ensure the Process Date field reflects the current date and time.
7. All of the processed input details are located near the bottom of the form.
Melissa Data Global Name Details:
Melissa Data Global Email Details:
Melissa Data Global Phone Details:
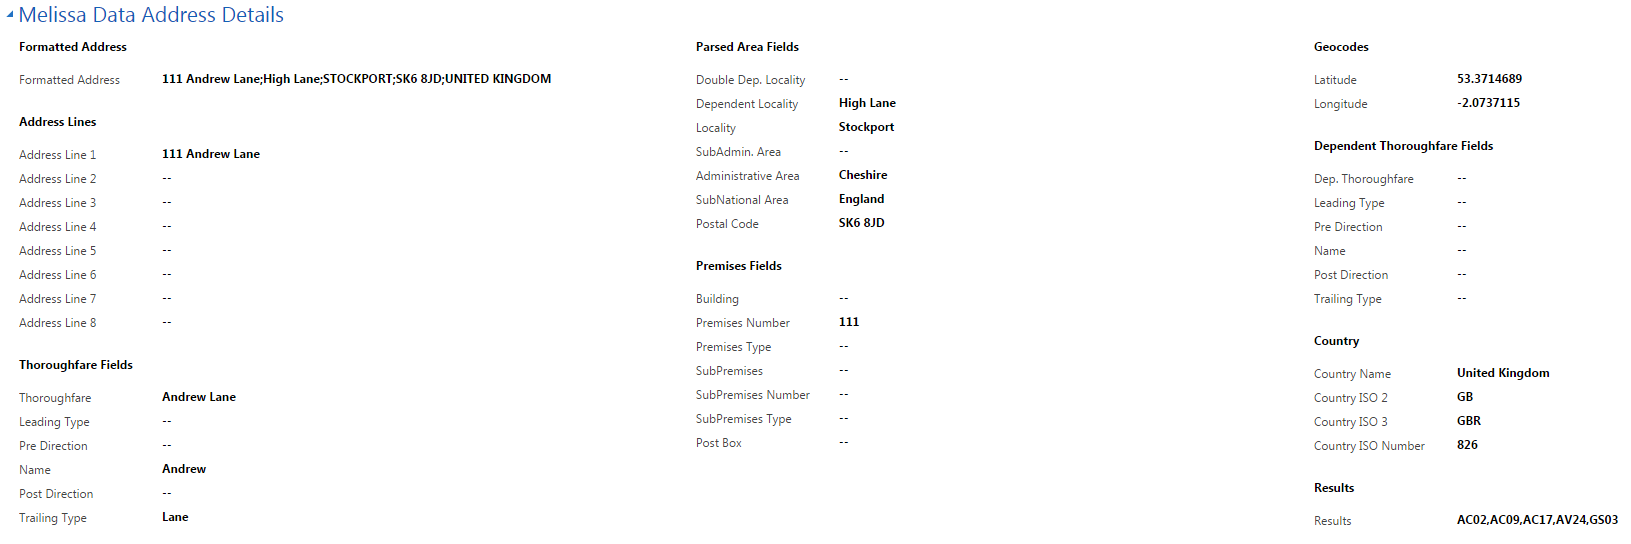
Melissa Data Address Details:

Note: If a second address was entered in the input fileds above, it would be processed below in a Melissa Data Address 2 Details section.