This wiki is no longer being updated as of December 10, 2025.
|
Salesforce:Installing Visualforce Pages: Difference between revisions
No edit summary |
No edit summary |
||
| Line 39: | Line 39: | ||
[[Category: | [[Category:Clean Suite for CRM:Salesforce]] | ||
Revision as of 15:10, 27 September 2018
← Clean Suite for CRM:Salesforce
Installing Visualforce Pages
VisualForce pages (for use with Contact objects) for the Personator component are already included with Listware. To add this component into your Contacts, use your Setup menu.
Here’s a guide to find this within Salesforce: https://help.salesforce.com/HTViewHelpDoc?id=basics_nav_setup.htm&language=en_US
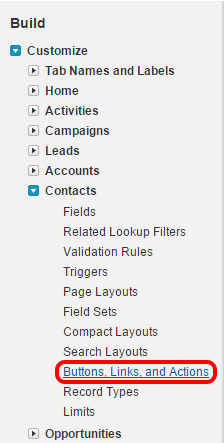
1. Go to Customize -> Buttons, Links, and Actions:

2. The Visualforce page that we’ve provided is designed for use with the View action, so click Edit next to View:

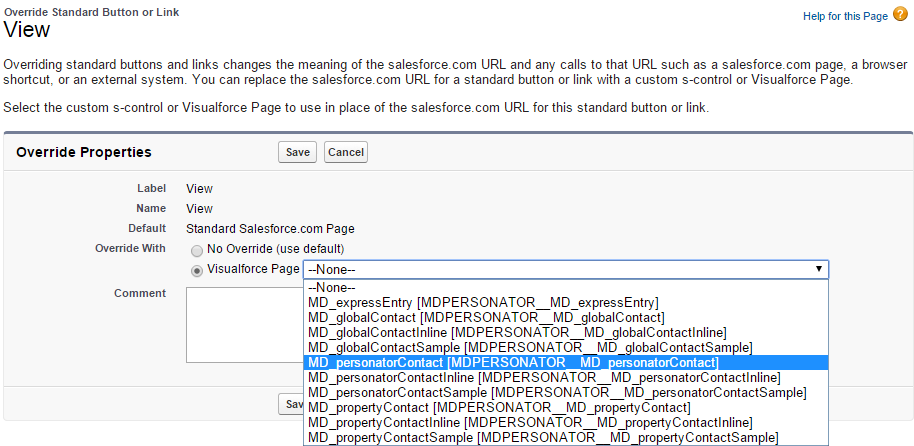
3. Next to Override With, select the Visualforce page containing the component that you would like to use:

4. Here you can select which Visualforce page to replace your view by picking which Listware component that you would like to use:
- MD_personatorContact
- Personator
- MD_globalContact
- Global Address Verification
- MD_propertyContact
- Property
You don’t have to use the Visualforce pages provided with Listware. If you need to customize them or adapt functionality in some other way (for example, using the Personator component for your Contact objects or Property component for a custom object), you can simply use the included Visualforce pages as a template by opening them and viewing the Visualforce markup. You can then copy and paste the markup into your own custom Visualforce page and change the way they look or create your own Personator/Property/Global Address Verification components for your own custom objects.
For more information on Custom Visualforce pages, see Custom Visualforce Pages.