Once you choose to install Clean Suite for Salesforce, you will be directed to the Package Installation Details page. This page displays the package name, publisher, and description.
In order to install Clean Suite for Salesforce, you must first visit our page on the Appexchange [https://appexchange.salesforce.com/appxListingDetail?listingId=a0N30000000pvskEAA here] and then click '''Get It Now'''.
Wait for the '''Where do you want to install this package''' window to appear. Once you have decided where you want to install Clean Suite for Salesforce, click the button that best relates to your decision. In this instance, we are choosing '''Install in a Sandbox'''.
Clean Suite for Salesforce needs access to certain web sites. This page asks for your permission to allow Clean Suite access.
==Confirm Installation Details==
Next you will be greeted by the '''Confirm Install Details''' window. Please confirm all details are correct, and confirm that you agree with the terms and conditions by checking the box as shown in the screenshot below. Click '''Confirm and Install''' when you are ready to continue.
2. Be sure to check "Yes, grant access to these third-party web sites" and click '''Continue'''.
If everything went well, you should now see the familiar Salesforce Login dialogue. Fill in the Username and Password field according to the destination you chose earlier.
===Approve Package API Access===
*Note: If you are installing onto a sandbox that is related to the username in the previous step, you must append the name of the sandbox to the end of your username. For instance, if my sandbox is named <code>MelissaTest<code> then my username would be <code>melissadata(partner main)@isvedition.org.MelissaTest</code>.
For Clean Suite to function, it needs access to selected objects in the API.
[[File:Salesforce_Install_04_Login.png|frame|none|Login to Destination Account]]
3.Click '''Next''' to approve access and continue.
[[File:ListwareSalesforce_GS_03_Permissions.png|frame|none|Approve Package API Access]]
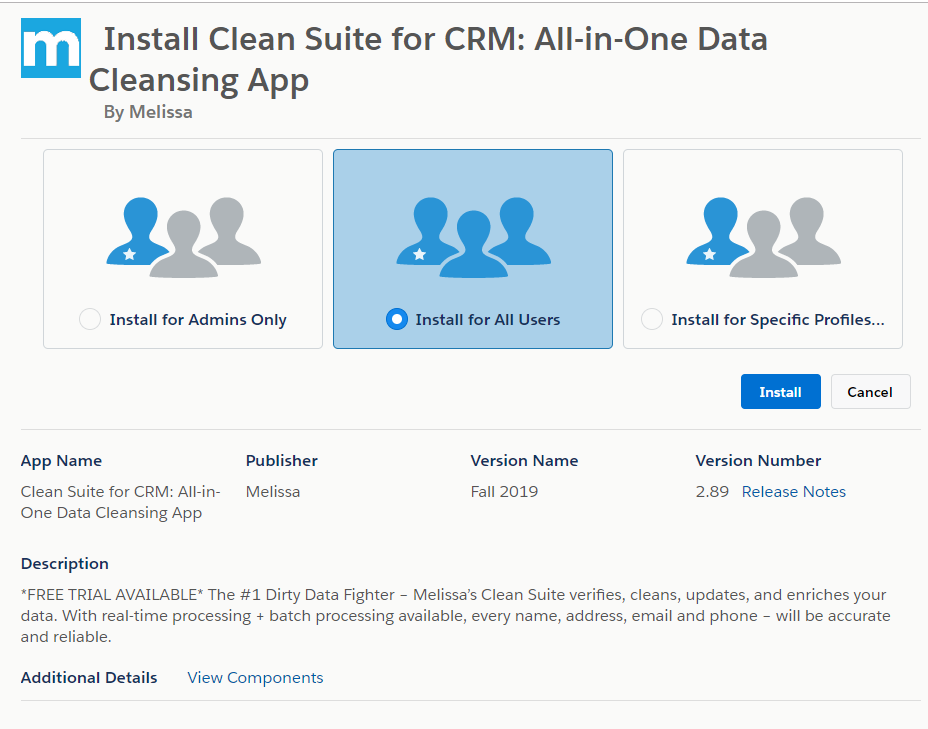
==Select Component Access==
Next please select the Users who will have access to Clean Suite for Salesforce and click '''Install'''. For this example, we are choosing the default option '''Install for All Users'''. This can be changed at a later time.
You may choose the sercurity level for who will have access to Clean Suite for Salesforce here.
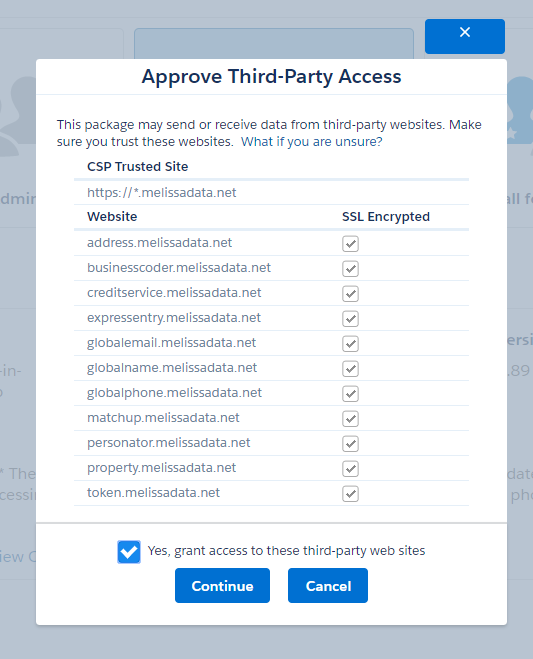
==Approve Third-Party Access==
Because our Component makes use of webservices outside of Salesforce’s network, we must grant the instance permission to make calls. Click '''Yes, grant access to these third-party web sites''' and click '''Continue'''.
Congratulations, we are almost done! Wait for the installation process to complete. Depending on the size of your Salesforce Organization, this may take anywhere from a few minutes to over an hour. Please be patient, Salesforce will email you when this step is complete.
===Install the Package===
[[File:Salesforce_Install_07_InstallationComplete.png|frame|none|Wait for Installation to Complete]]
5. Select '''Install''' to install the Clean Suite for Salesforce package.
[[File:ListwareSalesforce_GS_05_Install.PNG|frame|none|Install the Package]]
Once you receive an email from Salesforce telling you that your installation is complete, you can move on to the next step.
===Wait for Installation===
*[[Salesforce:Setup|Setup]]
Depending on Salesforce, the installation process may take awhile. Salesforce will email you once installation is complete.
[[File:ListwareSalesforce_GS_06_Processing.png|frame|none|Wait for Installation]]
In order to install Clean Suite for Salesforce, you must first visit our page on the Appexchange here and then click Get It Now.
Package Installation
Choosing Installation Destination
Wait for the Where do you want to install this package window to appear. Once you have decided where you want to install Clean Suite for Salesforce, click the button that best relates to your decision. In this instance, we are choosing Install in a Sandbox.
Installation Destination
Confirm Installation Details
Next you will be greeted by the Confirm Install Details window. Please confirm all details are correct, and confirm that you agree with the terms and conditions by checking the box as shown in the screenshot below. Click Confirm and Install when you are ready to continue.
Confirm Installation
Log In to Destination Account
If everything went well, you should now see the familiar Salesforce Login dialogue. Fill in the Username and Password field according to the destination you chose earlier.
Note: If you are installing onto a sandbox that is related to the username in the previous step, you must append the name of the sandbox to the end of your username. For instance, if my sandbox is named MelissaTest then my username would be melissadata(partner main)@isvedition.org.MelissaTest.
Login to Destination Account
Select Component Access
Next please select the Users who will have access to Clean Suite for Salesforce and click Install. For this example, we are choosing the default option Install for All Users. This can be changed at a later time.
Select Component Access
Approve Third-Party Access
Because our Component makes use of webservices outside of Salesforce’s network, we must grant the instance permission to make calls. Click Yes, grant access to these third-party web sites and click Continue.
Approve Third-Party Access
Wait for Installation to Complete
Congratulations, we are almost done! Wait for the installation process to complete. Depending on the size of your Salesforce Organization, this may take anywhere from a few minutes to over an hour. Please be patient, Salesforce will email you when this step is complete.
Wait for Installation to Complete
Once you receive an email from Salesforce telling you that your installation is complete, you can move on to the next step.