Difference between revisions of "Dynamics:Express Entry:Configuration"
Jump to navigation
Jump to search


| (One intermediate revision by the same user not shown) | |||
| Line 7: | Line 7: | ||
==Configuring Express Entry== | ==Configuring Express Entry== | ||
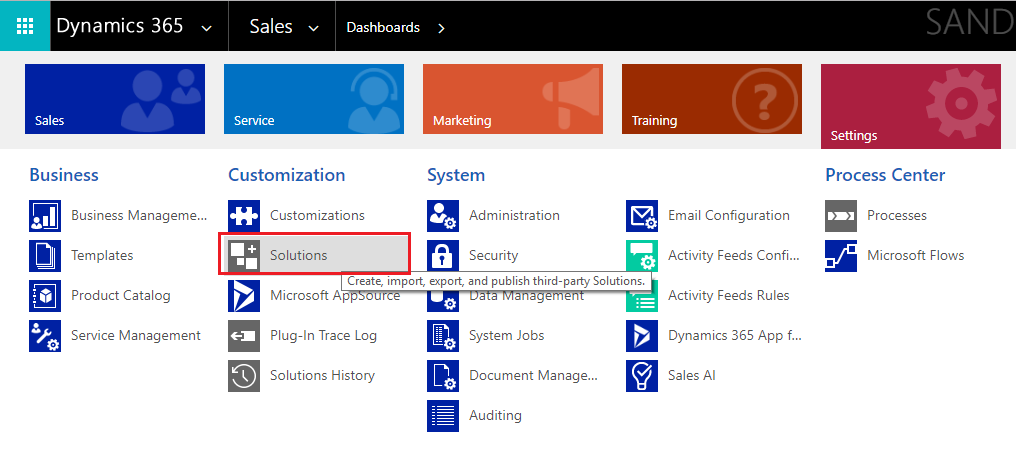
1. Begin by navigating to | 1. Begin by navigating to '''Settings'''. To do this, click the down arrow next to '''Sales''', then '''Settings''' in the menu that drops down. | ||
[[File: | [[File:Dynamics_ExpressEntry_Configuration_01_Settings.png|frame|none|Click '''Settings''']] | ||
2. | 2. Then click '''Solutions''' in the '''Customization''' category. | ||
[[File: | [[File:Dynamics_ExpressEntry_Configuration_02_Solutions.png|frame|none|Click '''Solutions''']] | ||
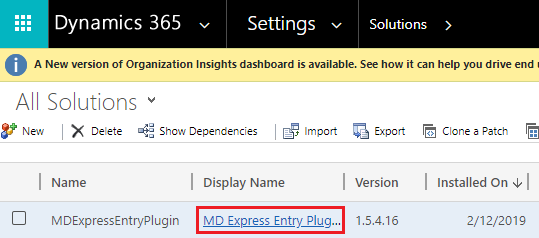
3. | 3. Click the '''MD Express Entry Plugin''' under '''Display Name'''. | ||
[[File: | [[File:Dynamics_ExpressEntry_Configuration_03_ExpressEntryPlugin.png|frame|none|Click '''MD Express Entry Plugin''']] | ||
4. Click '''Configuration''' in the solution pane located on the left side of the window. Then enter your '''License | 4. Click '''Configuration''' in the solution pane located on the left side of the window. Then enter your License Key into the '''License''' field and check the '''Activate Express Entry''' | ||
[[File: | [[File:Dynamics_ExpressEntry_Configuration_04_Configuration.png|frame|none|Click '''Configuration''']] | ||
5. Setup your desired options. | 5. Setup your desired options. Then click '''Set''' to save this configuration. This completes the configuration. | ||
[[File: | [[File:Dynamics_ExpressEntry_Configuration_05_Options.png|frame|none|Click '''Save all Settings''']] | ||
[[Category:Clean Suite for CRM:Dynamics]] | |||
[[ | |||
[[Category:Dynamics Express Entry]] | [[Category:Dynamics Express Entry]] | ||
Latest revision as of 23:36, 21 March 2019
← Clean Suite for CRM:Dynamics
| Express Entry Navigation |
|---|
| Overview |
| Installation |
| Configuration |
| Custom Mapping |
| Tutorial |
This is how to configure Express Entry once you have completed the installation.
Configuring Express Entry
1. Begin by navigating to Settings. To do this, click the down arrow next to Sales, then Settings in the menu that drops down.

Click Settings
2. Then click Solutions in the Customization category.

Click Solutions
3. Click the MD Express Entry Plugin under Display Name.

Click MD Express Entry Plugin
4. Click Configuration in the solution pane located on the left side of the window. Then enter your License Key into the License field and check the Activate Express Entry

Click Configuration
5. Setup your desired options. Then click Set to save this configuration. This completes the configuration.

Click Save all Settings