Difference between revisions of "Salesforce:Getting Started"

From Melissa Data Wiki
Jump to navigation Jump to search
Line 1: Line 1:
[[Listware for Salesforce|← Listware for Salesforce]]
{{ListwareForSalesforceNav
|IntroductionCollapse=
}}
 
{{CustomTOC}}
{{CustomTOC}}
==App Purchase==
You may purchase the Listware for Salesforce app from the Salesforce App Exchange located here: https://appexchange.salesforce.com/listingDetail?listingId=a0N3000000B57dcEAB
==Package Installation==
Once you choose to install Listware for Salesforce, you will be directed to the Package Installation Details page. This page displays the package name, publisher, and description.
1. Click the '''Continue''' Button
[[File:ListwareSalesforce_GS_01_PackageInstallation.png|frame|none|Begin Package Installation]]
===Approve Third-Party Access===
Listware for Salesforce needs access to certain web sites. This page asks for your permission to allow Listware access.
2. Be sure to check "Yes, grant access to these third-party web sites" and click '''Continue'''.
[[File:ListwareSalesforce_GS_02_ApproveAccess.png|frame|none|Approve Third-Party Access]]
===Approve Package API Access===
For Listware to function, it needs access to selected objects in the API.
3.Click '''Next''' to approve access and continue.
[[File:ListwareSalesforce_GS_03_Permissions.png|frame|none|Approve Package API Access]]
===Choose Security Level===
You may choose the sercurity level for who will have access to Listware for Salesforce here.
4. Select a Security level and click '''Next'''.
[[File:ListwareSalesforce_GS_04_Security.png|frame|none|Choose Security Level]]
===Install the Package===
5. Select '''Install''' to install the Listware for Salesforce package.
[[File:ListwareSalesforce_GS_05_Install.PNG|frame|none|Install the Package]]
====Wait for Installation====
Depending on Salesforce, the installation process may take awhile. Salesforce will email you once installation is complete.
[[File:ListwareSalesforce_GS_06_Processing.png|frame|none|Wait for Installation]]
==Setup Listware for Salesforce==
To begin using Listware for Salesforce, you must first complete a few simple setup steps.
1. Select Listware from the Sales drop-down menu.
[[File:ListwareSalesforce_GS_07_NewApp.png|frame|none|Select Listware]]
===Enter a License String===
For Listware for Salesforce to work, you need a valid license string from Melissa Data.
You should have received one in your email from Melissa Data. If you did not receive a license string from Melissa Data please [[Support|contact us]].
2. Enter your License String. Make sure to click '''Save Settings''' once you are done.
[[File:ListwareSalesforce_GS_08_LicenseString.png|frame|none|Enter a License String]]
===Modify your Contact Page Layout===
To easily utilize Listware for Salesforce, you can add a button to your contact pages to quickly verify your data.
1. Select '''Page Layouts''' under Build > Customize > Contacts.
[[File:ListwareSalesforce_GS_09_AppSetup.png|frame|none|Select Page Layouts]]
====Edit the Contact Layout====
2. Select '''Edit''' for the Contact Layout.
[[File:ListwareSalesforce_GS_10_ContactLayout.png|frame|none|Edit the Contact Layout]]
====Add a Button====
3. Select '''Buttons''' in the left column.
4. Choose which button you want.
5. Drag and drop your desired button to the '''Custom Buttons''' section.
[[File:ListwareSalesforce_GS_11_DragNDrop.png|frame|none|Add a Button]]
===Add in Express Entry Form===
To set up an Express Entry Form:
1. Go to setup. Select '''Buttons, Links, and Actions''' under Build > Customize > Contacts.
[[File:ListwareSalesforce_EE_01.png|frame|none|Select Buttons, Links, and Actions]]
====Edit New Contact====
2. Click '''Edit''' next to the '''NewContact'''.
[[File:ListwareSalesforce_EE_02.png|frame|none|Click Edit]]
3. Set the override properties. Select the '''Visualforce Page''' radio button and select the '''MD_expressEntry''' field in the drop-down menu.
[[File:ListwareSalesforce_EE_03.png|frame|none|Choose MD_expressEntry]]
====New Contact====
If you go to create a new contact, this is what the Express Entry service looks like. Simply use the '''Freeform''' field or optionally the Postal Code field.
[[File:ListwareSalesforce_EE_04.png|frame|none|New Contact]]
The same steps apply for leads and account.
===Advanced Mappings===
To set up the advanced mappings:
1. Click the '''Advanced Mappings''' tab.
[[File:ListwareSalesforce_AM_01.png|frame|none|Advanced Mappings]]
2. Select the Object Type. If you have no enterprise key, you can only choose the Contact/Lead/Account Object Types.
[[File:ListwareSalesforce_AM_02.png|frame|none|Object Types]]
For advanced mapping to any salesforce object, including custom objects, you need an enterprise key. Contact Melissa Data support for more information.
3. Map your input and output mappings. Then save the mappings.
[[File:ListwareSalesforce_AM_03.png|frame|none|Mappings]]
==Use Listware for Salesforce==
To use Listware for Salesforce:
Line 162: Line 21:


[[File:ListwareSalesforce_GS_13_ContactPage.png|frame|none|Click the Action Button]]
[[File:ListwareSalesforce_GS_13_ContactPage.png|frame|none|Click the Action Button]]
==Credit Usage==
Listware for Salesforce uses a credit system. For more information, see [[Listware for Salesforce:FAQ#Credit Usage|Listware for Salesforce Credit Usage]].


[[Category:Listware for Salesforce]]
[[Category:Listware for Salesforce]]

Revision as of 23:24, 11 March 2015

← Clean Suite for CRM:Salesforce

Salesforce Navigation
Introduction
Getting Started
Installation
Getting Started with Lightning Components
Credits
Lightning Components
Lightning Quick Actions
Lightning Lookups
Lightning Global Express Entry
Clean Suite Advanced Mappings
Clean Suite Batch Processing
Result Code Status Indicator
Visualforce Pages
Installing Visualforce Pages
Custom Visualforce Pages
Custom Code
APEX Triggers
Custom Clean Suite Batch Processing
Express Entry Lightning Action Override
Result Codes
Salesforce Result Codes


Use Listware for Salesforce

To use Listware for Salesforce:


1. Navigate to a contact page.


Click the Added Button

2. Click the button you added.

Click the Added Button


Click the Action Button

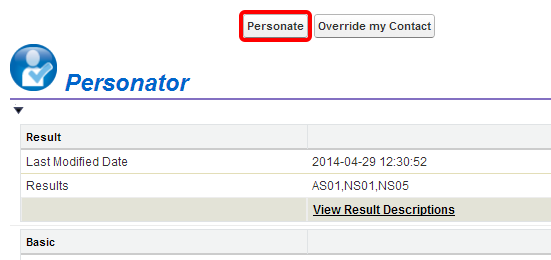
3. Click the action button to verify your data.

Click the Action Button